Now we can give a small example of using the Fragment in static mode.
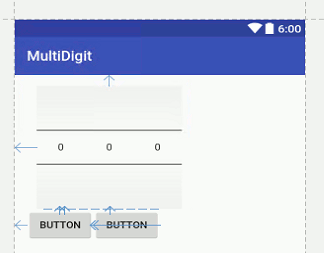
Load the activity_main.xml layout into the Designer and place a <fragment> tag towards the top - set its code to Digits.java and its layout to fragment_digits. You should see three numberPickers which you can move and modify as a single unit.
Next place two Buttons lower down.
We can add two simple onClick event handlers, one for each Button, to show how the Fragment can be used.
The first sets the display to three digits:
public void onClick1(View v) {
 FragmentManager fm = getSupportFragmentManager();
 ((Digits) fm.findFragmentById(R.id.mydigits)).
                              setValue(1, 2, 3);
}
Simply find the Fragment and call the method.
The second returns the current setting of the Fragment:
public void onClick2(View v) {
 FragmentManager fm = getSupportFragmentManager();
 ((Button) v).setText(Integer.toString(
   ((Digits) fm.findFragmentById(R.id.mydigits)).
      getValue()));
 }
This uses the same logic but it looks more complicated. First you find the Fragment, call the method, get the value, then you use this to set the text on the Button.
If you run the program you will see the three numberPickers and when you click the first Button you will see 1,2,3 displayed and when you click the second Button you will see whatever is on the numberPicker at the time as the Button's label.
A very basic demonstration of how a Fragment can be useful. Notice that the methods that the Fragment offers to the outside world work at a higher level than its component parts. It returns a single value and not the value of each numberPicker.
There is much more to do if you want to make this multi-digit numberPicker useful and it is better to leave the details until we have looked at some more advanced Fragment techniques.
Where Next?
We now know how Fragments behave when we include them in layouts using the <fragment> tag. This is a useful thing to do but the full power of the Fragment really only becomes apparent when it is added in code i.e. dynamically and this is the subject of the next chapter.
Summary
A Fragment consists of code and UI and Android Studio this doesn't vary according to how you plan to use the Fragment.
You can include a Fragment in a layout either using the <fragment> tag i.e. a static Fragment or using code i.e. a dynamic Fragment and these behave in different ways.
A static Fragment is created as part of the usual inflation process.
When the inflater reaches a <fragment> tag it first instantiates the Fragment class associated with it and then it calls the onCreateView to inflate the associated XML layout or generate the View hierarchy in code.
This means that the complete View hierarchy is ready to work with when the inflater is complete.
You can add code and generally modify the Fragment's UI within the Activity but this is not good design.
A Fragment should be an encapsulation of a UI and a behaviour and the Activity should only interact with the Fragment's UI via accessor methods that the Fragment provides.
Listing
The complete listing of Digits.java:
public class Digits extends Fragment { public Digits() { // Required empty public constructor }
@Override public View onCreateView(LayoutInflater inflater, ViewGroup container, Bundle savedInstanceState) { // Inflate the layout for this fragment View v = inflater.inflate(R.layout.fragment_digits, container, false); NumberPicker[] nps = new NumberPicker[3]; nps[0] = (NumberPicker) v.findViewById(R.id.numberPicker1); nps[1] = (NumberPicker) v.findViewById(R.id.numberPicker2); nps[2] = (NumberPicker) v.findViewById(R.id.numberPicker3);
String[] values = new String[10]; for (int i = 0; i < values.length; i++) { values[i] = Integer.toString(i); } for (int i = 0; i < 3; i++) { nps[i].setMaxValue(values.length - 1); nps[i].setMinValue(0); nps[i].setDisplayedValues(values); } return v; } public void setValue(int a, int b, int c) { ((NumberPicker) getActivity(). findViewById(R.id.numberPicker1)).setValue(a); ((NumberPicker) getActivity(). findViewById(R.id.numberPicker2)).setValue(b); ((NumberPicker) getActivity(). findViewById(R.id.numberPicker3)).setValue(c); } public int getValue() { int result = ((NumberPicker) getActivity(). findViewById(R.id.numberPicker1)).getValue() * 100; result += ((NumberPicker) getActivity(). findViewById(R.id.numberPicker2)).getValue() * 10; result += ((NumberPicker) getActivity(). findViewById(R.id.numberPicker3)).getValue(); return result; } }