| Getting Started with PC Kinect |
| Written by Harry Fairhead | |||
| Monday, 31 January 2011 | |||
Page 2 of 2
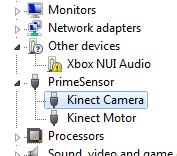
First testAt this point you are ready for your first test. If you plug the Kinect in then it should automatically find the drivers it needs. Notice that this can take a few minutes so don't rush things. After installing one USB device it goes on to install another so you can see multiple "device installed" messages. You also have to reboot your machine after the drivers are installed. If for any reason the auto installation doesn't work use the Device Manager to update the drivers for the Kinect Motor and Kinect Camera (if you can see it). In most cases when the drivers are not properly installed you will only see the Kinect Motor device - if you install a new driver for it then the Kinect Camera and Kinect Audio devices should appear and the Camera will either auto install or you can repeat the manual installation for it. Notice that at the time of writing the Kinect Audio device isn't supported and there are no drivers for it. All of the Kinect drivers will be found in the Platforms\Wind32\Drivers directory of the Kinect update from https://github.com/avin2/SensorKinect that you unzipped and installed earlier. Simply do a manual installation and specify that directory as the source of the drivers. When the drivers are correctly installed you should see a PrimeSensor section in the Device Manager and you should see Kinect Camera and Kinect Motor listed as devices. You will also see XBox NUI Audio under Other Devices - recall that this isn't supported. Note: you might be asked if you want to search for a driver for this device - the answer is no!
As long as everything goes according to plan you should be able to see the devices and the Kinect should have a green flashing light on its front. If you navigate the start menu to OpenNI Samples you will discover that there are two simple sample programs ready to run. NiSimpleRead just reads the data for the center of view into a console window. NiViewer gives you a color coded depth view what the Kinect is looking at. Try either and you should see something like the screen dumps below:
If you find that it doesn't work - especially if you get a timeout error - then simply restart the machine and try again. Working with NITEThe basic API lets you read the data streams coming from the Kinect but the NITE middleware processes the data to extract information from it. In particular there is a skeletonization body tracking facility. Installing NITE is easy compared to getting the basic API set up with the correct drivers. All you have to do is go to the OpenNI website, go to downloads and download the OpenNI Compliant Middleware Binary - i.e. NITE. Download the latest unstable binary currently at: http://www.openni.org/downloadfiles/ In the case of Windows you get a standard .EXE installer which you can run. Note: as in the case of the earlier installer it seems to be better to download i.e. Save the file and then run it rather than attempting to download and Run it in one go. The only complication is that you have to enter a standard key which is 0KOIk2JeIBYClPWVnMoRKn5cdY4= Some users don't notice that they have to do this, even though it is mentioned on the download page and without a key the software doesn't work. There is one other thing that you will have to do to make the supplied samples work on most PCs. The hardware is configured using XML files in NITE and to make them work with Kinect you need to copy the updated XML files from the unzipped Kinect drivers you downloaded earlier. Navigate to NITE\Data in the unzipped driver folders and copy the XML files you find there into \Program Files\Prime Sense\NITE\data and you can replace the file you find in the destination directory. With this change you should be able to run all of the NITE sample programs in the PrimeSense group in the start menu. For example the PointViewer will track a single hand and draw a track on the screen.
From here you can see what sorts of things NITE can do for you. Read the documentation that was installed along with the software to find out how to work with each of the APIs. Look out for the next article in using Kinect on the PC. Related articles:All About Kinect - an explanation of how it works and some videos of it working! A Kinect Princess Leia hologram in realtime <ASIN:0672333457> <ASIN:1449394620> http://store.microsoft.com/home.aspx |
|||
| Last Updated ( Saturday, 07 May 2011 ) |
 NiSimpleRead
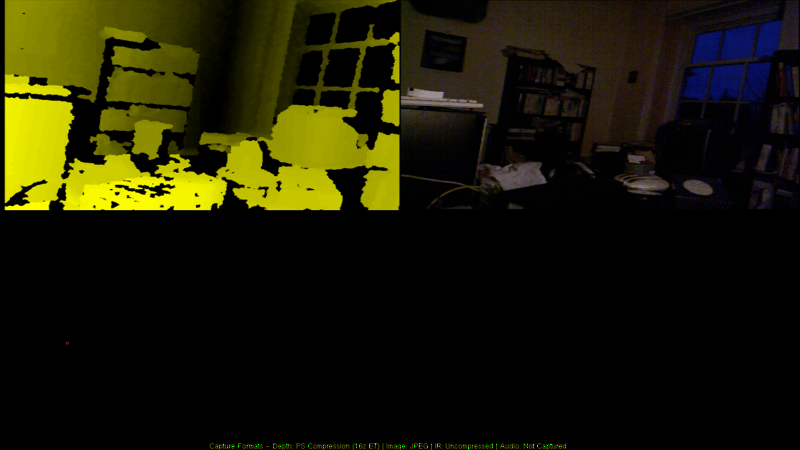 NiViewer