| Creating The Python UI With Tkinter |
| Written by Mike James | |||
| Thursday, 01 August 2019 | |||
Page 1 of 2 Python has a standard GUI framework - Tkinter - but most Python programmers don't really get to grips with it because they tend to use the command line. In this article we take a look at how a Tkinter program differs from a standard Python program and how to organize things around a GUI. There are some languages that concentrate on creating a UI from the very first steps and some that don't. Python is one that seems to prefer to concentrate on implementing algorithms, often leaving the UI to the command line. Of course there is Tkinter and a range of the UI libraries, but these aren't introduced as part of Python until much later in the programmer's education. To level the playing field just a little let's take a look at Tkinter as if it was a first class citizen of the Python domain. Tkinter is shipped with Python and this makes it marginally easier to use and makes it the closest thing to a standard UI kit. For this reason it makes sense to find out about it first before moving on to alternatives. There is a move to remove Tkinter from the standard library and if this happens you will need to download it before installing it. An Event Driven PythonUsing Tkinter is fairly easy just import the library and start work coding but a Tkinter program is distinctly different from a Python command line program. In a standard program you start executing code from some first line and keep going until everything has executed and the program is finished. In a GUI program things don't work like this. The program starts in the usual way but, after it has set up buttons and other UI components, the program just settles down into an event processing loop. This cycles round doing nothing until the user clicks on a button or does something that needs attention and then it calls the event handler you have set up. This is asynchronous programming as opposed to the synchronous programming that you first learn in Python. In an asynchronous program you don't call the functions that do the work - events triggered by the user do. What this means is that a Tkinter program always has roughly the same form:
One thing that often worries beginners, but is rarely tackled in introductions, is - how do you stop the event loop? After all the event loop is an infinite loop that simply calls event handlers to do what the user wants. The answer is that you provide the user with a button or a menu command to stop the program and one, or more of the event handlers destroys the main window, which brings the application to a halt. The Root WindowThe actual way that a UI is constructed is fairly standard. You create a main or root window and then add components or widgets to this root window. The widgets and the root window can be customized by setting various attributes and there is a layout manager that controls were each widget displays in the root window. Of course, to make anything a happen you have to provide some event handlers and bind them to the appropriate widget event. So we have to:
In most cases the creation and customization of the widget happens within the same instruction as does the binding of the event handler but it helps to think of them as separate steps. Let's have a look at how all of this fits together in a simple example. First we need to import Tkinter:
next we create the root window:
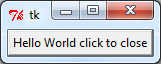
As an example of a creating a widget let's add a button with its caption set to "Hello World - click to close".
notice that the first parameter specifies the root window as the parent of the widget and we use text= to set the attribute. Next we need to layout the widgets in the root window. There are a number of layout managers but the simplest to use is pack which places widgets within the window one after another to fill the space.
Now we need to bind a function to the button's <Button-1> event which corresponds the user pressing the left button down over the button.
The stopProg function makes use of the root window's destroy method:
Finally we simply need to start the event loop going:
Putting all of this together gives:
If you run this program you will see a window filled by a button appear and when you click the button the program comes to an end.
In general you create a widget using:
and this makes the widget a child of the parent window and customizes it by setting the attributes that you specify. Similarly you bind a widget's event to a function using:
You need to look up the range of events that you can handle. There are also alternative ways of specifying event handlers but the bind method is the most general. Two WidgetsTo give you a slightly better idea of how you would create a UI using Tkinter lets have two buttons - an exit and a "do something" button and a label that the "do something" button modifies when clicked. The program starts off in the same way:
only now the button is captioned Exit. Next we create a second button:
Finally we add a simple label and start the event loop:
The event handler for the second button is just:
The configure method can be used to change any of the attributes you can set when the widget is created. Putting the whole thing together gives:
If you run this you will see two buttons and if you click the second you will see the label change.
In general you can change any attributes of a widget using:
<ASIN:0596158068> <ASIN:1449382673> |
|||
| Last Updated ( Monday, 13 April 2020 ) |