| Creating The Python UI With Tkinter - The Canvas Widget |
| Written by Mike James | |||||||
| Thursday, 23 April 2020 | |||||||
Page 3 of 3
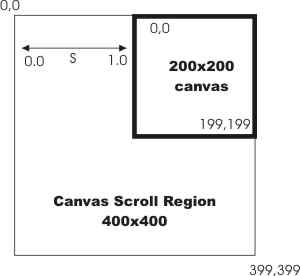
Co-ordinatesIn mastering any graphics system you first have to discover what sort of system it is - bitmapped or vector and retained or immediate. Next you need to understand its co-ordinate system. If you simply specify a co-ordinate as a numeric value then its units are assumed to be pixels. If you specify a string with a trailing m then the units are millimeters, c for centimeters, i for inches and p for points (1/72 inch). We already have the idea that the co-ordinate system in the canvas is slightly different from that in the root window. The canvas has 0,0 in the top left-hand corner and x increases to the right and y down the canvas. This is the same as the windows coordinate system but it doesn't stop where the window stops. That is you can draw things that are outside of the window. Things that are drawn off the edge so to speak are in the display list and you can work with then in the usual way but they are not drawn to the window. There are no co-ordinate transformation methods for canvas - i.e. no translate, rotate or scale. It is possible to implement these using add-hoc methods but the only real co-ordinate methods provided are designed to implement scrolling. To see the area of the drawing outside of the window area you can either increase the size of the window or you can define a scroll area.The scroll area is the area of the canvas that you could scroll into the window. For example if you specify that the canvas is 200x200 within the window then you have a 200x200 window onto the entire canvas drawing space. If you set the scroll region to 400x400 then you could scroll the 200x200 region smoothly across the bigger region so that a x scroll of 0 placed the window area with top left-hand corner at 0.0 and a x scroll of 1 placed the window with its top left-hand corner at 200,0. Scrolling in the y direction works in the same way. The only complication in this is that the scroll factor varies from 0 to 1 with 0 placing the viewing window either hard left or at the top and a value of 1 sending the window to the far right or bottom of the viewing window. In the case of a 200 by 200 window
and a 400x400 scroll region
we can draw some text at 300,20
and it will be invisible because it is outside of the canvas area i.e. 0 to 199 in x and 0 to 199 in y. To make it visible we can simply move the viewing window to the far right, i.e. a scroll factor of 1:
Now the viewing window is positioned with its top right-hand corner at 200,0 and the text is visible. You can do the same scrolling action in the y direction. You can scroll to any faction of the scroll area from 0.0 to 1.0 but it can be difficult to work out the scroll factor needed to place the viewing window where you want it.
In general if the window i.e. canvas size is wx by wy and the scroll area is sx by sy then to place the top left-hand corner at x, y you need scroll factors of:
with 0<x<(sx-wx) and 0<y<(sy-wy) You can also use the
method to scroll n steps in the x direction (similar method for y) and the steps can be "units" or "pages" the "little" and "big" steps that you can scroll by when using a scrollbar. There is also the xview and yview methods that can be used for either purpose, to scroll or to moveto, but these are mostly used by a scrollbar widget interface. Using a ScrollbarThe scrollbar widget is an interesting topic in its own right and it will be covered in a future article but it is worth showing how to add a scrollbar to a canvas widget. To use a scrollbar you have to hook up its command attribute to the canvas xview and yview methods and, if you want the scrollbar to set the size of its "button" to indicate the ratio of the scroll you need to set the canvas' xscrollcommand and yscrollcommand to the appropriate scrollbar set method. Let's do this job for just the x direction to make things easier to follow. First the canvas is set up at 200 by 200:
Next we need to create the scrollbar:
Now we need to connect the two widgets together:
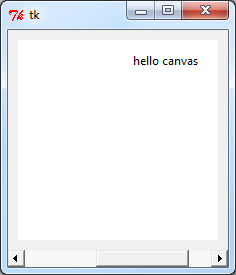
Putting all this together and runing it gives you a windows with a scroll bar and you can scroll the canvas horizontally.
Co-ordinate conversionBeing able to scroll the canvas brings a new problem. It doesn't matter how the scroll is set events always report position in terms of the window co-ordinates. If you want to work with event locations in terms of the canvas co-ordinates you need to convert them using the w.canvasx and w.canvasy methods. These return the co-ordinates of the event location in terms of the canvas no matter how it has been scrolled. In general if you want to use mouse clicks etc to manipulate graphics objects then you always need to perform the conversion to canvas co-ordinates first. More about how to work with graphics objects and events in the next article. Coming soon: Graphics objects, events, tags and using canvas to create widgets.
Related ArticlesCreating The Python UI With Tkinter Advanced Python Arrays - Introducing NumPy Head First Python (Book Review) A Concise Introduction to Programming In Python (Book Review)
To be informed about new articles on I Programmer, sign up for our weekly newsletter, subscribe to the RSS feed and follow us on Twitter, Facebook or Linkedin. 
Comments
or email your comment to: comments@i-programmer.info <ASIN:1871962587> <ASIN:B07S1K8KLW>
|
|||||||
| Last Updated ( Thursday, 23 April 2020 ) |