| WPF The Easy 3D Way |
| Written by Mike James | |||||
| Wednesday, 10 June 2015 | |||||
Page 3 of 4

Model GroupsWe are now almost ready to render the entire scene but first all of the 3D objects that we have created so far, i.e. the cube and the light, have to be gathered together in a single Model3DGroup object
In what at first appears to be an unnecessary level in the object hierarchy we next have to assign the Model3DGroup to a ModelVisual3D:
and then finally we create a viewport which does the actual job of converting everything from 3D to a 2D rendering:
The way the conversion is performed is controlled by the camera assigned to the viewport:
We can now add the 3D model to the viewport so that we have something to render:
and assign the viewport to the container that is going to display the 2D bitmap it creates. A standard WPF application creates a form with a Grid layout container as its content. The simplest thing to do to display the viewport is to add a Canvas layout container to the Grid by dragging and dropping from the Toolbox. This adds a component that we can name Canvas1 and we can add the viewport to it using:
We can also specify the 2D physical properties of the viewport such as its size and location:
If you want to use the entire window to display the scene you could simply use:
in place of setting the size properties.
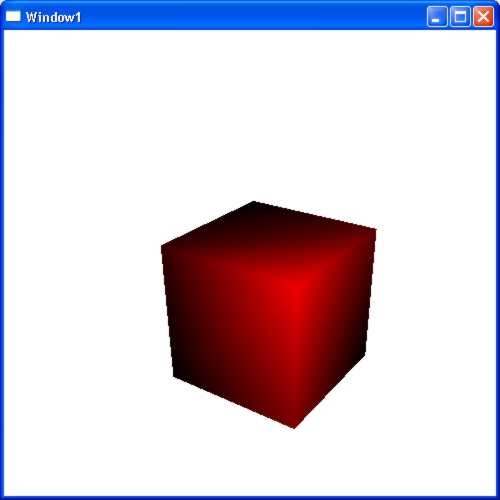
The red cube
TranformationsAt this point there are many different tracks to explore but to finish our example let’s explore a demonstration of how transformations work. All objects have transformation properties which can be use to modify where and how they appear in the model. To construct a rotation transformation we need an axis and an angle to rotate through:
The transform is now created and associated with the cube:
From this point on we can change the Angle property of axis and the cube will be redrawn at this new angle. The correct way to do this is to use WPF’s animation and as this is very poorly explained in the documentation an example is needed. AnimationAnimation is achieved using a Storyboard object which can contain any number of Animation objects. When the Storyboard is activated all of the animations it contains are run. To make use of animation you have to add:
You can think of an Animation object as specifying how a property of the object being animated should change over time. First we need an animation object that can change the Angle property:
This defines a repeated animation of a “double” from an initial value of 0 to a final value of 360 over 20 seconds. We now have to connect the animation with the object and property being animated. This is slightly complicated in that we have to first register a “friendly name” of the object we want to animate in the “namescope” of its container:
This creates a new NameScope for in canvas1 and adds “cubeaxis” as the friendly name for the axis object. You can think of this as building a database of all the objects we want to animate within a layout container. Now we have the axis object registered we can specify it and its Angle property as the target of the animation:
The first instruction sets whatever object has been registered as “cubeaxis” as the object to animate, i.e. axis in this case. The second instruction defines the property on the object that will be changed by the animation. At last we can create a Storyboard object and add the animation:
A Storyboard can support multiple animations on a range of different objects and properties. Finally we can start the animation:
Notice that the animation is specific to the canvas1 layout container and only at this point is the name “cubeaxis” resolved to the real axis object and its property. The advantage of this is that you could apply the Storyboard to another layout container with a different set of objects as long as you register the same names. It’s a flexible, if slightly confusing system, but we now have a rotating cube.
|
|||||
| Last Updated ( Wednesday, 10 June 2015 ) |