| A Drive List Control |
| Written by Ian Elliot | ||||
| Friday, 09 October 2009 | ||||
Page 3 of 3
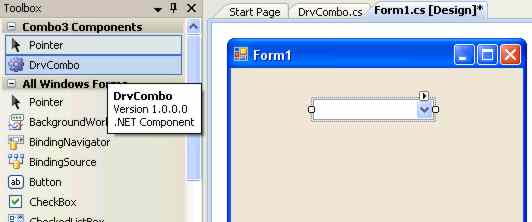
A Drive Combo controlThe code described above does the job but it isn’t particularly satisfactory. The first problem is that it is “fragile”. You will hear this term often in programming theory as something to avoid. In this case we have a comboBox on a form but its exact behaviour is controlled by code that lives on the form that contains it. This code is exposed to the possibility of change as the rest of the form’s functionality is created. The second disadvantage of this approach is that the new comboBox isn’t easy to reuse – you would have to copy the code in the form to any other form that wanted a Drive comboBox. A much better approach is to create a new control that can keep its internal workings to itself and be placed on a new form using the toolbox in the normal way. The only problem with this is that, yes you guessed it, the documentation is confusing about how to achieve this. In fact, once you know how, it’s all very simple. Start a new Windows form based project called Combo3 and add to it a new class called “DrvCombo”. This generates the following code: using System; Now add: using System.Windows.Forms; and change the class declaration to: class DrvCombo:ComboBox This means that our new class inherits from the ComboBox class. Inheritance is a feature of object-oriented programming that you don’t use every day but when you need it, you can’t imagine any other way of achieving the same result in a reasonable amount of time. In this case the meaning of inheritance is clear – the new DrvCombo class has all of the properties, methods and events of a ComboBox class. This makes it an exact copy of the ComboBox. If you compile or build the project you will discover that the DrvCombo control appears, with a default icon, in the Toolbox - under the heading Combo3 Components. You can select it and place it on the form in the usual way to create a perfectly standard ComboBox.
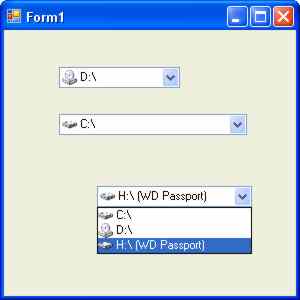
The new DrvCombo control works exactly like a ComboBox Customising the inherited classWe don’t really want an exact copy of a ComboBox class but the really useful part of inheritance is that you can extend and modify the inherited properties, methods and events. In this case we want to give the new control the owner draw behaviour that we have already developed. The new control needs access to the ShellIcon class, which can be done in a number of ways. The simplest way of keeping them together is to simply copy and paste the entire code of the ShellIcon class into the DrvCombo file. You also have to add: using System.Drawing; We need to perform all of the initialisation that we previously did in the Form's constructor and onload event handler in the new control’s constructor: public DrvCombo() The only real difference is that where before we referred to comboBox1, i.e. the specific instance of the class that was placed on the form, we now use the keyword “base” to refer to the class from which we inherit all the properties and methods. We also need to avoid initialising the control in design mode, and this is the reason for the if statement, which is the standard way of discovering the current mode. Use this same technique to avoid your control doing anything at design-time that is inappropriate. To make all this work we also need: using System.IO; Notice that as this is the default constructor the system automatically calls the base class constructor for you so the ComboBox class is correctly initialised before you start using it. DrawItemThe most complicated task we have is to replace the ComboBox’s DrawItem event. We don’t want to provide a facility to allow this control to be customised, so we want to intercept the DrawItem event and then run all of the code that was in the event handler in the form – i.e. the code that gets and draws the icons and text. You might think that the way to do this is to handle the event but it is in fact easier to override, i.e. replace with our own version the ComboBox method that raises the event in the first place. That is, when a ComboBox object wants to raise a DrawItem event it calls its OnDrawItem method which does the job of calling all of the methods that have subscribed to the event as event handlers. We can override the ComboBox OnDrawItem with our own code by adding to the new control class: protected override void If you now run the program you will see that the DrvCombo box on the form works but nothing is drawn. The new OnDrawItem doesn’t do anything. To make it draw the icon and text we need to copy everything that was in the comboBox1_DrawItem event handler associated with the form. As the only line of code that references comboBox1 is the one that gets the DriveInfo item this is the only line that needs changing to refer to “base” rather than an instance: DriveInfo drive = (DriveInfo) Now if you run the project you will see your DriveCombo control complete with Icons as before. The advantage is that now none of the code used to implement the control isn't part of the form and you can create as many instances of the DriveCombo control as you need simply by selecting it from the toolbox.
There are a few things left to do to tidy up the new control – a new toolbox icon for example but we have something that works. The complete code for all three versions of the DriveCombo control are in the Code Bin - Combo1 contains the code for Combo1 and Combo2 and Combo3 is the complete control. If you would like the code for this project then register and click on CodeBin. <ASIN:0596006993> <ASIN:1930110286> <ASIN:0321267966> |
||||
| Last Updated ( Friday, 09 October 2009 ) |