|
Page 1 of 2 The Arduino is an ideal way to delve into the realm of embedded programming - or the Internet of Things. Here's a fun introduction to the basics that will get you started without fear of creating any burning electronic components.
Programming is a powerful tool but many programmers miss the simple fact that with the right hardware you can do almost anything with a program - create a radio, a phone, a dishwasher, a refrigerator, a toaster...
You get the idea.
Add a programmable core to almost any machine you can name and you can often make the physical machine much simpler and you can always make if more flexible. Of course this takes us into the world of "embedded" programming and as such a black art to many programmers who think that electronics is the work of the devil.
In fact electronics is just program design using hardware implemented logic and with a few simple extra rules to make sure that you don't destroy a component or put any humans in danger (only when working with high voltages) then its just programming.
The problem is always how to get started. The professional world of embedded design uses custom electronics and custom printed circuit boards which are eventually manufactured by the thousands if not millions.
This is not the place to start.
There are a wide range of off the shelf development boards that support different processors and offer different capabilities.
However, at the moment one stands out as being different. The Arduino is an open source hardware development and it is programmed in a nice friendly language that looks like almost any modern block structured language.
For most uses the fact that the Arduino is open source will be fairly irrelevant in practice as you aren't likely to want to engineer your own hardware or software using it. What it does mean however is that there are multiple sources for the hardware and there is a thriving community turning out software, projects and so on to keep it all going.
There are also a lot of add-on boards or "shields" that you can buy to turn the basic Arduino into anything from a motor controller to a web server. The majority of these are also very reasonably priced.
So while Arduino isn't the only development system in town it has a lot going for it.
Using the Arduino UNO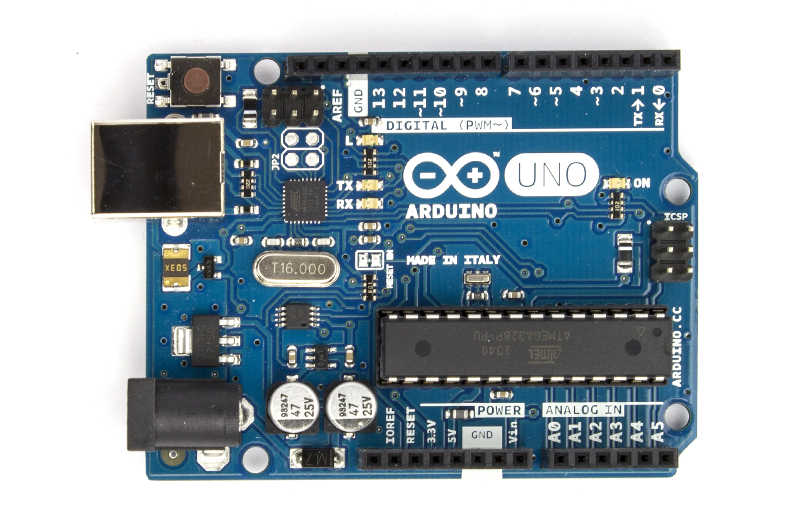
In this article we are going to use an Arduino UNO board which is the latest design. It is compatible with the previous best selling version and a lot easier to say (for non-Italian speakers at least) than the Duemilanove board.
It costs around $15 and you can buy it from a range of companies. Notice that all you get is the circuit board with the electronics mounted on it. It is all ready to go the only extra you will need is a USB cable.
Although the UNO has a socket for a power adaptor you don't need to worry about this initially as it runs perfectly well from the USB connection.
It also has lots of different inputs and outputs and at some point in the future you will want to connect to these. In other words, you will need some additional electronics - wires, LEDs, relays, transistors and so on.
You can buy Arduino experimenters kits that are designed to get you started but for the moment just get hold of an Arduino UNO and a USB A to B cable - this is all the hardware you need for your first program.
What about software?
Well the good news is that there is a complete development environment based on Processing and Wiring. The actual language you use is C but used with the Arduino this looks a lot like Java or C# or any modern language.
The only downside is that they use some strange terminology - such as a program being a sketch and a folder containing programs is a sketchbook.
Don't worry what we have is a perfectly standard IDE and programming language.
Installation
To get started you first have to download the software http://arduino.cc/.
You can choose an installer or download a zip file. Next you simply unzip it to a suitable location - it doesn't really matter where as long as you can find it.
The next step is to get the drivers installed.
The official documentation makes this sound hard and it has to be admitted that there are lots of variations on a step-by-step installation of the drivers.
All you really need to know is that the Arduino Uno communicates via an interface that looks like a USB COM port. So the most direct way is to install the driver manually. Plug in the Arduino UNO and then use the manual installation route to select a the folder where you stored the Arduino software and select Arduino UNO in the drivers sub-folder. Also ignore warnings about the driver being signed etc.
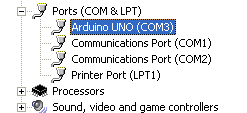
When the driver is finished installing you can use the Device Manager to view the Ports section where you will see a new serial port called Arduino UNO - take note of the port number (COM 3 in this case) you will need it later.
Next you can start up the Ardinuo software. Simply click on the Arduino icon - or drag it out to the desktop to create a short cut and click on that. The software doesn't need any sort of installation - just unzipping it does the job.
To make the IDE work with the Arduino hardware you have connected there are two simple configuration tasks. The first is to select the menu options:
Tools, Board, Arduino Uno
this tells the IDE the type of board you are using. Next select:
Tools,Serial Port, COM3
or whatever port the Arduino is connected to.
Now we are ready to write our first Arduino program.
The Hello World Of Hardware
The Hello World of Arduino programming is a short program that flashes the built-in LED which is connected to pin 13.
In fact making something flash is usually the first program you write with any embedded hardware that you are trying to get started with.
The key idea is that the hardware has digital Input/Output I/O pins which you can use to control things like LEDs and sense switches. These are the hardware equivalent of zero one variables. If you set an output to 1 then it generally produces a high voltage that switches something on and a 0 produces a low voltage that switches it back off.
The Uno has 14 digital I/O pins but the first 8 have a dedicated job leaving pins 8 to 13 for general purpose tasks.
Pin 13 is also special in that has a surface mount LED connected to it ready for you to flash and generally use as a status indicator. This makes it ideal for your first program because you don't even need any additional hardware. Just the Arduino, a USB cable and the software.
You can see pins 8 to 13 at the top edge of the photo below and you can see the LED marked with L next to the Arduino symbol (just above the TX RX LEDs).
When you program works you will see the LED marked L flash - and it is quite bright so you probably won't miss it.
<ASIN:B009UKZV0A>
<ASIN:B006H06TVG>
<ASIN:0071784225>
<ASIN:1593274483>
<ASIN:1449313876>
|