| Micro:bit Getting Started With C/C++ |
| Written by Harry Fairhead | |||||
| Monday, 05 September 2022 | |||||
Page 1 of 4 Anyone who wants to use the BBC micro:bit to its full potential as an IoT device needs to look outside the coding environments provided by its own website. As an mbed device, the micro:bit is capable of being programmed in C/C++ and this is the easy way to get started. This is an advanced chapter from Harry Fairhead's book, Micro:bit IoT in C.
Micro:bit IoT In C Second EditionBy Harry Fairhead
Buy from Amazon. Contents
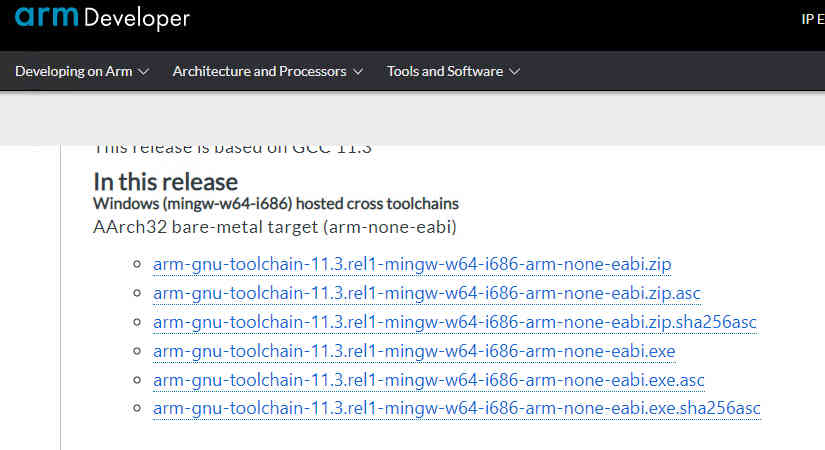
<ASIN:1871962676> <ASIN:B08XPRMK97> Getting Started With CAnyone who wants to use the micro:bit to its full potential as an IoT device needs to look outside the coding environments provided by its own website and for this you need a development environment and a toolchain. As already explained, the original micro:bit was an mbed device and as such you can use some of the tools provided by the mbed organization. In particular, you can use the online compiler as an easy way to create your C programs as outlined in Appendix I. However, this only works for the micro:bit V1 and, as it is based on deprecated software, it isn’t a good long-term choice. The complete solution to V1 development is to install and use Yotta, the mbed build system, but this is complicated and best avoided if possible. However, should you need Yotta you can find full details in Appendix II. To make it easy to get started, you’ll find a complete template for a V1 C program on the I Programmer GitHub repository: https://github.com/I-Programmer-info which you can simply customize and use. All of the programs in this book will run using the template without modification and this is the recommended way of getting started. While this has the advantage of a quick start, any out of the ordinary configuration changes that you make independently might involve refactoring the template’s Cmake build files. The micro:bit V2 isn’t an mbed device, and so the option of using the online compiler isn’t available, but it retains backward compatibility with Yotta. This means you can use Yotta to build a project, but in most cases it is much simpler to download the appropriate template from the I Programmer GitHub repository and customize it. As in the case of V1, this is the quickest way to get started and all of the programs in this book work without having to modify the template. PrerequisitesIt doesn’t matter whether the micro:bit you are using is a V1 or V2, the prerequisites for getting started are the same. To develop C/C++ programs for the micro:bit using the templates provided you need the GCC ARM cross compiler together with Cmake and Ninja (or make on non-Windows systems). To cross compile the code you also need first install the arm-none-eabi-gcc compiler. This can be downloaded from a number of places including: https://developer.arm.com/tools-and-software/open-source-software/ This web page does have the original compiler used with micro:bit code but it is now deprecated and the more up-to-date alternative is to be found at the ARM GNU Toolchain Download page: https://developer.arm.com/downloads/-/arm-gnu-toolchain-downloads This lists a large and confusing range of installers for the latest versions of different hosts and targets. You need to download the Window hosted bare-metal target version: AArch32 bare-metal target (arm-none-eabi) which is 11.3 at the time of writing.
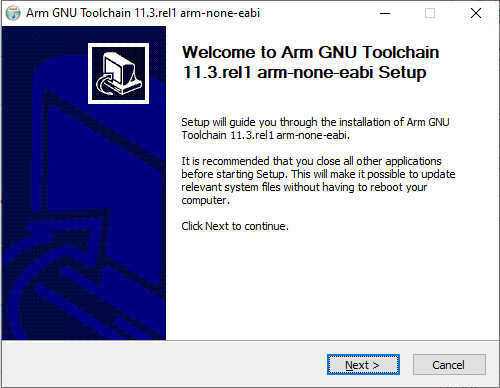
The .exe installer is that easiest to use – make sure to select the add parth to environment variable option. Once installed you can select the compiler as a “kit” within VS Code – see later. Run the installer and follow the instructions. Make sure to tick Add path to environment variable at the end of the installation:
The compiler is installed in: C:\Program Files (x86)\GNU Arm Embedded Toolchain You can check that it is installed and on the path using: arm-none-eabi-gcc -v which will display a lot of information about the version and configuration. Next you need to install Cmake: https://cmake.org/download/ Select the correct installer for your machine and follow the prompts. Make sure that you select the option to add Cmake to the path, otherwise you will have to add it yourself. Cmake is installed to: C:\Program Files\CMake\ Check it works using: cmake -version If not check that it is on the path. Cmake uses Ninja under Windows to actually perform the build. Download this from: https://ninja-build.org/ Download the ZIP file for Windows and extract the ninja.exe file into a suitable folder that is on the path. A simple solution is to copy it to the Cmake\bin directory. To check that Ninja is on the path and working use: ninja --version There is another requirement in the form of a utility called srecord, but this is included with the project template and you don’t need to download it unless you are going to work without the template. In this case you can obtain srecord from Sourceforge as a source file that you can build yourself. Alternatively, and more simply, you can download a binary for Windows from: https://sourceforge.net/projects/srecord/files/srecord-win32/ Simply unzip srec_cat.exe into a directory that is on the path - the Cmake/bin directory is an easy choice. |
|||||
| Last Updated ( Monday, 05 September 2022 ) |