|
Page 3 of 3
Extending WriteableBitmap
The backbuffer uses the pixel format you sepecified when creating the WriteableBitmap and there is a BackBufferStride property that you can use to create a suitable storage mapping function.
It is easy enough to add some methods to set and get pixels in a particular case by way of two new extension methods defined in a static class created just to host the extension methods:
 public static class bitmapextensions
 {
The setPixel method first checks that the x and y co-ordinates are in the correct range and that the format is Brga32 (you can extend the method to deal with other formats):
 public static void setPixel(
  this WriteableBitmap wbm,
     int x, int y, Color c)
 {
 if (y > wbm.PixelHeight - 1 ||
    x > wbm.PixelWidth - 1) return;
 if (y < 0 || x < 0) return;
 if (!wbm.Format.Equals(
        PixelFormats.Bgra32))return;
It then gets the backbuffer details:
 wbm.Lock();
 IntPtr buff = wbm.BackBuffer;
 int Stride = wbm.BackBufferStride;
Then it computes the storage mapping function to access the pixel at that x,y location and stores the specified colour split into the four bytes corresponding to the pixel format:
 unsafe
 {
  byte* pbuff = (byte*)buff.ToPointer();
  int loc=y *Stride  + x*4;
  pbuff[ loc]=c.B;
  pbuff[loc+1]=c.G;
  pbuff[loc+2]=c.R;
  pbuff[loc+3]=c.A;
 }
Finally we mark the pixel dirty and unlock the WriteableBitmap:
 wbm.AddDirtyRect(
        new Int32Rect(x,y,1,1));
 wbm.Unlock();
}
The getPixel method is very similar, only it assembles and returns a Color struct:
public static Color getPixel(
 this WriteableBitmap wbm, int x, int y)
{
 if (y > wbm.PixelHeight - 1 ||
   x > wbm.PixelWidth - 1)
      return Color.FromArgb(0, 0, 0, 0);
 if (y < 0 || x < 0)
      return Color.FromArgb(0, 0, 0, 0);
 if (!wbm.Format.Equals(
         PixelFormats.Bgra32))
     return Color.FromArgb(0, 0, 0, 0);;
 IntPtr buff = wbm.BackBuffer;
 int Stride = wbm.BackBufferStride;
 Color c;
 unsafe
 {
  byte* pbuff = (byte*)buff.ToPointer();
  int loc = y * Stride + x * 4;
  c=Color.FromArgb(pbuff[loc+3],
    pbuff[loc+2],pbuff[loc+1],
      pbuff[loc]);
 }
 return c;
}
Notice that as we are only accessing the bits and not changing them there is no need to lock or mark an area as dirty.
These two extension methods are easy to use but you might want to think about using more direct methods if you are going to manipulate a lot of pixels. Direct access via the Pixel property, and assigning pre-computed integer colour values, is always going to be faster than using general methods and objects.
With these extension methods defined we can now give an example of accessing pixels:
  wbmap.setPixel(5,10 , Colors.Red);
  Color c= wbmap.getPixel(5, 10);
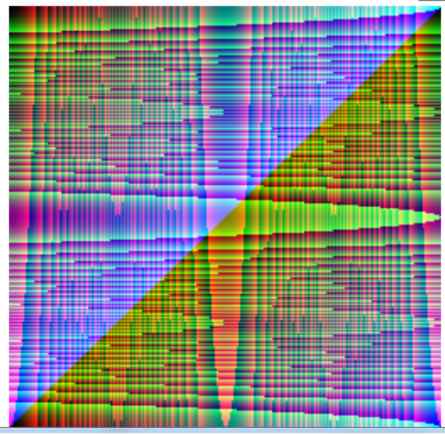
Finally, as an example of a dynamic image, the following plots a range of colours which depend on the position of the pixel according to a simple formula:
private void button1_Click(
      object sender, RoutedEventArgs e)
{
 WriteableBitmap wbmap =
  new WriteableBitmap(256, 256,
   300, 300, PixelFormats.Bgra32, null);
 for (int x = 0; x < 256; x++)
 {
  for (int y = 0; y < 256; y++)
  {
   wbmap.setPixel(
     x,y,Color.FromArgb(255,
      (byte) (x*x+y),
       (byte) (y*y+x),(byte)(x+y)));
  }
 }
 image1.Source = wbmap;
}
WPF The Easy 3D Way
WPF provides a full 3D graphics experience without the need to master DirectX. It really is the easy 3D approach.
|
Loading Bitmaps: DoEvents and the closure pattern
Sometimes loading a bitmap causes an asynchronous download and you have to wait for it to complete before using it - but how best to wait? The standard solution is to use an event but this breaks what [ ... ]
|
Bitmap Coding and Metatdata in WPF
Having looked at working with raw pixel data we turn our attention to formattted image files and how to code and decode both the pixel data and the meta data they contain.
|
Getting Started with WPF
WPF Windows Presentation Foundation is the new way to do forms and all things graphical in .NET. You can still use Windows Forms but don't expect anything particularly new to be added to [ ... ]
|
WPF .NET Core - Inside Dependency Properties
One of the great mysteries of WPF is the strangely named "Dependency Properties". In this chapter we learn how dependency properties really work by creating a custom dependency property
| | Other Articles |
<ASIN:0672329859>
<ASIN:0735623945>
<ASIN:0979372518>
<ASIN:1430224819>
|
