|
Page 1 of 3 Working with Android Studio 2 makes building the UI easy with an interactive editor, but you still need to find out how to handle the things it isn't quite so good at. In this chapter we look at the general event handling - i.e beyond the onClick property that we have used so far.

Starting With an App
Third Edition
Is now available in paperback and ebook.
Available from Amazon.
- Getting Started With Android Studio 3
- The Activity And The UI
- Building The UI and a Calculator App
- Android Events
Extract: Using Lambdas
- Basic Controls
- Layout Containers
- The ConstraintLayout
Extract: Guidelines and Barriers
- UI Graphics A Deep Dive
Extract: Programming the UI ***NEW
- Menus & The Action Bar
- Menus, Context & Popup
- Resources
- Beginning Bitmap Graphics
Extract: Simple Animation
- Staying Alive! Lifecycle & State
- Spinners
- Pickers
- ListView And Adapters
If you are interested in creating custom template also see:
Custom Projects In Android Studio

We have looked at the general principles of building a UI but now we have to spend some time looking at the most basic components that can be used to build an application.
We also need to find out how to work with any event and not just onClick. Even though most controls can be used very successfully using just the onClick event - there are other types of event that cannot be handled simply by setting an onEvent property in the Property Window. In this chapter we look in depth at Android event handling.
As before the emphasis will be on using Android Studio and the Layout editor to get as much of the work done as possible.
Let's start with the problem of how to write an event handler in Java.
The General Android Event Handler
If you have used languages other than Java you might expect event handlers to simply be functions that are passed to UI controls to register them as event listeners - i.e. functions that are called when an event occurs. You might even have used an IDE that adds event handlers automatically for you but Android Studio doesn't currently do this - you have to add code to handle and event. It does however help with the automatic generation of this code.
Events in Java are slightly more complicated because you cannot pass a function as an argument like you can in JavaScript, C# and many other languages - you can in the latest version of Java but it will be sometime before UI frameworks and Android catchup.
In Java functions can only exist as methods of objects so if you want to pass a function you have to pass an object that has the function as a method.
As a result what has to be passed to register an event listener is more complicated in Java than in many other languages. The way that it all works was invented in the early Java UI frameworks such as GWT and later refined in Swing. Android uses the same approach.
As already mentioned you can't pass a function you have to pass an object which contains a function that can handle the event. Clearly the event handling function has to be capable of handling the event and hence how it is defined depending on the type of the event.
For example an onClick event needs a handler that returns void and accepts a View object, which is the object the event occurred on.
To make sure that an event listener has the right sort of event handling event handling functions are defined using an Interface.
If you recall an interface is like a class but it simply defines the functions that a class has to support. If a class inherits or implements an interface then you have to write code for each function defined in the interface.
You can think of an interface as a specification for a list of functions you have to write to implement the interface. The only things that are defined in an interface are the names of the functions and the types of the parameters they accept and return.
For example the onClickListener is an interface that defines a single function
void onClick(View v)
any class that implements the onClickListener interface has to have an onClick function of this type.
To create an event handler for the onClick event you have to do the following things:
- Create a new class that implements the onClickListener interface
- Define your custom onClick event handler within the class
- Create an instance of the new class within the Activity
- Use the button's setOnClickListener method to add the listener object created in step 3 to the event.
This is the general pattern that you have to follow when implementing any event handler. The only things that change are the interface you have to implement and the event handling function it defines.
The condensed way to remember all this is:
Event Class with event methods ->
Event Object Instance ->
Event Object set as Listener on UI component ->
Event happens calls event method in Event Object
Sounds complicated - well it is and there are ways of simplifying it but first let's see how it is done exactly as described.
This is not necessarily the best way to do the job but it is how it all works in principle and it is important to understand what is going on.
Implementing An Event Handler Class
This is as much an exercise for Java beginners as it is an explanation of event handling.
If your Java is good feel free to skip ahead.
Start a new project called FullClassEvent and add a button using the designer.
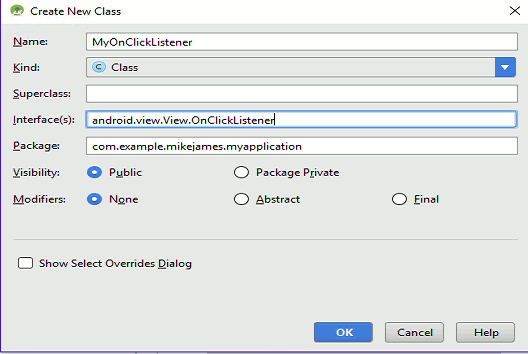
To implement an event handler for the onClick event first we need to add a new class to the project. Right click on the folder under the Java folder and select New, Java Class and call it MyOnClickListener. You can use the Interface(s) box to enter any interfaces you want the class to implement. In this case we want it to implement OnClickListener and you can enter this with the help of a drop down list that appears as you type. Select the View.OnClickListener interface.

This creates a new Java file, MyOnClickListener.java in the directory.
Note: For users of other languages it is worth pointing out again that Java has an almost unbreakable convention that each class is stored in its own file of the the same name.
When you look at the new file in the editor you will see that it has some red underlining indicating that there is an error.

The reason for the error message is that you have to implement the methods defined in the OnClickListener interface. To agree to implement an interface and then not do it is considered an error. The only alternative is to declare the class as abstract which means it doesn't define any methods and only exists to be inherited by other classes.
To get rid of the red underlinings we have to define all of the methods in the interface. Fortunately Android Studio will do some of the job for us.
|


