|
Page 1 of 2 One of the biggest simplifications Kotlin brings to Android programming is the way events are handled. It may be easier, but it still helps to know what is going on. This extract is taken from Events in a new book aimed at Android programmers wanting to use Kotlin.
Android Programming In Kotlin
Starting with an App
Covers Android Studio 3 and Constraint Layout.
Is now available as a print book:

Buy from: Amazon
Contents
- Getting Started With Android Studio 3
- The Activity And The UI
Extract: Activity & UI
- Building The UI and a Calculator App
Extract: A First App
- Android Events
- Basic Controls
Extract Basic Controls
Extract More Controls ***NEW!
- Layout Containers
Extract Layouts - LinearLayout
- The ConstraintLayout
Extract Bias & Chains
- Programming The UI
Extract Programming the UI
Extract Layouts and Autonaming Components
- Menus & The Action Bar
- Menus, Context & Popup
- Resources
Extract Conditional Resources
- Beginning Bitmap Graphics
Extract Animation
- Staying Alive! Lifecycle & State
Extract State Managment
- Spinners
- Pickers
- ListView And Adapters
-
Android The Kotlin Way
If you are interested in creating custom template also see:
Custom Projects In Android Studio

Working with Android Studio makes building the UI easy with an interactive editor, but you still need to find out how to handle the things it isn't quite so good at. We now need to find out how to work with any event, not just onClick. Even though most controls can be used very successfully using just the onClick event, there are other types of event that cannot be handled simply by setting an onEvent attribute in the Attribute Window.
In this chapter we look in depth at Android event handling. As before, the emphasis will be on using Android Studio and the Layout Editor to get as much of the work done as possible.
The good news is that Kotlin’s support for passing functions as parameters makes it all much easier. However, this doesn’t mean that you can completely ignore the way that Java handles the problem. Kotlin has to work with libraries written in Java and are based on Java’s way of implementing event handlers. You don’t have to go too deep, but you do need to know how Kotlin makes use of the Java object-oriented event mechanism.
How Java Passes Functions
If you don’t want to know how things work you can skip this section until you get stuck with an event handler and then come back and read it.
Events in Java are slightly more complicated than other languages because originally everything in Java was an object and the only way a function can exist is as a method, i.e. as part of an object. When you need to set up an event handler you need to specify the function to be called when the event happens. You can’t pass a function as a parameter to another function as Java doesn’t support function types.
The solution is to define an Interface that has one abstract method – a SAM or Single Abstract Method. The abstract method is the function that will be used as the event handler. To pass it you have to create an instance of the Interface, i.e. an object that has the method defined, and pass it.
An interface is like a class but it simply defines the functions that a class has to support. If a class inherits or implements an interface then you have to write code for each function defined in the interface. You can think of an interface as a specification for a list of functions you have to write to implement the interface. Both Kotlin and Java support interfaces.
It is worth saying at this early stage that not all event handlers in the Android SDK are implemented as SAMs.
Some are classes or interfaces that have more than one abstract method. That is they are objects that bundle up a set of related events. Both Java and Kotlin have provided easier ways of working with SAMs, but these don’t work when the object in question has multiple abstract methods. When you encounter this situation you have to create a full instance of the class in question – the good news is that there are easy ways of doing this as well.
Android Events
The way that events are implemented in Android follow a standard pattern.
Any object that can generate an event will have a seteventListener method which can be used to attach an onEventListener object to the event handler list.
The name of the method and the object includes the name of the event. So there is a setOnClickListener method which takes an OnClickListener object as its only parameter.
Notice that this naming system is entirely convention and not part of the Java language.
The OnEventListener objects are all derived from an interface of the same name which defines a single abstract method which acts as the event handler.
For example, OnClickListener is an interface which has the single method onClick(View v) defined.
To use it as an event handler you have to create an instance that implements onClick and then add it to the event handler list using setOnClickListener.
In Java this is a simple but tedious process, if you use the fundamental way of implementing an event handler, that involves a lot of boilerplate code. First you would have to create a new class that implemented the Interface. Then you would have to create a new instance of this class and pass it to setOnClickListener.
The Kotlin Object
In Kotlin you don’t have to first create a class and then create an instance, you can go directly to the new object you require using the ability to declare objects directly.
You can declare an object using very similar syntax to declaring a class. For example:
object myObject {

    fun myMethod() {

       . . .

    }

}
creates an object instance called myObject with a single method. Notice that this gives you an object without having to define a class. Objects declared in this way can implement an interface in the same way as a Class.
object myObject:myInterface {

          . . .

 }
So to create an instance that implements OnClickListener all we have to do is start the declaration of the object with:
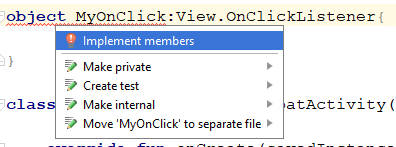
object MyOnClick:View.OnClickListener{
}
Android Studio will implement the methods defined in the interface for you. All you have to do is place the cursor in the red line that signals that you haven’t implemented the interface and then press Alt and Enter. Select Implement members from the menu that appears:
The generated code is easy to understand:
   object MyOnClick: View.OnClickListener {
  override fun onClick(p0: View?) {
     TODO("not implemented")

  }

    }
The question mark at the end of View is the only thing that might confuse you. This declares p0 to be a nullable type. Java doesn’t use Kotlin’s non-nullable types and rules and hence anything passed into a Kotlin function that is a Java object has to be treated as a nullable type – hence the question mark. It is good practice not to convert nullable types to non-nullable types without checking that it isn’t actually null – see Chapter 17 for more information.
In this case there is no way that p0 can be null so we can cast it “unsafely” to Button which is non-nullable:
object MyOnClick:View.OnClickListener{
    override fun onClick(v: View?) {
        (v as Button).text = "You Clicked Me"
    }
}
If, for any reason v is null, an exception will be thrown.
Now that we have our instance of OnClickListener we can set it as an event handler for the Button b:
b.setOnClickListener(MyOnClick)
You can also make use of an object expression to create and pass the object in one step.
An object expression is an anonymous object that you create in the usual way, but without supplying a name
object {

    fun myMethod() {

       . . .

    }

}
An object created in this way can implement an interface or inherit from a class:
object:myInterface{

}
So you can write the previous example as:
b.setOnClickListener(object: View.OnClickListener {
    override fun onClick(p0: View?) {
        (p0 as Button).text = "You Clicked Me"

    }
  }
 )
This is the simplest way of doing the job, but sometimes it is useful to define the object so that it can be reused. There is also a subtle difference in what variables are accessible depending on where the object is created – see the section on closure later in this chapter.
This method of creating event handlers works for any type of event. All you have to do is:
-
create an instance of the OnEventListener object and provide implementations for all of the abstract methods.
-
Use the setOnEventListener function to add the OnEventListener you have just created to the list of event handlers.
If there are multiple event handlers defined in the OnEventListener you simply implement them all and pass the entire object.
In most cases, however, there is only a single abstract method (SAM) and in this case there are even simpler ways of achieving the same result.
|