| Android Adventures - Managing Fragments |
| Written by Mike James | ||||||
| Thursday, 22 May 2014 | ||||||
Page 1 of 5 You might know how to create a Fragment and how to display it but how to you deal with multiple Fragments in one Activity? The solution is to use the FragmentManager, but not quite in the way it is described in most examples.
Android Adventures - Mastering Fragments & Dialogs
ContentsThis book is currently being revised. Chapter 5 and later refer to an earlier version of Android Studio - revisit for updates.
If you are interested in creating custom template also see: Custom Projects In Android Studio
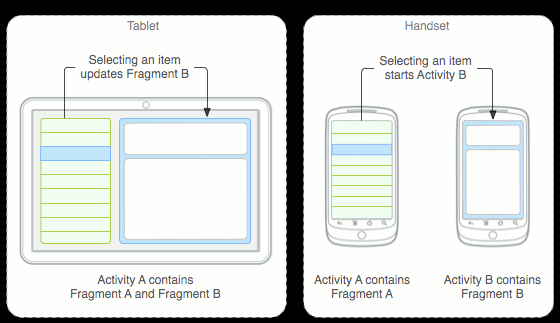
The whole point of using Fragments is to build UIs that can work on different types of devices with minimal effort on your part. Notice that this isn't no effort because creating an app that works well on a range of screen sizes and resolutions is a tough problem. Fragments make it easier they don't make it easy. Most accounts of how to use Fragments give you a single example and then expect you to draw general conclusions that apply to what you want to do - but in most cases this is difficult as the examples do complicated and realistic things. In this case the objective is to make the general principles as clear as possible with a very simple and totally unrealistic example. Handling Screen SizeThe simplest place to start is with screen size because this doesn't change while the app is running.Once you have seen how to handle this simpler situation, how to make any change at any time becomes a much easier task. Using Fragments to adapt to screen size is an easier task simply because you only have to cope with the problem when the app first starts and we can assume that the layout we start with is the one that persists for the life of the app. Typically when you have a large screen you can put lots of UI widgets in front of the user. When the screen size is smaller you have to divide the UI up into chunks that can be shown on request. This is the "classic" diagram you will find in the Android documentation introducing Fragments:
Notice that it shows two Fragments, first used with a single Activity and then used each with their own Activity. If you follow the principle of keeping each Fragment self-contained and only allow it to interact with the Activity that hosts it then you can reuse Fragments in this way. However, a simpler example is to use two Fragments with a single Activity and simply modify how the Activities are shown by that Activity. Let's see how this works. In most cases you can start off with the UI design for the largest screen size you want to work with. In this case the Fragments will fit on the screen like in the left-hand diagram. As this is a static layout you might as well use the Android Studio layout editor to construct the entire UI - it is easy and quick and requires almost no coding. You can also use the editor to create the layout for the smaller screen in the same way, but you will have to add some code to allow the user to see the second Fragment. That is what we are going to do is create a layout for the big screen containing both Fragments and a layout for the smaller screen containing only the first Fragment. Adaptive layoutsBefore we can go very much further it is important that you recall or discover how Android's resources are used to provide resources appropriate to the device that the app is running on. In this case we can concentrate on providing layouts for different screen sizes. All layouts are stored in sub-folders within the res folder. The folder called layout contains the xml files that are used if there is no more specific folder available. You can create folders with the following suffixes:
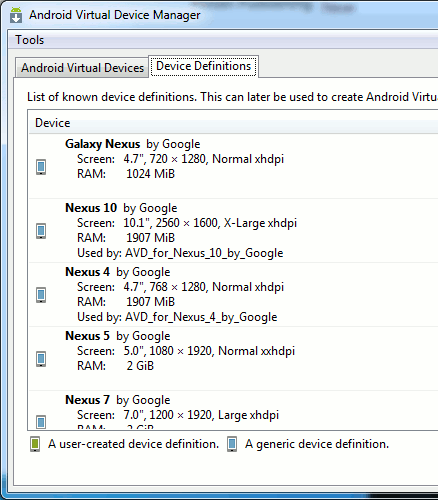
For example, the Nexus 4 is normal, Nexus 7 is large and the Nexus 10 is xlarge. The screen size is shown alongside each device in the Virtual Device Manager:
When the app requests an xml layout the folder that the file is loaded from is determined by the device the app is running on. For example, if you try to load activity_main.xml then the file will be loaded from layout-large if the app is running on a Nexus 7 or any large device and from layout-xlarge if the app is running on a Nexus 10 or any xlarge device. If you don't provide a folder or a file of the correct name in the custom folder then the file will be loaded from the layout folder. You can see that using this system you can provide a layout for, say, a large device and one for a normal device and this is how we are going to generate our initial layouts for Fragments. The system also works for portrait and landscape formats. Two screen sizesCreate a new project called FragMan set the minimum SDK to 3.0 to avoid complications with support libraries. Select Blank Activity and let the system generate your project - ignore any warnings you might see. What we are going to do is set up a default layout with a button and two FrameLayouts that are going to act as containers for the two Fragments. Load the Layout.xml file and select the Design tab in the layout editor. Delete the Hello World text and replace the relative layout with a Vertical Linear Layout. Next place two FrameLayouts and a Button within the Linear Layout. Set the FrameLayouts to have Layout Weight 1 so they take equal amounts of space and name one Container1 and the other Container2. Ignore any warnings you might see about FrameLayouts being empty. The generated XML file is listed below for accuracy and clarity - you can achieve everything you need to using the designer and the property window:
The next step is to create two Fragments. Move to the java directory and right click. Select New,Fragment,Fragment(Blank). Give the Fragment the name BlankFragment1 and untick interface callbacks. In a real app you would almost certainly want the interface callbacks to allow the Fragment to communicate with the Activity, but for this example it just complicated things. We could also do without the Fragment factory method, but it is simple enough make use of it in an example. Repeat the above but name the Fragment BlankFragment2. |
||||||
| Last Updated ( Saturday, 25 July 2015 ) |


