| Android Adventures - A NumberPicker DialogFragment Project |
| Written by Mike James | ||||
| Thursday, 14 August 2014 | ||||
Page 1 of 3 There comes a time when you need to see a complete example and this chapter of Android Adventures is exactly that. It constructs from the beginning a dialog containing a variable number of NumberPickers to demonstrate how to create a UI on the fly and how to make use of DialogFragment.
Android Adventures - Mastering Fragments & Dialogs
ContentsThis book is currently being revised. Chapter 5 and later refer to an earlier version of Android Studio - revisit for updates.
If you are interested in creating custom template also see: Custom Projects In Android Studio
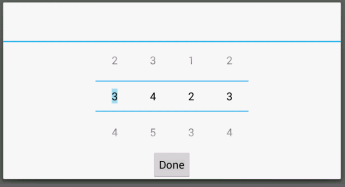
While this is a much more complete example than anything in previous chapters it is still just that - an example. A production version would need more features and more safeguards against misuse. However, in most cases you can see what needs to be done and some of the shortcomings will be addressed in "tasks for the reader" at the end of the chapter - you should have no difficulty in implementing them or at least seeing how they should be implemented. It is assumed that you have read the earlier chapters on Fragments and DialogFragments and the basics are not repeated here. As well as the technical details the thought processes behind the decisions are explained. I hope that you get a flavour of not just what was done but why it was done and some of the alternative that could have been used. The basic idea for this dialog is to present the user with a set of NumberPickers so that they can enter an N digit value. The idea can be best seen from a screen dump of the finished dialog:
The number of NumberPickers displayed can be set at run time. For simplicity each NumberPicker is set to display 0 to 9 but you can easily add an initialization parameter that could set the range to anything you like. In this case fixed multiplier are used 1,10,100,1000 and again these could be set by the user by providing an additional initialization parameter. There are lots of things to be added. Consider this a version 1 or a minimally viable product. So how do we get started. First we need a DialogFragment. The Initial DialogFragmentStart a new blank project and accept the defaults. Target it for API 15 which avoids problems with having to work with the support library. If you do need to target earlier APIs then it is easy enough to change to make use of the support library. Once the project is open navigate to the app\src\main\java directory and right click on your apps directory and select New,Fragment, Fragment Blank. At the moment there isn't an option to add a DialogFragment but it is easy to change a Fragment into a DialogFragment. Call your new Fragment NumberDialog and accept all of the defaults except for Create Layout XML. You could generate a default XML layout file and work with it to provide the basic layout that the dialog needs but it is just as easy to do the whole job in code. Why are we creating the UI in code? The answer is that the UI isn't fixed. The user can specify as many NumberPickers, up to a reasonable limit, they desire. You could implement this as a layout for each number of NumberPickers - for example a layout for one, two and three NumberPickers - but it is fairly easy to do the entire job programatically. First we need to convert the Fragment to a DialogFragment. To do this simply change:
to public class NumberDialog extends DialogFragment {Use Alt+Enter to add the necessary import statements. Now we have DialogFragment ready to customize and our first job is to create the UI. Creating The Basic UIAt this point we have to decide how to create the UI. We could use a custom Dialog class such as AlertDialog to host the controls but this seems a very roundabout way. It is a reasonable approach if you already have an old dialog implementation and want to reuse it but for something we are creating from scratch it seems a nesting of classes too far. It is much simpler and more direct to put the UI generation code in the Dialog Fragment's onCreateView. This has the advantage that the DialogFragment can be used as a standard Fragment within a bigger UI or it can display in a Dialog window all on its own. As we opted not to have an XML layout the generated onCreateView has code to create a TextView with some sample text:
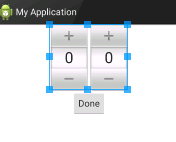
You can use this to test your DialogFragment even before you have started to customize it. It is always a good idea to check that things are working as soon as you possibly can. If you want to try this then skip ahead to the section that tells you how to run the DialogFragment - you will have to make some changes to make it work but nothing difficult and everything obvious. We need at least one container to layout the NumberPickers and the single Done button that currently make up the UI. There are many possible ways of doing this but if you are trying to create a single UI that works with screens of different sizes then the LinearLayout has a lot going for it. In this case we can use a vertical LinearLayout with a horizontal LinearLayout as a child. The horizontal layout will be used to hold the NumberPickers and the Vertical layout will be used to display the Done button below the NumberPickers.That is the NumberPickers are grouped into the horizontal LinearLayout:
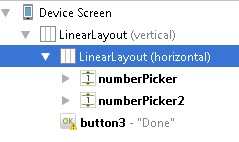
The Component Tree also shows the way things are placed in containers:
A good tip is that when you are creating a UI in code it is very useful to be able to use the designer to create a mockup layout. You can use it to find out what layout properties to set as well as generally to see what things are going to look like.
The LinearLayout and LayoutParamsReturning to the code. Our first job is to create the inner horizontal LinearLayout and add the requried number of NumberPickers to it. The LinearLayout is easy:
and by default we get a horizontal layout. Next we usually have to customize any properties of View object we have created. in this case we also need to set some LayoutParams. In a View hierarchy there are two types of properties that change the layout. Properties that an object has that controls its appearance e.g. text or background say. However, there are also properties that it may have set that are used by the container that it displays in to modify how it is displayed. For example if you want the size of something to be just enough to contain its displayed children then you need to set its size to WRAP_CONTENT - however this isn't something that the object deals with but the container that the object is displayed in. To allow objects to have sets of properties intended for consumption by their containers and not by them the Android Framework uses the idea of layout parameters. In XML they correspond to tags like android:layout_width. By contrast something like android:text is a property that the object handles whereas android:layout_width is handled by the object's container. When working with the designer you can mostly ignore the differences between layout parameters and other parameters - you simply set them using the Property window. When working in code you need to know that layout parameters are specified by a LayoutParams object. This comes in different flavours depending on what the container is. That is the LayoutParams object is provided by and is specific to the container not the object. In this case this LinearLayout object is going to be put inside another Linearlayout object so we need a LinearLayout.LayoutParams object. And the reason we need it is to set the width and height parameters to WRAP_CONTENT:
Notice that as promised the LayoutParams object is stored in the object even though it is the container that will make use of it to determine the layout. We will need to setup other LayoutParams objects later. |
||||
| Last Updated ( Saturday, 25 July 2015 ) |