|
Page 1 of 2 jQuery UI is built to work with jQuery. If you are already using jQuery, it is recommended as an addin to make your pages look like more than just HTML. Let's see how easy it is to get started with this excerpt of Ian Elliot's new book, Just jQuery: The Core UI (I/O Press).
Available as a Book:
buy from Amazon
- Understanding jQuery
- Basic jQuery CSS Selectors
Extract: The DOM
- More Selectors
Extract: Basic Selectors
- The JQuery Object
- Filters
- DOM Traversal Filters
- Modifying DOM Objects
Extract: Modifying The DOM
- Creating Objects & Modifying The DOM Hierarchy
- Working With Data
Extract: Data ***NEW!!!
- Forms
- Function Queues
- Animation
- jQuery UI
- jQuery UI Custom Control
- Easy Plugins
- Testing With QUnit
- Epilog A Bonus Function
Also Available:
buy from Amazon
jQuery UI is a JavaScript library that can be used to add sophisticated controls such as a date picker, dialog boxes, slider and so on to a standard HTML page. It doesn't even have to be an HTML5 page as long as JavaScript is running then it works with most browser. You can also use it to add animation and other special effect but in this article we are going to concentrate on using its controls using the slider as an initial example.
The good news is that jQuery UI is getting better all the time. If you tried it out in its early days and thought it was a bit chaotic and poorly documented then it is worth trying it again. The current version, 1.12, has been much reorganized and as a result it is much more logical to work with. The downside is that any old programs you might have will need to be modified before they work.
Assuming that you know a little about using jQuery, it is very easy to get started using jQuery UI. Even if you don't it is still easy as long as you keep to the simplest use of jQuery to find the HTML element you are going to work with.
To use jQuery UI you need to load
- jQuery
- jQuery UI
- jQuery UI style sheet.
There is more to say about jQuery UI and its style sheet but for the moment a basic default style sheet will do.
You can host all three files on your local server, but to get started the easiest thing to do is to use remote versions of the libraries. Your HTML page should start:
<link rel="stylesheet" href=
 "http://code.jquery.com/ui/1.10.0/themes
       /base/jquery-ui.css" type="text/css"/>
<script src=
   "http://code.jquery.com/jquery-latest.js">
</script>
<script src=
 "http://code.jquery.com/ui/1.12.1/jquery-ui.js">
</script>
The Basic Widget Pattern
The way that all jQuery UI widgets work is that you have to create an element that they can use for position and other basic style details. The element is processed by the JavaScript into something more complicated and added to the DOM. In the latest version of jQuery UI this works in more or less the same way for all the widgets - so let's see what the pattern is.
All of the widgets have a constructor which processes the HTML element you specify to create the widget. The constructor always has the same name as the widget, i.e. the Button has the button constructor, the Slider has the slider constructor and so on.
The constructor has to be called on a jQuery object containing the DOM object. That is, if you want to turn the div:
<div id="mydiv"></div>
into a widget with constructor widgetname you would first have to use jQuery to retrieve the DOM object wrapped by a jQuery object i.e:
var jqObject=$("#mydiv");
Once you have the jQuery object representing the element, you can call the constructor in the standard form:
jqObject.widgetname(options);
where widgetname is replaced by the correct constructor name, e.g. button and options is an object which contains properties set to values to customize the widget.
Of course most programmers wouldn't split these two steps out and would instead write:
$("#mydiv").widgetname(options);
It is worth knowing that the constructor returns a jQuery object which represents the widget and this can sometimes be useful.
The options object is also usually constructed as an object literal within the constructor call. For example, if the widget has a max property that can be set, you might use
$("#mydiv").widgetname({max:100});
which would pass the constructor an object with a max property set to 100. If the widget had a max and a min property you would use something like:
$("#mydiv").widgetname({max:100,min:0});
to set max to 100 and min to zero.
The only problem with this approach is that the definition of the options object can be a long and difficult to read. The trick is to use layout to show what properties and values you are setting.
What if you want to change an option? The simplest way is to use the constructor again. To retrieve the current value of a property you would use:
$("#mydiv").widgetname("option","propertyname");
and to set a new value:
$("#mydiv").widgetname(
             "option","propertyname","value");
The only confusion here is that there are properties that belong to the original element that control some aspects of the widget. For example, the width and height properties of the element control the size of the widget. You can set these within the HTML tag:
 <div id="mydiv" style="width:100px height:200px>
 </div>
or you can set them in code using either DOM methods or, more simply, using jQuery:
$("#mydiv").width(100).height(200);
Using the constructor to access the properties of a widget is just a specific example of using the constructor to call widget methods. If a widget has a method called widgetmethod then you call it using:
$("#mydiv").widgetname(
      "widgetmethod",paramter1,parameter2);
and the parameters are passed to the method.
The final common task is setting up event handlers to determine what happens when the user clicks or drags the widget. Obviously, what events are supported depends on the nature of the widget, but in general the way that you connect an event to an event handler is the same.
For example, if the widget supports the click event you can add an event handler when the widget is first created by defining the click property to be a function:
$("#mydiv").widgetname(
           {click:function(event,ui){ code}});
Notice that the event handler has two parameters.The first is the usual W3C event object that includes information such as the event target, position and so on. The second parameter, usually called ui, is an object which contains data that is specific to the widget concerned. To find out what ui contains you need to look at the documentation for the widget and the event.
To add an event to the widget at a later time you attach the event to the jQuery object that represents the widget. That is
$("#mydiv").on("click",function(event,ui){ code});
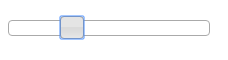
The Slider
The Slider widget makes a good example because it is simple enough to understand but sophisticated enough to demonstrate all of the techniques of working with a widget.
To create the area in the page where the slider will appear we need a suitable div:
< body>
 <div id="mySliderDiv" style="width:200px;">
 </div>
</ body>
The Slider constructor is called slider and so to create a default slider we use:
$( "#mySliderDiv" ).slider();
This creates a default slider - max 100, min 0 - which is functional as far as the user is concerned but not much use to the program, i.e. it slides but provides no values.
To read its value you could use:
var value= $("#mySliderDiv").
               slider("option","value");
and to set its value:
$( "#mySliderDiv" ).
               slider("option","value",50);
In most cases, however, you need to setup a change event handler to retrieve the slider's value only when the user has changed it. To do this after the slider has been set up we use:
$("#mySliderDiv").slider({change:
    function(event, ui) {
       alert(ui.value);
    }
});
This could also have been setup as part of the initial construction of the slider.
As well as the change event there are also slide, start, stop and create.

|