| Getting Started with Firefox OS - The UX Building Blocks |
| Written by Ian Elliot | |||
| Sunday, 07 July 2013 | |||
Page 1 of 2 The great thing about Firefox OS is that you can build apps without knowing anything much about it. All you need is some HTML, CSS and JavaScript. While this is true, it is also worth finding out how to create a UI that looks and feels like official Firefox programs. To do this you need to find out about the UI Building Blocks. Firefox OS - Building AppsThis article is part of a first draft of a book on Firefox OS.
A Firefox OS app is just an HTML app. What might surprise you, and it still surprises me even though I've known it for a long time, is that all of the UI presented on the mobile device, i.e. Gaia, is just HTML - with some suitable CSS and media resources. You can just create any UI you care to usin HTML5 but if you want to create apps that fit in with the way the that the official apps look and work then you need to adopt their way of doing things and build your UI using the User Experience Building Blocks - UXBB. You can find documentation on the UXBB at Firefox OS UX building blocks and at the relatively new site Building Firefox OS. At the time of writing the documentation is a work in progress. How to actually use the different components is easy enough once you have seen how to work with one or two simple examples. The ResourcesTo use any UXBB you have to do a minimum of two things - load the appropriate css file and make available any graphics resources used. If you really want to fit in then you also need to use a particular font - FeuraSans. There are a number of problems you will encounter in getting started. The first is that the documentation is very incomplete and probably out of date in lots of places and similarly the resource files that are made available are also probably out of date and incomplete. The second problem is that many of the examples don't really go far enough and most of them ignore the font problem. The final difficulty for the average HTML/JavaScript programmer is that many of the help pages point you to the the GitHub repositories rather than simple downloads. Recently the Building Firefox OS site has added a download of everything you need to get started and this has made everything very much simpler. However if you want the very latest versions of the UXBB code and fonts then the GitHub repository is likely to be the best source. To get the resource files that you need the simplest way is to download a zip of the repository and extract just the folders you need. You need to extract the folders in the directory:
There is also a set of CSS files for a second set of UXBBs that are considered too unstable to provide final document for. They are in the folder
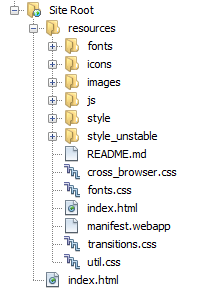
You also need to copy the FeuraSans folder. To make things easier you can find the all of the above resource files organized under a resources directory in the CodeBin at I Programmer - this is the setup used for the following examples. The folder structure needed isn't explained anywhere but by reading the some but not all for the examples you can deduce that it should be something like:
Note some examples don't use a resources directory and place everything in the site root. If you are using an IDE like NetBeans simply copy the resources folder into the SiteRoot. If you download the Building Blocks zip from Building Firefox OS then you will find that you have all of the files you need but not in a resource directory. There is also an index.html which demonstrates all of the UXBB components. If you extract the zip into a resource directory you will have something like:
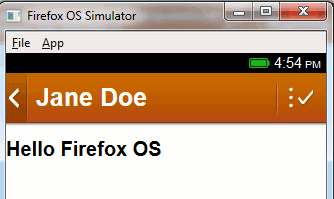
HeadersOne of the best places to start is with the Header Add a Header to your app and it instantly looks more part of the system. The Header is also a good example of a composite component that you can use to create a range of different Headers for different jobs. The key facts about a Header is that is sits at the top of the screen and occupies the full width. If you don't add one to your app then one isn't automatically added. Basically to create a header you need to use the headers.css file and some HTML. The structure of a UXBB follows different patterns depending on how complex it is - usually an outer container and then some internal objects which are formatted by the CSS. Essentially you just follow the recipe. For example a header starts with a
then it has a
and as many links to actions you care to fit in but usually not many. The options listed in the toolbar are right aligned. You can also include an optional links before the toolbar and these are left aligned. The links will also display an icon according to the class you apply:
So to construct a header with a back button at the left, an edit button at the right and some text just to the left of the back button:
To make this work we need to load the appropriate style sheet in the page header and the font and apply the font to the entire page:
Notice that this assumes that the style sheet is in resources/style and the font is in resources/fonts/. Now if you run the program, the simulator is the easiest way then you will see a very standard looking header:
|
|||
| Last Updated ( Sunday, 07 July 2013 ) |