| Mastering VB Properties |
Page 2 of 4
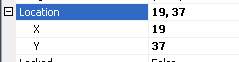
Step Four - Location and SizeThe properties that an object can have depends on what sort of object it is, however there are some properties that are so common that they apply to nearly all objects. As already discussed all objects have a Name that identifies them and some have a Caption which they display. Most have a location and a size property. These are interesting because they introduce a new idea - properties can be made up of multiple properties. For example, if you look at the Location property and expand it by clicking the plus sign to its left you will see that it is composed of an X and a Y sub-property.
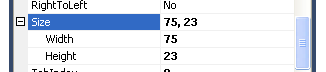
This is easy to understand as Location is a property but with two sub-parts - an X value giving its position horizontally and a Y value giving its position vertically. Both X and Y are measured in pixels from the edge of the "container" i.e. the form that the Button or other object is placed on. When editing the Location property the Properties window is clever enough to let you enter a Location either as two numbers separated by a comma e.g. 15,21 or by entering a separate value for X and Y e.g. 15 into X and 21 into Y. The result is the same. Once you have seen the Location property that the Size property if composed of a Width and a Height property should come as no surprise.
Again you can set them in one as 75,23 or as individual properties. Of course as you edit objects using the mouse the relevant properties are changed in the Properties window. Step Five - Run time changesSo far we have only looked at how properties can be changed at design time either by directly altering the object on the form or by entering values into the Property window. However every property listed in the Property window is accessible from the event handling routines. In other words, you can write commands that alter properties in response to events. For example to change the text that is displayed by a button called Button1 you would use: Button1.Text="Hello" This introduces the idea of using a "fully qualified name". That is the object is Button1 and Button1.Text is the Text property belonging to Button1. This idea of giving all of the names until you get to the property you want applies generally/ For example to change the vertical or Y positon of a button called Button1you would use an instruction like Button1.Location.Y = 20 This sets the Y property on the Location property that belongs to Button1. In principle you can have names that In general you can set any property of a named object using name.property=value with the property names and dots continuing if necessery to pin down the exact property you want to specify. Now we come to a slight complication. For historical reasons many objects have additional properties, not listed in the property window that do the same job as newer properties. In particular as well as Location and Size most objects have alternative ways of specifying position and size and this has the slight advantage that they can be specified with a single property name. For example Button1.Location.X is exactly the same property as Button1.Left Which one you use is up to you as they have the same effect. In general Left=Location.X |