|
Page 1 of 8 Continuing to chart my experience of Udacity's Android Developer Nanodegree we step up in level, embarking on the advanced part of the super-course.
Completing project "Popular Movies" (see Part 2 of this series) signaled the end of "Android Developer". Now we are ready to tackle the second element of the program "Advanced Android Developer", a new class with a new syllabus and project.

"Advanced Android Developer" is a mixed bag of self contained material and of coding seven different sample apps to learn about the advanced capabilities of the Android platform. These lessons with their associated sample applications are:
- Learn to use Fragments, reusable UI components which resemble "mini activities" in coding the AndroidMe app, an application that lets you style your own Android(avatar) by customizing it's hair and clothing.
- Learn to use Libraries, a set of third party classes and methods that can be reused in all kinds of projects, in coding the Emojify app, a fun application that turns your face in a selfie into an appropriate Emoji based on your facial expression.
- Learn to use Notifications and background services based on FCM, the Fire Cloud Messaging platform in coding Squawker, a social media app where the course instructors send "Squawks" whenever the mood strikes.The application then shows new server data in real time and in a battery efficient way.
- In Places, you learn how Android locates devices in the globe using GPS and other techniques.By implementing Geofences in coding the ShushMe app, you learn to trigger actions based on locations that turn your device silent whenever you enter any of a list of places of your choice.
- The chapter on Media Playback shows how to add multimedia, background playbacks, external clients and media sessions by including the ExoPlayer media library in coding ClassicalMusicQuiz, a simple audio-based quiz app where you try to guess the composer by listening to a musical piece.
- In Widgets you learn how to display updated information from your app in an associated widget placed on your device's home screen, in coding MyGarden, a plant growing app where you add plants to your garden and keep them alive by regularly watering them.
- In coding TeaTime, a mock tea ordering app, you learn how to test your UI (Views, AdapterViews, Intents, IdlingResources) using the Espresso Testing framework.
- Publish Your App walks you through all the steps required in order to release your app into the world, engage with your audience and earn revenue.
Finally we'll use all that we've learned to showcase the skills gained, in building the course's final project.Unlike "Popular Movies" where we were given an implementation guide to follow, this time it's up to us to figure things out.
From the very beginnings it becomes apparent that we are indeed dealing with more advanced requirements. Back in "Android Developer" we were handed over the class's source code in downloadable zip files, while this time we're required to install a Git client, clone the exercises' GitHub repos, learn how to switch between branches and stage and commit code.
Instructions on how to begin with Git and Github are not part of the syllabus, however, so students are referred to the Interactive Git Tutorial and to Udacity's free How to Use Git and GitHub course. Both of these resources will ready you for the introductory stuff, but if you're really looking to master the Git and GitHub workflow you might want to check the Git and GitHub LiveLessons video tutorials series which I reviewed some time ago and awarded a top rating of 5/5.
Initially students on this nanodegree course were expected to work on the "Stock Hawk" app as the final assignment but as of April 26 it was discontinued in favor of the brand new Baking App.In Baking App you have to produce an application that will allow Udacity’s resident baker-in-chief, Miriam, to share her recipes with the world. The app should allow a user to select recipes and watch video-guided steps for how to complete them. This would involve finding and handling error cases, adding accessibility features, adding a widget, adding libraries and so on.
The essential lessons to draw upon for the Baking App are Fragments, Libraries, Media Playback, Widgets and Espresso. Places and Publishing Your App were not at all necessary, while FCM could potentially considered of value with some of its parts, like background services and notifications, of use.Those are the lessons you have to focus on if you want to proceed as quickly as possible.The rest will probably become useful in the later and more advanced levels of the Nanodegree.
So I'll approach reviewing this class by going through the theoretical as well as practical results of its lessons and apply everything taught to my own version of Baking App. I'm going to dissect the application and examine each and every part in the context of the relevant lessons, keeping always in mind the specifications set out by the course's rubric:
General App Usage
- App should display recipes from provided network resource.
- App should allow navigation between individual recipes and recipe steps.
- App uses RecyclerView and can handle recipe steps that include videos or images.
- App conforms to common standards found in the Android Nanodegree General Project Guidelines.
Components and Libraries
- Application uses Master Detail Flow to display recipe steps and navigation between them.
- Application uses Exoplayer to display videos.
- Application properly initializes and releases video assets when appropriate.
- Application should properly retrieve media assets from the provided network links. It should properly handle network requests.
- Application makes use of Espresso to test aspects of the UI.
- Application sensibly utilizes a third-party library to enhance the app's features. That could be helper library to interface with ContentProviders if you choose to store the recipes, a UI binding library to avoid writing findViewById a bunch of times, or something similar.
Homescreen Widget
- Application has a companion homescreen widget.
- Widget displays ingredient list for desired recipe.
So let's begin!
Step 1 - Fragments
As already said, Fragments are introduced with the Android Me app, whose behavior depends on the device it is viewed on. So when viewed on a Phone where the space is limited, the app is broken down into separate activities, each one utilized in its own screen. On a Tablet with more space, screens are split side by side so that they display more content, that way offering a much more flexible navigation.
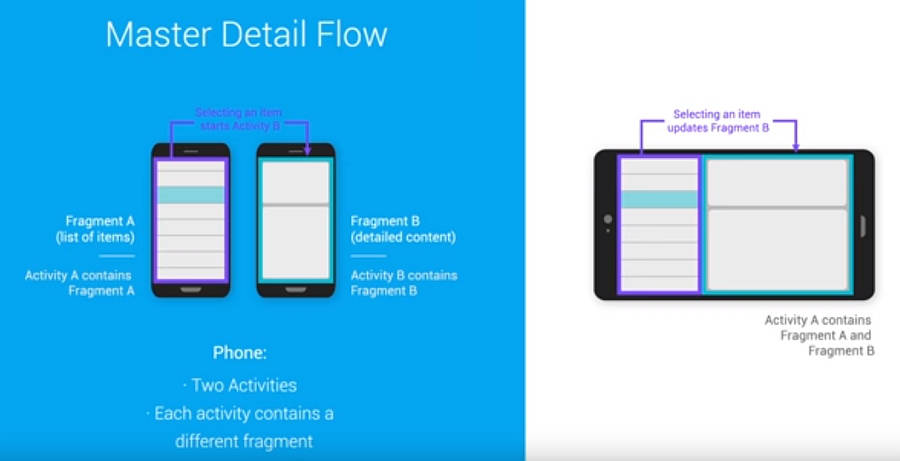
In fact, this is such a common pattern that it has a name. It's called the Master-Detail flow, where the master list of the items takes up an entire Phone screen but only the left portion of a Tablet screen. The detailed content pane, which often shows more information about a selected item in the master list, takes up the entire Phone screen, but only the right portion of a larger Tablet screen.
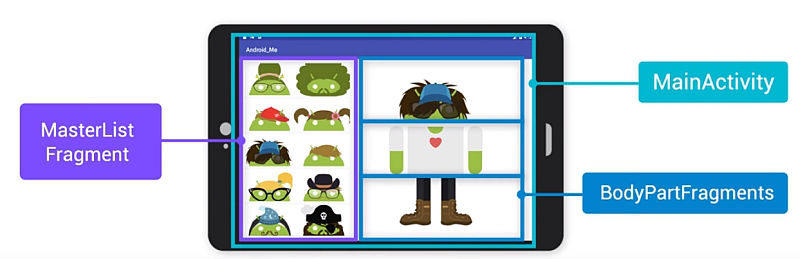 AndroidMe app AndroidMe app
The same is required by Baking App which has to adopt the responsive design mindset in order to adapt to variable screen sizes and orientations. Supplied app mock layouts make it apparent that you need three separate activities on Phone and one Master-Detail view on Tablet.
In the Tablet case, the left screen portion will host the list of a single recipe's ingredients and underneath it a RecyclerViewer with a CardView layout containing the titles of the associated step necessary to execute the recipe.The right pane then will host the videos in which Miriam demonstrates the execution of the chosen step, while underneath that Video view there's going to be a TextView with a short description.
|