|
Page 1 of 3 Working with Android Studio makes building the UI easy with an interactive editor, but you still need to find out how to handle the things it isn't quite so good at. In the next two chapters of our ebook on Android the easy way, we look at spinners and pickers, the next step up from buttons and text controls.
Starting With an App
Third Edition
Is now available in paperback and ebook.
Available from Amazon.
- Getting Started With Android Studio 3
- The Activity And The UI
- Building The UI and a Calculator App
- Android Events
Extract: Using Lambdas
- Basic Controls
- Layout Containers
- The ConstraintLayout
Extract: Guidelines and Barriers
- UI Graphics A Deep Dive
Extract: Programming the UI ***NEW
- Menus & The Action Bar
- Menus, Context & Popup
- Resources
- Beginning Bitmap Graphics
Extract: Simple Animation
- Staying Alive! Lifecycle & State
- Spinners
- Pickers
- ListView And Adapters
If you are interested in creating custom template also see:
Custom Projects In Android Studio

Spinners are what are referred to as drop down lists or something similar in other UIs. They allow the user to pick from a list of possible items.
Pickers are similar to spinners in they allow the user to pick an item, but in this case the items are more narrowly defined - a date, a time or a number. Of the pickers the date and time pickers are quite well known but for an odd set of reasons the number picker has long been neglected.
Let's start with the Spinner and deal with the Pickers in the next chapter.
The Spinner And The Editor
The spinner presents a set of alternatives to the user and lets them select one.
Putting a Spinner into you project is as easy as using the toolbox in the designer but you can't get away without some Java to make it all work. In particular you need to define the list of items that the Spinner will display when the user activates it.
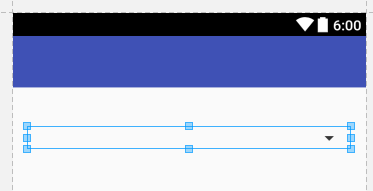
When you place a Spinner on the design surface all you get is a blank control with a non-functioning dropdown icon.
At the moment the editor only provides minimal support for setting up the Spinner with some data to display.
The simplest sort of thing to show the user is a list of text items and you might well think that the most direct way of doing this is to use a String array - and it is but things are slightly more complicated than this. They are simple, however if you create a resource to specify the String array because in this case the system will do everything necessary to load the data.
Setting the contents of the Spinner using a String array in code is a good way to see how the Spinner works but it isn't the way it usually happens.
Android provides a comprehensive system of resources - strings, images and lots of XML files. The idea is that you can produce customized versions of you application just by changing the resource files i.e. without having to modify your code.
For detailed information on using resources see chapter 9 - Resources
For example in the case of a Spinner you could set up a resource that was a String array that provided the list of items to be displayed. If you then wanted to create a version of your app for a foreign market you could get the list translated and created a resource in the new language.
Resources are a great idea and you should use them for all fixed strings and fixed data in general. So far the examples have tended to avoid resources to make things simpler but for a Spinner you need to know how to code up a String array resource and use it.
Android Studio does have some good resource support but in some areas it is lacking. For example, in an ideal world the system would help you create a String or String array resource but at the moment it only goes so far. While it does help you create a String resource it does nothing for a String array and we have no choice but work with the XML file.
That is - at the moment Android Studio only provides help for simple string values.
Find the file strings.xml in the res/values directory and open the file strings.xml. Add to this the String array definition:
<string-array name="country">
 <item>Canada</item>
 <item>Mexico</item>
 <item>USA</item>
</string-array>
The meaning of the XML is obvious and this is the advantage of a human readable markup language.
If you have explored resources using the Resource window which appears when you select the three dots option in the properties window you might worry that this new resource i.e. SpinnerList, doesn't appear. It also doesn't appear in the Resource editor that you can select while editing the XML file.
The reason is that currently Android Studio doesn't support the assignment, editing or creation of String Arrays other than manually.
However making use of the new resource is fairly easy.
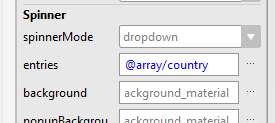
The id of the resource is @array/country and this has to be typed inot the entries propery in the Properties window as the Resource picker doesn't support arrays at the momement.
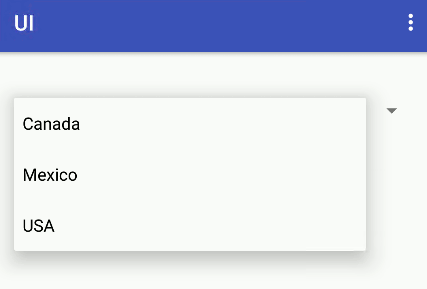
If you enter the id correctly you will see the first item appear in the Spinner within the editor. When you run the app you will see all of the entries when you drop the list down:
For simple lists of options that can be specified at design time this is all you need to know about how to load a list of items into a Spinner. In practice however a Spinner usually has to be loaded with a list at run time and then you need to know about the ArrayAdapter.
The ArrayAdapter
In the case of UI widgets that display lists of things Android has a much more general mechanism to cope with the different type of things you could display. Widgets that show lists of things generally work with an example of an "adapter".
For more on adapters in general see: ListView And Adapters.
An adapter basically takes a list of objects and converts them into something that can be displayed in the widget. In general you can create custom Adapters to do clever things with lists of objects of your own so that they display appropriately. In most cases however you can get by with just using the provided built-in adapters.
In the case of the spinner the most usual choice of adapter is the ArrayAdapter.
This takes an array of objects of any type and makes them suitable for display by calling their toString() method. As long as the toString() method produces what you want to see in the Spinner then everything should work.
In the case of an array of Strings calling the toString() method on each array element might seem like overkill but it is the price we pay to build mechanisms that can cope with more complicated situations.
So the plan of action is to create a String array with the items we want to display, use this to initialize an ArrayAdapter object and then attach the ArrayAdapter to the Spinner.
Creating the array is easy:
String[] country = {"Canada", "Mexico", "USA"};
The ArrayAdapter constructor can seem to be complicated. It seems even more complicated because ArrayAdapter uses generics to allow you to specify the type of each element in the array.
If you haven't used generics before, all you need to know is that in general generics are a way of creating useful classes, often collections of objects that can be of a type you specify. You know you are working with a generic when you have to specify the type it is to work with using <type>.
So instead of creating a special array Adapter for each type of array, an IntArrayAdapter, a StringArrayAdapter and so on, you simply have to specify the type as <int> or <String> when you use the generic ArrayAdapter type.
For example, to create an ArrayAdapter for an array of Strings you would use:
ArrayAdapter<String> stringArrayAdapter=
    new ArrayAdapter<String>(
              constructor parameters);
The pattern is the same for all the constructors and for different array types.
There are quite a few ArrayAdapter constructors, but they all need some basic information.
They need to know the current context, usually this, the layout to be used to display the list and the array of data items.
The only difficult one is the layout to be used to display the list.
This sounds like a lot of potential hard work until you discover that the system provides some basic standard layouts that you can just use. In our case the layout is:
android.R.layout.simple_spinner_dropdown_item
Notice that this is actually an integer that determines the layout resource to use and nothing more complicated.
Putting all of this together gives:
ArrayAdapter<String> stringArrayAdapter=
 new ArrayAdapter<String>(this,
 android.R.layout.simple_spinner_dropdown_item,
  country);
And if you are wondering what country is, you have forgotten that we defined a String array called country earlier.
The final step is to specify the ArrayAdapter to use in the Spinner. First we have to retrieve the Spinner and then we can use its setAdapter methiod:
Spinner spinner=(Spinner)findViewById(R.id.spinner);
spinner.setAdapter(stringArrayAdapter);
If you add all of the code to the onCreate event handler the result is:
@Override
 protected void onCreate(
                 Bundle savedInstanceState) {
 super.onCreate(savedInstanceState);
 setContentView(R.layout.activity_main);
 String[] country={"Canada", "Mexico", "USA"};
 ArrayAdapter<String> stringArrayAdapter=
  new ArrayAdapter<String>(this,
  android.R.layout.simple_spinner_dropdown_item,
  country);
 Spinner spinner =
    (Spinner)  findViewById(R.id.spinner);
 spinner.setAdapter(stringArrayAdapter);
 }
If you run the program you will see the same drop down list we produced using just the Layout designer.
|