| Android Adventures - UI Graphics A Deep Dive |
| Written by Mike James | |||||
| Tuesday, 07 April 2015 | |||||
Page 2 of 4
Layout - ViewGroupIf an Activity can only show a single View object how can we ever create a complex UI with multiple buttons, textViews and other widgets? The answer is, and you probably already guessed it, is that there are Layout or ViewGroup objects which can be used to host other View objects. You already know about using Layouts in the designer or in an XML file but they, like all UI elements correspond to particular Java classes that do the actual work. A ViewGroup can display multiple View objects. So in nearly all cases the View object that is associated with an Activity is a Layout View. When the Activity asks the Layout View to render itself, by calling its onDraw method the Layout calls the onDraw method of each of the View objects it contains and puts them together to make a single result. Of course it also performs a layout operation positioning and sizing the View objects it contains. So a Layout does two things:
To see this in action try:
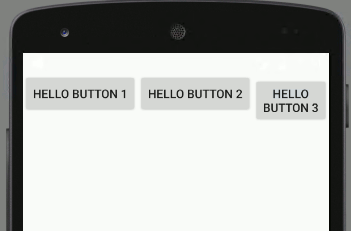
The first instruction creates a LinearLayout object. This is a subclass of View that can contain other View objects and it organizes them in a left to right or top to bottom way depending on the setting of its orientation property. Next we create a button object and then use the standard addView method of the LinearLayout to add it to the layout. All Layouts have an addView method and it can be used to add multiple View objects. If you run this program you will see a button right at the top left of the screen. You can add more buttons to see how the default linear layout works:
Layout PropertiesAt the moment we are relying on default settings for the properties and the layout properties in particular of the View objects we are creating. However, in practice you could spend the time and lines of code to set all of the properties needed to create any user interface and layout you wanted to. You now know how to create a UI completely in code. All you have to do is create all of the objects you need, set their properties and add them to suitable layout objects. This however is a little more complicated than you might think because each Layout type has a different set of layout properties. Exactly how this is done is easy enough but if you don't want to know about it at this stage you can skip on - it doesn't change any of the general principles. As explained in the previous chapter each Layout type has an associated class derived from LayoutParams called name.LayoutParams where name is the Layout class. For example, LinearLayout has the LinearLayout.LayoutParams class which is used to define all of the layout properties that a View object can use when added to a LinearLayout object. You can probably guess how to make use of the LayoutParams class. All you have to do is create a correctly initialized instance of the appropriate LayoutParams class and use setLayoutParams on any View object you want to customize. For example, to set the height and width of a button we could use:
There is a constructor for all of the LayoutParam classes that accepts just the width and the height properties. Once you have a LayoutParams object you simply set it on any View object you want it to apply to:
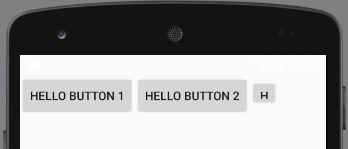
With this change the third button in our previous layout will be exactly 100 x 100 pixels. Notice that the constructor works in pixels not device independent pixels. You can also use constants for MATCH_PARENT and WRAP_CONTENT. There is also a constructor that allows you to set the wieght. Other layout properties have to be set using setProperty methods after the constructor has done its job. For example:
which sets the left, top, right and bottom margins accordingly.
More complex Layout objects have correspondingly more complex LayoutParams that you have to spend more time setting up. So to be clear - there are properties such as Text that you set directly on the View object but there are also Layout properties that you have to set on an appropriate LayoutParams object which is then set at the View object's LayoutParam property. The Layout HierarchyNotice also that a Layout can contain other Layouts and so the set of View objects that make up a UI is structured like a tree - the View hierarchy. When the screen is redrawn each View object is asked to draw itself and this is done for all View objects in the hierarchy from top to bottom. Normally the View hierarchy is drawn just once when the Activity loads. If an area of the screen is obscured by another graphic for any reason then the redraw is clever enough not to draw the entire View hierarchy. It only redraws View objects that intersect with the invalidated area of the screen. There is more to say on this later. The View hierarchy is also involved in passing events between objects and in determining which widget has the current focus. XML LayoutSo far the principles of the graphic system are simple enough. Every control or widget corresponds to a View object and you can build a UI by creating View objects in code and adding them to Layouts. You control the way the View objects are arranged using the LayoutParams object or by directly setting properties. An Activity will draw its View hierarchy to the screen when it needs to. OK, this is how to create a UI in code but so far we have been building a UI using the Designer. How does this relate to the View hierarchy? The Designer creates an XML file which describes the View hierarchy that you want to create. The way that this works is fairly obvious. Each tag in the XML file corresponds to a View object that you would like to create an instance of. For example:
would create an instance of a LinearLayout object. Nesting tags within a layout indicates that the object created need to be added to the layout as child Views. For example:
would create a LinearLayout object and a Button object and then add the Button object to the LinearLayout using its addView method. You can see that the XML captures the idea of the View hierarchy perfectly. To set object properties all you have to do is is use the corresponding attributes in the XML. For example to set the button's text you would use
Layout parameters are set using properties prefixed with layout_property. For example:
That is really all there is to it. The XML defines a hierarchy of objects and their properties and the system reads the file and creates the objects. This use of XML as an object instantiation system is not an uncommon one. Of course, the XML created by the designer looks a lot more complicated than the examples above but this is mainly because of the number of attributes it defines. The basic idea is still the same. |
|||||
| Last Updated ( Friday, 28 October 2016 ) |


