|
Page 1 of 4 jQuery's animation functions are built on the use of the default function queue. They are easy to use, but can sometimes be confusing because of the way they mix different ways of showing and hiding elements.
This is an extract from my book Just jQuery The Core UI.
Available as a Book:

buy from Amazon
- Understanding jQuery
- Basic jQuery CSS Selectors
Extract: The DOM
- More Selectors
Extract: Basic Selectors
- The JQuery Object
- Filters
- DOM Traversal Filters
- Modifying DOM Objects
Extract: Modifying The DOM
- Creating Objects & Modifying The DOM Hierarchy
- Working With Data
Extract: Data ***NEW!!!
- Forms
- Function Queues
- Animation
- jQuery UI
- jQuery UI Custom Control
- Easy Plugins
- Testing With QUnit
- Epilog A Bonus Function
Also Available:

buy from Amazon
In the previous chapter we looked in detail at the jQuery function queue - a way of running a set of asynchronous functions one after the other in such a way that each is completely finished before the next starts. This is the basis of jQuery's animation system. Each special effect is an asynchronous function that animates some part of the UI for a specified time. These animation functions automatically make use of the default function queue to run sequentially without blocking the UI while they are working.
As well as a set of predefined animation functions there is also a custom function that you can use to create your own animations.
Let's start with one of the predefined functions and see how it works.
FadeTo
There are a set of animation functions that change the opacity of an element - generally called the "fade" animations. The fade animations modify the CSS opacity property, but some of them do a little more than this and this can be confusing if you don't know exactly how they work. The purest and the best example of an animation function is fadeTo as this only modifies the opacity.
The opacity property has a value between 0 and 1 with 0 being completely transparent and 1 completely opaque. Of course elements that you create in HTML have their opacity set to 1 by default. If you want to see an opacity directly you can use
style="opacity: value"
where value is between 0.0 and 1.0.
The simplest of the fade animation functions is fadeTo which will animate the opacity from its current value to the specified value. You have to at least specify the speed of the animation and the final value. For example:
.fadeTo(1000,0.5);
animates the elements that match so that their opacity is 0.5 after 1000 milliseconds, i.e. 1 second.
To see this in action try:
<body>
 <button id="button1" style="opacity: 0.0">
   mybutton
 </button>
 </body>
 <script>
 $("#button1").fadeTo(1000,0.5);
 </script>
Notice that the animation proceeds from whatever the opacity is to the final value. In this case the effect is a fade in as the opacity goes from 0.0 to 0.5 in 1 second. If you start with an opacity higher than the final value then it will be a fade out as the value reduces to the final value.
It is also important to realize that each element is animated independently from the rest. For example, if you have two buttons to animate, one set to opacity 1 and the other opacity 0 then animating them to 0.5 sees the first fade out and the second fade in.
You can also use "slow" and "fast" for the duration of the animation and by default these are 600 and 200 milliseconds. The default speed is 400 milliseconds. These can be changed by assigning to the fx.speeds property. For example
$.fx.speeds.slow=1000;
$.fx.speeds.fast=100;
$.fx.speeds._default=500;
sets slow to 1 second, fast to 100 milliseconds and default to 500 milliseconds, i.e. half a second.
You can also specify a function that will be called when the animation is complete.
Easing
The fadeTo function is very simple in that it changes the opacity from what it currently is to the target, taking the time you specify to do the job. However, there a number of other parameters that you can use to control the animation and these are general to all of the animation functions. The most important is easing, although unless you also use jQuery UI you have only two choices of easing.
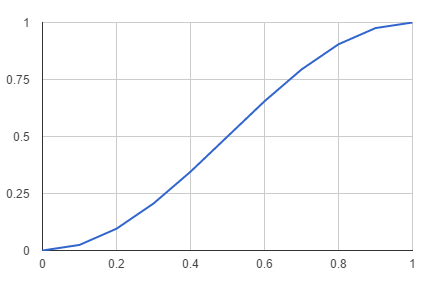
Easing is simply the speed at which the animation occurs. For example you could change the opacity slowly at first and then ever more quickly. There are two easing function provided by jQuery - linear which changes the opacity or other animated property evenly through the time period and swing which starts and finishes gradually:

This chart of swing easing has percentage time along the horizontal axis and property value on the vertical axis.
To specify easing all you have to is specify "linear" or "swing". For example:
$("#button1").fadeTo(3000,1,"linear");
You can add your own easing functions directly to jQuery, but the recommended way to do this is using jQuery UI.
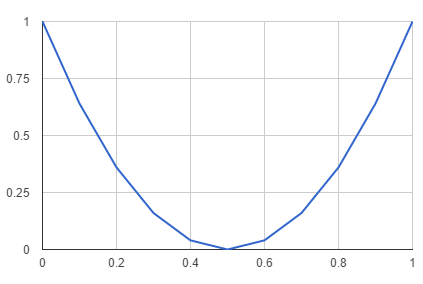
For example, you could specify an easing function that changes the property from a maximum to 0 and then back to the maximum:

You could do this with:
$.easing.twinkle = function (p) {
  return (p - 0.5) * (p - 0.5)*4;
 }
and to use it:
 $("#button1").css("opacity",0)
       .fadeTo(3000, 1, "twinkle");
The css opacity setting is done to give the animation something to do in case the button is already set to opacity 1.0.
In general you can add an easing function by adding a property to $.easing that implements the easing characteristic you want.
The full range of possiblities for calling fadeTo are:
fadeTo(duratio,opacity,easing,complete)
and you can leave out the easing parameter, i.e. the name of the easing function and/or the complete parameter - a callback to use when the animation is over.
|


