| jQuery UI and Auto-Complete Address Entry |
| Written by Ian Elliot | ||||
| Tuesday, 18 April 2017 | ||||
Page 1 of 3 jQuery UI has a little-known feature that makes interactive auto-complete very easy. In this hands-on tutorial we put it together with the cloud-based Global Express Entry address auto-complete service from Melissa Data to smooth over one of the biggest problems in getting users to sign up. There are many things that users hate having to do on a website, but they all come down to the same thing - they hate having to do work. Of all of the things you can ask a user to do, typing in their name and address probably qualifies as one that involves most work. How many potential customers give up on a purchase because they find typing in a full address too irksome. Even if they do go through with it, how can you be sure they have done it correctly. Most users aren't expert typists and easily make a mess of their data entry. The cost of trying to ship something to an invalid address is obvious. The best idea is to provide instant feedback on any data entry field. Don't wait until they have finished the complete form and then nag them about some mistake you could have picked up while the field had the focus. If possible provide auto-complete so that as they type their choice is narrowed down to the point where they can simply click to select a data-perfect validated entry. This is where jQuery UI's autocomplete widget comes into the picture. It makes adding autocomplete to any field that can accept input. As an example of using it let's make an autocomplete feature for an address - the most work you can ask a user to perform - using a cloud service that is remarkable for its ease of use and comprehensive coverage, Provided with the bare minimum of an address, Melissa Data's Global Express Entry, will autocomplete and verify an address from anywhere in the world returning a full address in the standard format accepted in the country concerned. Any address can be converted into the "Latin" alphabet and, to aid delivery services, maps showing the latitude and longitude based on Google maps are provided. The onsite demo has examples and lets you experiment freely:
Obviously, not all countries are verified to the same level, but I think you'll be impressed by coverage of over 250 countries with 200 of them at street level or better.
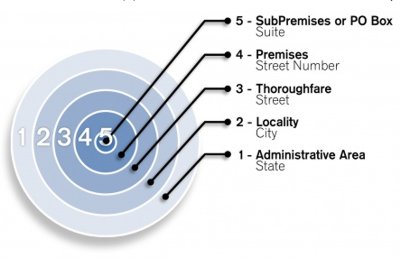
You can see a full list of coverage at: Address Coverage by Country. Currently there are 51 countries at address verification level 2, locality, the lowest level represented, including Antarctica, British Virgin Islands and Western Sahara. A further 77 countries, including Afghanistan, Barbados, Bolivia, China and Ghana are at level 3. The most common classification, 77 countries,is level 4 which applies to Japan, India and many European countries, including Austria, Belgium and Spain. Level 5, which get to individual premises is available for 30 countries, notably USA, Canada, Australia, Russia, France, Germany, Greece and the UK. With regard to mapping, this is provided at locality level for Hong Kong, at the equivalent of address level 4 for 33 countries including Australia and most of Europe and at the equivalent of the top level for USA, Canada, Australia, Czech Republic, Germany, Russia, and Ukraine. The cloud service uses a simple REST API and returns XML or JSON. You can also use a desktop version and there are plugins for Excel and other apps. Adding Express EntryHere we look at adding it to a simple form. To try this example you will need a key which you can get as part of a free trial. First we need to use jQuery to add autocomplete to a form element.
Basically all we are doing here is loading the latest jQuery, jQuery UI and a basic stylesheet. Update to the latest version of any of these in the future and everything should still work. We also need a basic form to input some addresses. As with all examples, the simpler the better:
You can see that we have an input text field for the user to start to type the address and a textarea ready to display the address. The way that the autocomplete widget works is very simple and typical of the way all jQuery UI widgets work. To create the widget all you do is call its constructor function, which always has the name together with an options object which specifies how it looks and behaves. In the case of the autocomplete widget, all we have to do to add the feature to the address text field is:
Of course, we have to specify options to make it do what we want. The most important option is source which specifies where the autocomplete data comes from. It can be an array of strings or an object containing label value pairs or it can be a URL as a string or a function. The array of label value pairs is particularly useful because the label is shown to the user so that they can pick the correct autocomplete, but it is the value that is inserted into the field. This allows you to provide the user with data in one format, but enter it in another. The array and strings option is used to provide local autocomplete data the other two are used when the data comes from a server. For example:
In this case when the user types a c the list of three possible autocompletes appears.
Notice that autocomplete is doing quite a lot of work for you. You don't have to arrange the data or select what is going to appear when the user types. In addition, if the user selects one of the items it is entered into the field. Using local data in this way has the advantage of being fast, but in most cases the autocomplete is going to be far more complicated and you are going to need to contact a remote server. The autocomplete widget allows you to specify a URL that it will get a JSON or JSONP response. In this case it doesn't filter the result and so the server needs to use the GET query parameter term to find out what the user is typing. In most cases you are going to want to use the final option, which is to provide a function that gets and processes the data. This function has two parameters - a request object with a single term property which stores what the user has types so far, and a response callback which has a single parameter which is the data to suggest to the user as string or an array. So for example:
|
||||
| Last Updated ( Tuesday, 18 April 2017 ) |