| Getting started with App Inventor 2 |
| Written by Mike James | ||||
| Thursday, 18 December 2025 | ||||
Page 1 of 3 MIT App Inventor is the ideal way to get started with programming, but getting started with App Inventor has some small problems all of its own. In this guide we find out the best way to write and run a simple program. A Programmers Guide To Languages
Contents
App Inventor is an amazing way to create Android applications. You don't need to be able to program to use it, but if you can then all the better. All I can say is that as a programmer this is the first time in quite a while that a development environment and its associated "language" has brought a smile to my face. It's not perfect, but if you give it a little room to grown on you might just smile as well. Although App Inventor is sometime described as an educational toy that you can use to get kids interested in programming, don't let this fool you into thinking that you can't do real things with it. It makes a very good prototyping facility and a couple of the prototypes that I have created have actually ended up as final apps that are still in use. Getting startedThe worst part of trying any new programming environment is having to download and install things. For the App Inventor this is less of a problem because most of it is designed as a web application. Everything runs in the browser until you actually want to run the Android program you have created. To use it you need a Google account - if you don't have one it is worth signing up. To run a program you will need either a real Android device or you need to install the Android emulator. Of the two options a real Android device is by far the best choice because the Android emulator is slow and has a tendency to crash. You don't have to install the emulator or get your Android device ready to use before you start creating an app - this only becomes an issue when you want to run an app. When you are learning a new system there is a lot to be said for the simpler the better. So lets create a Hello World app. Hello WorldTo get started go to If you are already signed in to Google you will be able to go straight to MyProjects - if not sign in and accept the terms and conditions. MyProjects lists all of the projects you have created and allows you to add new ones. In MyProject click the Start new project button. Enter HelloWorld and click the OK button. After a few moments you should see the App Inventor Designer window open. Anything you create using the App Inventor under the project named HelloWorld will be saved under your account for you to use the next time you log in.
Before getting started you need to know that the Designer, as its name suggest is used to design and create the user interface of your application. If you have used a drag-and-drop designer for any other programming language, Android Studio say, this will be nothing new to you. Notice that the designer doesn't provide any behavior for the user interface you create - this is all done using the Blocks Editor which is the second member of the team. So to sum up:
and
We will come to the Blocks Editor in a moment. For now let's just design a simple UI - in fact the simplest UI that can be made to do something. The DesignerThe Designer is split into four regions -
First button and textboxTo get started all we need to do is place a button and a TextBox on the Viewer. To do this simply make sure that the User Interface tab is selected, click and hold on the button icon and drag it to the viewer and release the button. If this doesn't seem to work for you give the web page a moment or two - it can be slow to respond. Repeat the drag-and-drop for the Textbox.
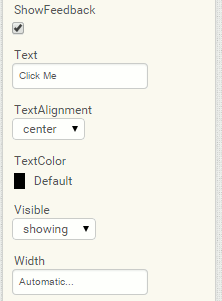
The components will arrange themselves on the screen. There are ways that you can control the layout but for the moment let's concentrate on getting the example working. If you select the Button object in the viewer and look at the Properties panel you will see lots of settings that effect the way the Button looks. To change any of these simply type or select a new value. In this case all we need to do is change the Button's text. Scroll down until you find the Text property and enter into the box below - Click Me.
When you return to the Viewer you will find that the Button now says "Click Me" - if it doesn't you haven't left the Text entry box. Either press return or click another area of the page. This completes our very minimal UI! In a real application you would spend much longer creating a suitable UI including uploading graphics and sound files to use with it. You will also go through many iterations of creating and tweaking the UI as you gain experience from using the app for real. |
||||
| Last Updated ( Tuesday, 23 December 2025 ) |