| Creating The Python UI With Tkinter - The Canvas Widget |
| Written by Mike James | ||||
| Thursday, 23 April 2020 | ||||
Page 2 of 3
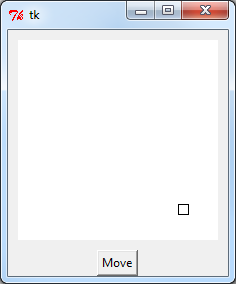
Bounce the ballThis suggests a simple example bouncing a small rectangular ball around the canvas. The only new idea we need is some way of executing the move function after a regular time interval. You could do this using the thread sleep but this has problems in that used in the simplest way it freezes the UI. A much better solution is to use the root window's after method. The call
will call the function after ms milliseconds.It does this using the event queue so the UI stays active during the wait. If you need to pass some arguments to the function use:
To call a function periodically you simply have to add the call to the end of the function so that it adds itself to the event queue:
The main program is:
There are better ways to organize a program like this but this is the main idea. Notice that Dx and Dy play the role of velocities and when the ball reached the edge of the canvas these are simply reversed to provide a bounce.
It you try it out then you will find that it isn't the smoothest animation ever but it works and it demonstrates the idea of the canvas being a retained mode vector graphics system. Notice that you don't have to blank out the old ball position because the canvas does the redraw for you. Add a couple of bats and a net and you have Python Pong... ShapesNow that you have met the rectangle and seen how it works it is easy to figure out how to use the other drawing methods:
All of these do what you expect them to do from their name and they all return an object Id so that you can continue to work with the graphic object you have created. You need to lookup the options that can be used with each of the graphics objects but apart from this it is all - as for the rectangle. For example to replace the rectangle with a circle you would use:
Some of the methods have quite complicated lists of options but if you look them up you should be able to work out how to draw what you need. The only method that might need some explanation is create_window. This allows you to put any existing widget on a canvas. For example,
This allows you to mix widgets with general graphics. You can only place one widget into each window object. use a frame if you want to add a group of widgets in a single window. Text on a canvas is easy enough:
the only complication is that the location is the center of the text not the top corner. Working with text in a canvas can become complicated if you are going to allow the user to interact with it. Working with text is the subject of another article. |
||||
| Last Updated ( Thursday, 23 April 2020 ) |