| Commando Jump Game For The Micro:bit In Python |
| Written by Mike James | ||||
| Friday, 15 April 2016 | ||||
Page 1 of 3 The Micro:bit is quite a capable computer but it does have one limitation - it only has a 5x5 LED matrix display. What sort of game could you possibly program on that! In this project we resurrect a classic BBC Micro game on the BBC micro:bit. Games have always been a great way to get into programming so why should the micro:bit be any different. In this article we implement the game in MicroPython development, but if you want to use the Microsoft Blocks editor see Micro:bit Commando Jump In The Microsoft Block Editor.
Back in the days of the BBC Micro I was involved the development of a game called Commando Jump that was included in the book 21 Games for the BBC Micro. It was, by design, a very simple game intended to teach BBC Basic programming. It presented the player with a wall that the commando had to climb. The initial jump height was determined by the player's reaction time. After that they could make the commando scramble up the wall by pressing a key as fast as they could. The faster, the higher the commando climbed. If you reached the top of the wall before that time out then at the next level there was a higher wall. If you didn't make it the commando would slide down with a deflated noise.
A 5x5 LED display is just enough to implement this game. Not in all its many-colored glory but we can reproduce some of the original game play - and the temptation of re-implementing a game from the BBC Micro days on the BBC Micro:bit days was too good to miss! In the rest of this article it is assumed that you have a Micro:bit and know a little Python but not that much. Getting Started With MicroPythonMake your way to the Micro:bit website, www.microbit.co.uk, click on Create Code, choose the MicroPython editor and start coding.
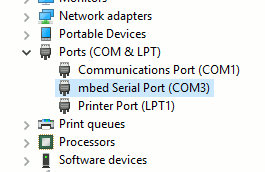
All you do is enter the program into the editor, click the download icon and then copy the download onto the Micro:bit usb drive. When you connect the Micro:bit to your desktop computer it installs itself as a USB drive - this is the only communication the PC needs with the Micro:bit as any program copied there is immediately loaded and run. The MicroPython editor is very easy to use but there are some difficulties that we can do something about. When you enter a program there is no online syntax checking. This means you can download a program and the first thing you know about even a really big error is that you see an error message scrolling across the LED display. You might be better than me at reading the LED, but it can be difficult to spot the line number go by and the rest of the message is often cryptic on first reading, to say the least. The solution is to set up a debug console. The REPLYou don't have to do this step but if you are going to be developing using MicroPython then I strongly advise it. Without it you are going to have to do a lot more work to debug your programs. I would even go so far as to say that MicroPython isn't fit for purpose without it, if that purpose is to teach children to program. Even with it MicroPython is the most unfriendly of the supplied programming languages because it does no syntax checking before you go to the trouble of downloading and running the program. Having a console where you can see error messages and see debug output is essential for an efficient and stress free programming experience. The steps to get a debug console, also more commonly known as a REPL - Read Evaluate Print Loop - are very easy. First you need to set up a USB serial connection to the Micro:bit. This is the default on Linux and the Mac but you have to install it under Windows. To do this you need a driver. I suspect that any USB serial driver for the OS of you choice will do, but the offical drivers for the Micro:bit can be downloaded from: https://developer.mbed.org/handbook/Windows-serial-configuration It should just install as it is a very standard USB driver. When you have the driver installed you need to discover what new serial port has been added to your system. Use the device manager to examine the serial ports. The one you want is called mbed Serial Port.
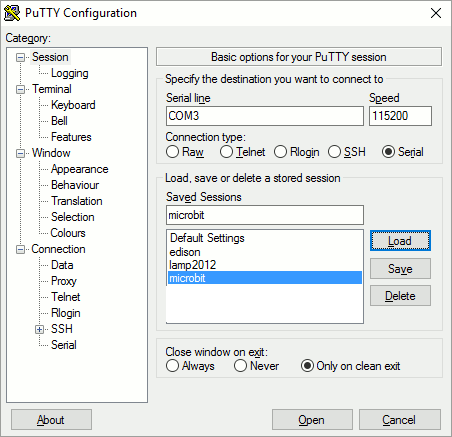
In this case the port is COM3, but this isn't always the case. Next you need a serial console program to run on your PC. There are a lot of different possible choices, but I would advise using PuTTY because its versatile and works with serial and SSH connections. Learning to use PuTTY is a skill worth the effort in acquiring. Download and unzip PuTTY. Open it and enter the details of the serial connection you want to make. You need to enter the COM port number that corresponds to the mbed serial port and the speed of 115200 and the rest of the parameters can remain at their defaults.
When you run the console you will be able to interact with your Python program, see error messages and any information you care to print. For example:
will cause hello world, new line, to be displayed on the serial console.
will display the current value of count. This really does make debugging easier. |
||||
| Last Updated ( Saturday, 23 April 2016 ) |