| Building Geo-tracking Apps with AngularJS, Ionic, and the Salesforce REST API |
| Written by Mikhail Yurasov | |||
| Thursday, 26 June 2014 | |||
Page 1 of 2 This project, based on the Force.com REST API, takes you through the steps required to create an iOS Geo-tracking app using free resources and open standards - OAuth protocol and RESTful APIs - ideal for a multi-platform environment.
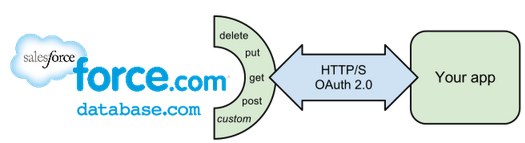
In this tutorial we will create an app using the Salesforce REST API together with the Ionic framework (http://ionicframework.com), AngularJS (https://angularjs.org) and Apache Cordova (http://cordova.apache.org/). The Ionic framework offers a library of mobile-optimized HTML, CSS, and JS components for building highly interactive cross-platform mobile apps. It is built on top of Apache Cordova and optimized for AngularJS, thus giving your application a clear structure and usage of best practices. REST APIs are accessible from any environment that can send an HTTP request. In many ways, it's the most flexible way to communicate with Salesforce Platform and gives you the ability to fully control your data flow.
We will go through the following steps:
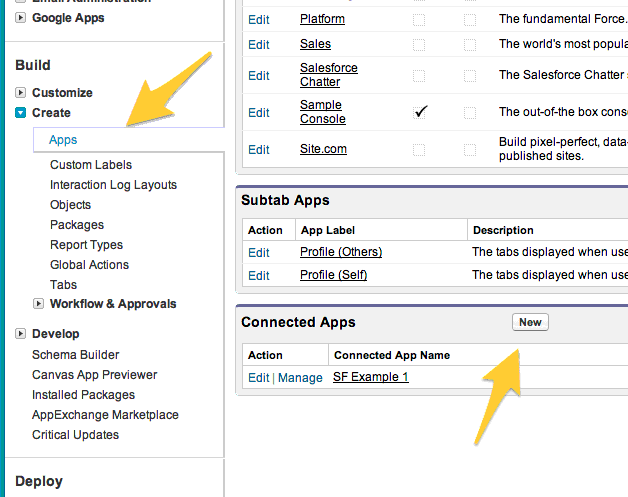
Creating a Salesforce Connected AppLet's create a Connected app on Force.com:
You may have noticed we're using a custom URL scheme for the callback. Our app is registered in the system as the one that opens this type of URLs, so we get a callback when the user is done with the login process on the Salesforce Developers web site. We're going to use a custom object for storing location data in the salesforce cloud, so we need to create one:
Now we need to install the Ionic CLI tools. Since Ionic is built on top of Apache Cordova, we need to install it too. Provided you already have nodejs and npm on your system (here are instructions on how to install them if you don't), run the following commands in your terminal:
Go to https://github.com/myurasov/Salesforce-REST-API-Ionic-framework-app-sample and copy all the files from the repository to the current folder. The app uses a few of the Cordova plugins:
Install them by executing the following commands: cordova plugin add https://github.com/EddyVerbruggen/LaunchMyApp -PhoneGap-Plugin.git --variable URL_SCHEME=sfsampleapp cordova plugin add org.apache.cordova. inappbrowsercordova plugin add https://git-wip-us.apache.org/ repos/asf/cordova-plugin-geolocation.git
Edit www/js/app.js and replace ---your-app-client-id--- with your Salesforce Connected App Client ID (can be seen in your Force.com developer account under Create > Apps > SF Sample 1 > Manage). Now, you should be able to launch your app. Run the following commands to open the app in the iOS emulator (iOS SDK needs to be installed to run the commands): ionic platform add iosionic build ios ionic emulate ios
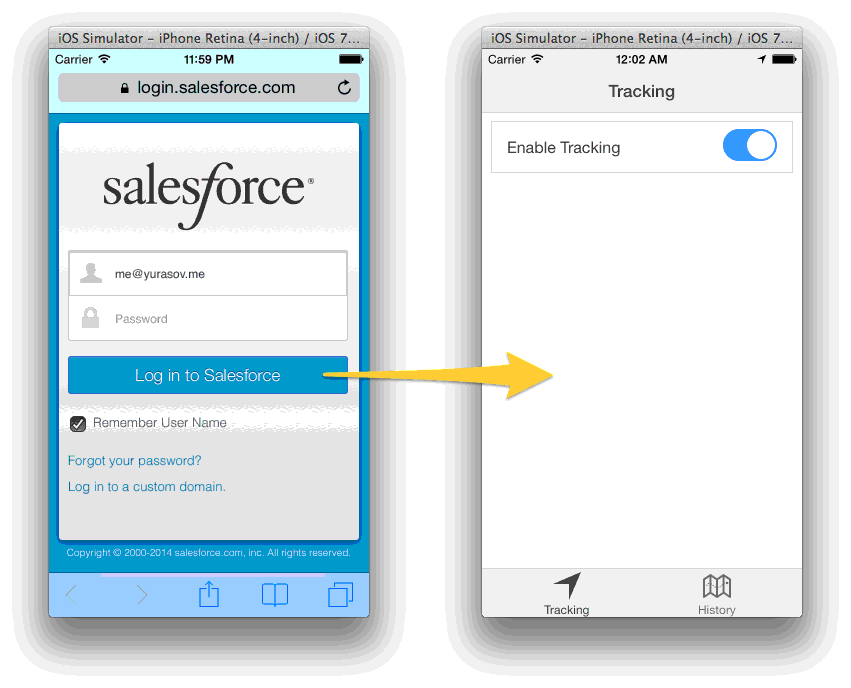
You should see the app loading and then opening the Salesforce login page. After entering your login credentials and pressing "Log in to Salesforce", the app is opened, ready to be used:
|
|||
| Last Updated ( Thursday, 24 July 2014 ) |