| Building JavaScript controls |
| Written by Alex Armstrong | |||||
| Wednesday, 23 September 2009 | |||||
Page 4 of 4
A Custom CalendarThe final example demonstrates one of the real powers of the JavaScript approach to building controls. Not only can you wrap existing HTML controls, you can extend what is available by creating custom controls. For example, HTML has no calendar tag and hence there is no calendar class within the DOM, but it is possible to create one based on the table class just developed – after all what is a calendar but a table with numbers in it. The first thing we need is the table: calendar=function(parent,month,year) The top row is going to contain the days of the week and setting the width of its cells sets the width for each column: var width="30px"; There are probably clever ways of entering the days of the week into the top row but the most direct is: DOMObj.cellvalue(0,0,"Sun"); At this point we have a table with fixed width columns displaying the days of the week in the top row. Our next problem is very standard and has little to do with JavaScript or using the DOM. We need to work out what day the first day of the month is. This is just an exercise in using date and time functions, specifically JavaScript’s date object and its associated methods. First we need a date object corresponding to the first day of the month that we are constructing the calendar for: var d=new Date(year,month-1,1); Notice that JavaScript has January as month zero. This date object is used to get the weekday number, counting Sunday as day zero: var FirstDay=d.getDay(); The weekday number gives us the column that the calendar starts in. We now need a for loop to step through the number of days in a month. One small problem is that there isn’t a simple way of discovering the number of days in a month. We know that there can’t be more than 31 however so the simplest solution is to create a for loop that always steps through 31 days and simply ignore the loops where the month changes: for(var day=1;day<32;day++) The setDate method sets the date object to the day specified but if the day goes beyond the number of days in the month then the month rolls over to the first day of the next month. So as long as the current month agrees with the specified month we can proceed to fill the table. First we need to work out the row and column of the cell that is to hold the date. We can easily work out the number of the cell that is to hold the date ignoring rows and columns, that is treating the table as just one long string of cells: var offset=FirstDay+day-1; We can then convert this into the row and column numbers using simple arithmetic operators and functions: var r=Math.floor(offset/7)+1; To see how this works try evaluating it with a few test values of offset. Now we have the row and column we can store the day of the month number and centre the entry: DOMObj.cellvalue(r,c,day); These two actions are repeated on each cell of the table that correspond to a valid date in the same month. At this point we could finish the for loop and try the calendar out. It would work but it wouldn’t be much use apart from allowing a user to see the dates in a month. To be more useful the control needs to allow the user to select a date. In other words we need to add some “behaviour” to the control and this means using some event handling. The problem is that event handling is the most non-standard and messy technology with virtually none of the browsers doing it in the same way. What we need to do is respond to a user clicking on a cell by changing the appearance of the existing “selected” cell back to normal and the new selected cell to bold – or reverse foreground background colours or whatever you want to do to indicate which cell is selected. This means that we have to associate an event handler with each cell. This doesn’t sound very efficient and in an ideal world the best way of dealing with this would be to allow the event to “bubble” up to the containing object – i.e. the table in this case. In theory you can just write a single click event handler for the table and discover which cell actually triggered the event. Unfortunately event bubbling and finding out the source of an event are things that different browsers do in different ways. As there are only a maximum of 31 active cells, and what we are doing in response to each event is trivial, defining 31 event handlers isn’t so bad. Setting the onclick event handler for each cell is easy: DOMObj.cell(r,c).onclick= function(e) The key to understanding how this event handler works is to know that when an event occurs on an object the “this” variable is set to the identify of the object. In theory the “this” variable should remain set to the identity of the triggering object if you choose not to handle it and allow the event to bubble up to the higher levels – but for reasons that aren’t clear IE, for example, sets “this” to point to the main window. Notice also that it is assumed that there is already a selected cell and we set the fontweight of the currently selected cell back to normal. By storing “this” we create the newly selected cell and indicate this to the user by setting its fontweight to bold. So that we can easily discover what date the user has selected, the day of the month is also stored in a selectedDate property. The final line calls the onDateChange member function which acts like a new event that we call when the selected date is changed. This also has to be initialised to a null function to allow everything to work even if an event handling function isn’t supplied.
This ends the if statement and the for loop but we have one more thing to do. There always has to be a selected date so we need to add lines to automatically select the first day: DOMObj.selected=DOMObj. We also need to initialise the new event: DOMObj.onDateChange=function(){};
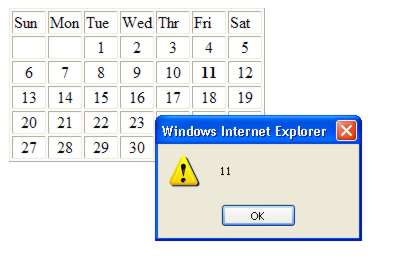
Now all that remains is to return the pointer to the newly created calendar object: return DOMObj; Now it’s time to try it out: cal1=new calendar( This creates a calendar object and displays the day that the user has selected in an alert box.
This is still an unfinished control and in particular it needs a method to set the month displayed without having to create a new calendar – but this is very easy to do and is included in the code in the Codebin. If you would like the code for this project then register and click on CodeBin.
|
|||||
| Last Updated ( Wednesday, 23 September 2009 ) |