| Getting Started With Google's Android Things - Preview 2 |
| Written by Harry Fairhead | ||||
| Monday, 13 February 2017 | ||||
Page 2 of 3
Simple GPIOFrom here all you have to do is make use of the new classes and methods provided by the Things support library. There are classes to interface to the GPIO lines including PWM, I2C, SPI and Serial bus. Using them is just a matter or reading the documentation and dealing with the hardware side of the connection. As an illustration of how things work let's see how fast we can toggle a GPIO line. This will give a rough idea of how fast things can be done in Things - the results might surprise you. To use the GPIO you have to know what each pin is called and use an appropriate String identifier. There doesn't seem to be any attempt to standardize names between platforms as there is in, say, mBed. To find out what pins a device supports you either have to look in the documenation or run a small query program:
To make use of the PeripheralManagerService you need to add:
The documentation gives the Pi's GPIO pin outs as:
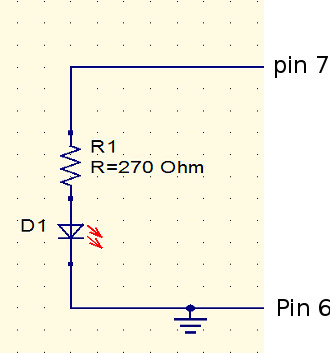
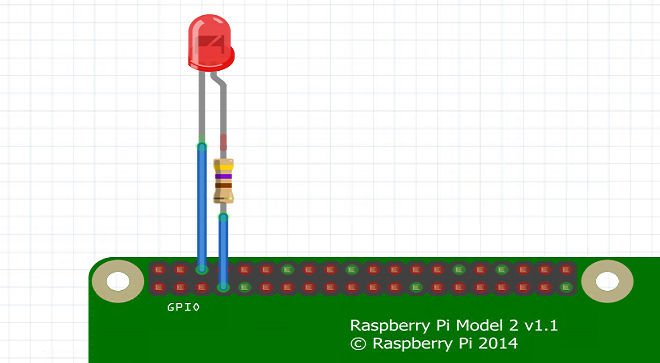
The list of pin names returned by the code corresponds to all of the BCM pins, which means you cannot choose to use the I2C or SPI pins as GPIO lines. To flash an LED connected to BCM4 (i.e. pin 7) you would use:
Notice that the GPIO line is selected using a string identifier "BCM4" and there are configuration methods to set it to output and active high or low. The actual work is done using the setValue method. The SystemClock.sleep suspends the thread for the specified number of milliseconds. If you try the program with suitable hardware you should see an LED flash slowly - this is Blinky in action.
How Fast?A question that always has to be asked when using a new platform is how fast can you go? Putting this another way, how much of the device's processing power is actually available to you? The Pi 3 is a fast quad-core device and it runs Linux fairly fast. In fact, it is among the fastest IoT devices I use so I was very hopeful of good results. First a modified Blinky program toggled the GPIO line as fast as possible:
Connecting a logic analyser to the pin revealed the following timings:
The fastest pulses seen are around 0.23ms and there are lots of large (up to 8ms) interruptions in the pulse train. Compare this to the same program implemented in C, which can be found in Raspberry Pi IoT in C, running on the Pi 3. This has a smallest pulse of around 45ns. It too has some irregularities but not as bad as in the case of Android Things. That is, the Java program is running a staggering 5,000 times slower than the same program in C. With such a slow control over the GPIO lines, there are a great many things that you could not use Android Things for. You most certainly couldn't use it for anything that needed even a reasonably fast response time. If you think that 0.23 ms is fast enough, then consider flashing say ten LEDs on and off. A Things controller inside a robot vacuum cleaner stands a good chance of falling down a staircase by the time the program manages to scan a clutch of sensors. There may be ways to speed things up, but this all depends on how well the asynchronous event notifications have been implemented. Even so it is clear that if you are planning to do anything even slightly demanding you are going to have to worry exactly how it is implemented. At the moment the verdict has to be that Android Things takes one of the most powerful IoT devices available and brings it to its knees. User Drivers A Solution?This also means that the ability to write user drivers is also crippled. It is fine if you simply want to read and write a new I2C or SPI device because the low level interfacing which needs speed is taken care of by the hardware and system software. What it doesn't help with is connecting any custom or unsupported bus device. For example, where is the 1-wire bus and what about the DHT22? At the moment there seems to be no way to use them. A possible solution is to use the NDK to write native code. This feature has been introduced in preview 2 but at the moment it isn't particularly easy to use. As an example of getting started with the NDK we can modify one of the samples to toggle a GPIO line as fast as possible. To get started with the NDK you first have to install it using the SDK manager. Select SDK tools and tick the NDK box. You also need CMake so tick its selection box as well. The installation takes some time. Once the NDK is installed we can download the sample-nativepio project from GitHub https://github.com/androidthings/sample-nativepio This has a number of modules but the only one we are interested in at the moment is blink - which simply flashes an LED. Once you have the project simply copy it into the Android Studio project's directory. If extract it from the zip you will end up with sample-nativepio-master as a folder in the AndroidStudio Projects directory. Next you need to install the Android Things native library, which you can download from GitHub androidthings/native-libandroidthings If you download this as a zip you can extract it into the root of the project folder. However you will need to rename its folder to libandroidthings. The final folder structure should look like:
If you are using a Windows system there is also a misconfiguration problem. Select the blink module and try running it, just incase the problem has been fixed. If you get the error message:
Then edit CMakeLists.txt which you will find in libsandroidthings\armeabi-c7a\lib Change the lines:
to read
Make sure you enter the path on a single line and replace username with your user names i.e. make sure you enter the path to the .cpp file. Now the project should compile and run.
<ASIN:1871962463> <ASIN:1871962447> <ASIN:187196251X> |
||||
| Last Updated ( Sunday, 26 March 2017 ) |