| Mastering VB Controls |
| Written by Mike James | |||||
Page 2 of 4
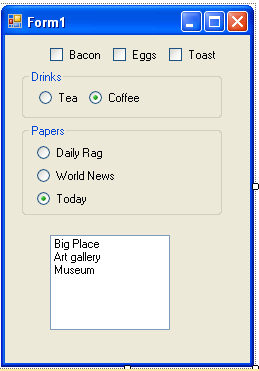
Step Three - ListsUsing the command Button, CheckBox and RadioButton you can already provide a lot of different ways to allow the user to select options but sometimes the possible choices change too often to build a form with multiple RadioButtons. For example, suppose that as part of the breakfast ordering form you need to give the user the ability to select which sightseeing tour they would like to go on. They can clearly only go on one tour that day and so you could build a form with an option button for each tour - but this would have to be changed each day.
A better option is to use a ListBox control. You can use this to display a list of options to the user and they can select one option from the list. What makes this flexible is that the items in the list can be specified when the program runs. To do this you have to use the Items property and its Add method. Of course the complication introduced here is the idea of the list itself. We have to find out how to work with lists of items. This introduces two new ideas. The first is the idea of a collection. The Items property is a collection of objects that the ListBox will display as a list in the order that you added the objects. How this works will become clear after the example. The Add method is an example of an action that an object can perform. You can think of it a bit like an event that you can make happen simply by writing its name: For example, you can write ListBox1.Items.Add("New Choice")
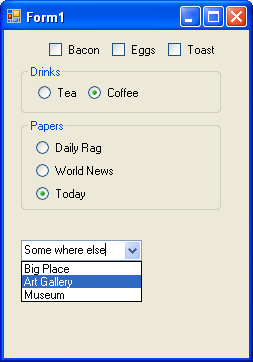
to add the item "new choice" to the list in the list box called ListBox1. You can add items to the list box anytime you want to. In the case of the day trip example the program would find out what day trips were on offer and would fill the list box with all of the options. If the number of options exceeds the space that the list box has been allocated then scroll bars are automatically added. To find out which item the user has selected you simply use the SelectedItem property. For example: ListBox1.SelectedItem There are lots of different ways of customising the way a ListBox looks and behaves but this is all you need to know to start using it. Step Four - ComboBoxesListBoxes are fine if you want to give the user a choice from a list of items that might change or even if the number of possibilities is large. One thing a ListBox cannot do is allow the user to type in an option that you hadn't thought of. For example, the user might want to type in a day trip that you hadn't planned and if enough users were to suggest the same trip you could organise it for them - real interactive holidaying! If you want to give the user a choice from a list of possibilities but still allow them to type in a choice not on the list - then you need a ComboBox.
A ComboBox works in roughly the same way as a simple ListBox but now the user can type a new value into it or select from the list that appears when they click on the arrow at the right of the box. As before the Items property is a collection of the items in the list - but notice this time the user can add to the collection by typing something new in. The ComboBox has most of the methods and properties of the ListBox to enable it to work with a collection of items. For example the currently selected item can be found using the SelectedItem property. However the ComboBox has some additional facilities to enable it to work with items that the user has typed in.
Step Five - Advanced combo/ListBoxesYou might think that taking the step of looking at advanced combo/ListBoxes when you have only just made their acquaintance is a bit ambitious - but remember advanced doesn't mean difficult! A list/ComboBox stores the items that you can select as a numbered list - the numbers don't show but you can use them to manipulate the list. For example as well as the SelectedItem property there is also the SelectedIndex property that gives the number in the list of the currently selected item. Notice that in programming most counting starts from zero and so the first item in the list is item zero not item one. You can also use an index to add and delete an item from the list. The command ListBox1.Items.Insert(index,item) will add the item to the list at the specified index position. For example, ListBox1.Items.Insert(2,"Albert Hall") puts the new item "Albert Hall" into the list at position 2. The only complication that you have to remember is that the first item in the list is numbered 0 and so the item 2 is actually the third item - counting from zero is something programmers have to get used to! You can also remove items from the list using: ListBox1.Items.RemoveAt(index) For example, ListBox1.Items.RemoveAt(2) removes item 2 from the list. If you want to remove all the items simply use ListBox1.Clear Finally it is worth knowing that there is a Sorted property which if set to True will re-arrange the list into order. There is also a DropDownStyle property which allows you to select between three types of ComboBox - Simple with the list always on display, DropDown - the standard ComboBox arrangement and DropDownList which is the same as standard but you can't edit the predefined list. <ASIN:0672331004 > <ASIN:0470499834> <ASIN:1430229853 > <ASIN:1890774588 > |