| Using the Kinect Depth Sensor |
| Written by Harry Fairhead | ||||
Page 3 of 3
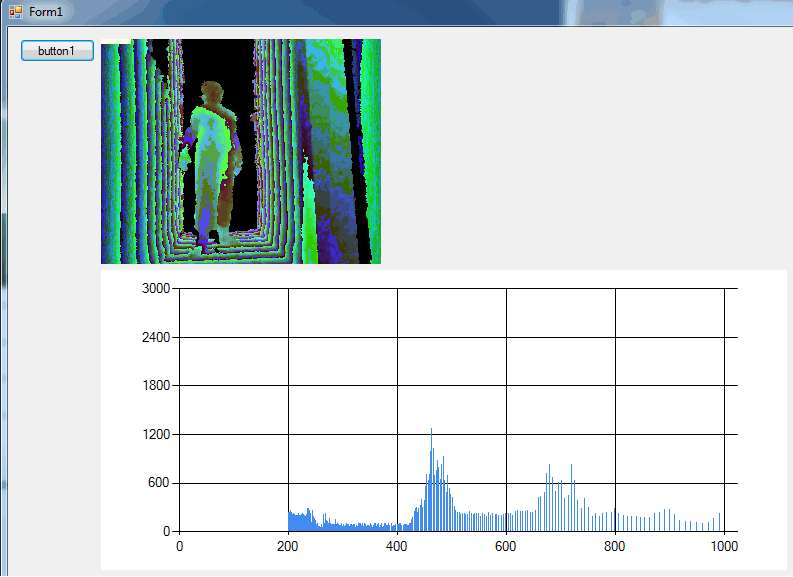
Histogramming depthOne of the standard and very basic methods of segmenting an image is to use a depth histogram. Imagine that you are looking at a scene with two objects then all of the points in each object will be roughly the same distance from the Kinect. What this means is that if you plot the histogram of the distances you will see two peaks - one corresponding to each object. You can use these peaks to work out threshold values for dividing up the image into different objects. It doesn't always work and you can easily invent situations where it really doesn't work but the point is that local maxima in the depth histogram generally mean objects. Start a new Windows Forms project. A Windows Forms project is easier to work with because since .NET 4 there is a chart control which makes it easy to draw a histogram. Place a button, a PictureBox and a Chart control on the forms. To make it all work you will need to add: using Microsoft.Kinect; Clicking the button starts the program running in the usual way: KinectSensor sensor; When a frame is ready to be processed we simply count the number of points at each depth. void DepthFrameReady(object sender, There are too many possible depths and counting each one would result in a histogram with a lot of bins so we divide the distance by four which means we only need a quarter of the number of bins: int[] count = new int[0x1FFF / 4 +1]; Next we scan though the data incrementing the count array for each distance measured: imageFrame.CopyPixelDataTo(pixelData); Notice that the right shift by 3 normalizes the data and the shift by 2 divides it by 4 so that it can be plotted in bins. Next we chart the data: chart1.Series[0].Points.Clear(); Yes you really have to add the data points one by one! Finally we have to give the system time to display the chart and generally catchup so we use DoEvents despite all its problems - its a quick and ok solution in this case. Finally we load the image into the PictureBox using the function described earlier: Application.DoEvents(); Finally to make sure everything shuts down corectly you need to add: private void Form1_FormClosing( You also have to customize the Chart control a little to make it work. Use the Property window to access the ChartAreas collection and then access the Axes collection to set reasonable max and min for the X and Y axes. If you don't do this the chart will keep rescaling and it will jump around. Now if you run the program you will see a real-time histogram of the depth scene displayed in the PictureBox.
This is a very rough and ready program but it will do for experimenting with. Your next task is to extract the cut off points from the histogram - i.e. at the minima between the local maxima - and use these to threshold the image to show areas that are likely discrete objects. Your next task is to check that these "objects" form areas of the image that are physically close to one another. You can then add your own algorithms for working out what the objects are and how they are moving. This is why raw depth data is useful.
Practical Windows Kinect in C#
|