| Raspberry Pi CM5 IoT In C - Setting Up the CM5 |
| Written by Harry Fairhead | |||||
| Monday, 14 April 2025 | |||||
Page 2 of 4
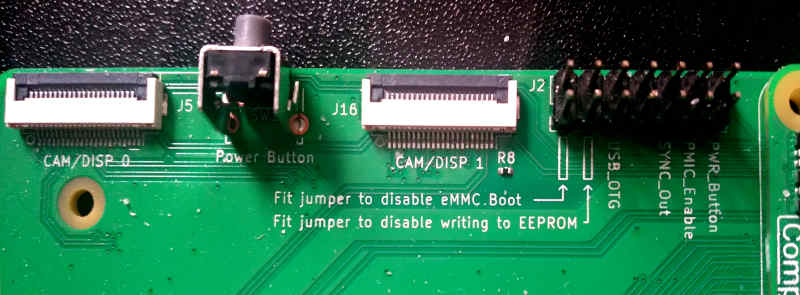
Installing Pi OSThe latest Pi OS is based on Debian Bookworm and is available in 32- and 64-bit versions. This is a very standard implementation of Linux. There are some minor irritations in that some drivers have been renamed, but this is relatively easy to cope with. A bigger difference affects any program planning to make use of graphics. Bookworm has taken the big step of using Wayland in place of the X graphics system that previous versions used. In most cases you can isolate your programs from this change by using a suitable graphics library, but if you plan to interact at a low level with graphics you need to find out more about Wayland. If you are using a Lite version of the CM5 then you simply use the Raspberry Pi Imager to write an OS to an SD card. Then simply insert the SD card into the card reader on the CM5IO and reboot. Versions of the CM5 that have eMMC flash memory have to be setup so that the flash memory presents itself to a host machine as removable storage. For this to happen you have to disable booting from the eMMC and install a driver into the host operating system. Once the eMMC is mounted as a disk drive, the Raspberry Pi Imager can be used to install the operating system. The step-by-step instructions are: 1) Place a jumper to short the pins of J2 on the IO board labeled Fit jumper to disable eMMC Boot:
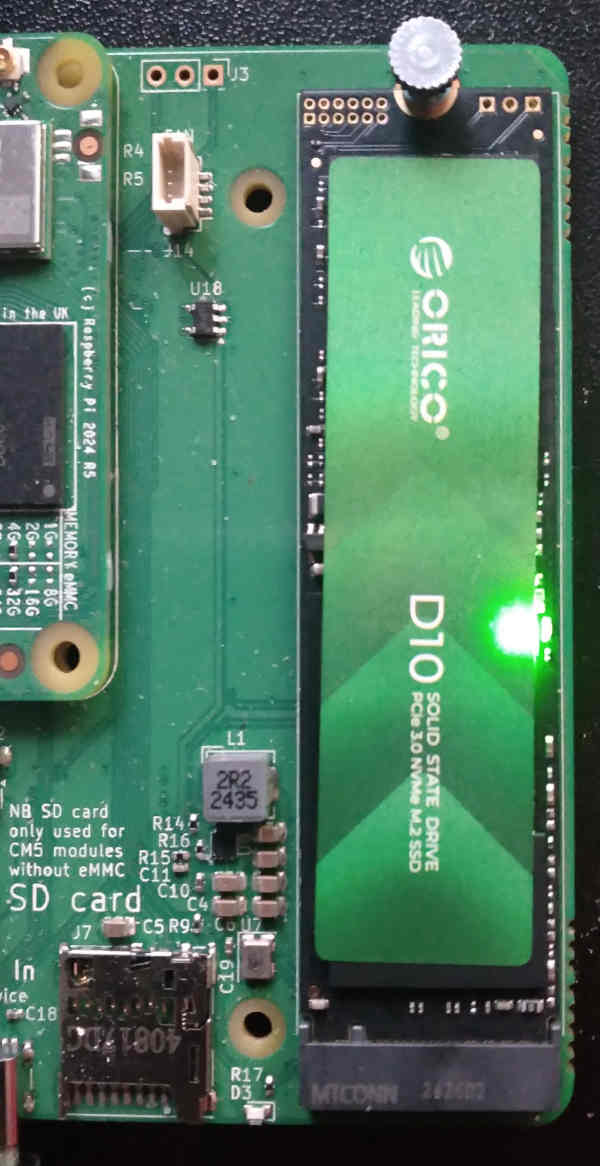
3) Install rpiboot: Linux: sudo app install rpiboot Windows: Download the Windows installer from https://github.com/raspberrypi/usbboot/raw/master/ Run the installer and reboot the Windows machine. 4) Run rpiboot, select the CM5 version under Windows and wait until the storage device appears. 5) Run the Raspberry Pi Imager and install the OS. 6) Remove the jumper on J2 and reboot the CM5. If you don’t want to use the Raspberry Pi Imager you can also arrange to copy the raw OS image using the usual file copy commands. Using NVMeIf you need to expand the storage capacity of the CM5 then the simplest and best way is to add a Non-Volatile Memory Express, NVMe, disk to the CM5IO board. To do this all you have to do is plug an NVMe module into place on the CM5IO board:
If you can see nvme0n1 then the drive is installed correctly. Next task is to create a partition table: sudo parted -a optimal /dev/nvme0n1 mklabel gpt then create an ext4 partition using the whole disk: sudo parted -a optimal /dev/nvme0n1 mkpart primary ext4 0% 100% You can change the amount of the disk used if you want to create multiple partitions. The new partition is named nvme0n1p1 and this needs to be formatted before it can be used: sudo mkfs.ext4 /dev/nvme0n1p1 Creating a formatted partition is something you only have to do once, but to make use of it you have to mount the drive each time the machine boots. To mount the drive manually you can use: sudo mkdir /mnt/data to create the mount point and: sudo mount /dev/nvme0n1p1 /mnt/data -t ext4 to mount it. After this you can access the extra storage via the /mnt/data directory. To make the mount permanent you need to edit the fstab table. To do this you need the UUID of the new drive using the sudo blkid
/dev/mmcblk0p1: LABEL_FATBOOT="bootfs" LABEL="bootfs"
The important part of the listing is UUID="f003b110-baa9-4270-83f7-a87adddd8c7f" which identifies the new partition. Once you have the UUID for the new partition you can edit the /etc/fstab table and add to the end the line : UUID=f003b110-baa9-4270-83f7-a87adddd8c7f
/mnt/data ext4 defaults 0 0
Where the UUID is changed to the one reported by blkid. After this the NVMe drive will be accessible for general storage after every boot. |
|||||
| Last Updated ( Monday, 14 April 2025 ) |