| Android Adventures - Activity And UI With Android Studio 2 |
| Written by Mike James | |||||
| Saturday, 23 July 2016 | |||||
Page 3 of 4
Connecting the Activity to the UINow we have an event handler hooked up to the button click event we usually want to do something that affects the UI as a result. Let's suppose that when the button is clicked we want to change the text displayed in the TextView widget to "You Clicked Me!". We can do this by changing the TextView widget's text property to the new text. The only problem is how do we find and reference the TextView widget in code? This is a fairly standard problem when you use a markup language to define a UI. The markup language defines widgets or other UI objects and the code has to have a way of making the connection to those UI objects. For example in JavaScript you make use of the getElementById method to retrieve a DOM object corresponding to a particular HTML element. In Android we do something similar. First make sure you follow the idea that all of the XML generated by the designer gets converted into a set of Java objects, one for each widget or view placed on the design surface. These objects have the same range of properties as you saw in the Properties window and methods to get other things done. All you need to do if find a way to reference one of them. In the case of the View object that caused the event this is very easy as it is passed to the event handler as the only argument of the call. So if the event handler is:
and the event handler is only hooked up to the button then you can be 100% sure that v is the button object when the event occurs. If you want to change the button's caption you could just use its setText method to change its value. Note: if you aren't used to Java then it is worth pointing out that generally all Java frameworks follow the rule that if an object has a property called myProperty, visible as such in the Property window then in code you set it using setMyProperty and retrieve it using getMyProperty. So all you have to write, in principle, is:
but this doesn't work because v is declared to be a general View object which doesn't have a setText method - not all View objects have text to set. To call the Button's setText method we have to cast v to its correct type - a Button. Note: casting is where you tell the system the type of the object you are working with. If classB is a subclass of classA then you can treat a classB object as a classA - after all it has all of the methods and properties that classA does by inheritance. However if you want to make use of a property or method that only classB has then you need to cast the reference to the classB object to make its type clear. For example. assuming classB inherits from classA:
creates an instance of classB but myObject is declared to be of type classA. This is fine but you can only access the methods and properties of the classA object. But if you try
then it will fail if classBMethod only exists in classB. To use the classB method you have to cast myObject to its real type:
You can store a reference to the cast in a new variable:
and then call the method
or you can just do the cast on the fly at the cost of an extra pair of parentheses:
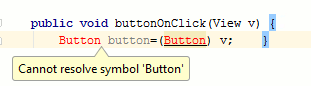
However if you simply use add the cast to Button you will discover that Android Studio flags an error by showing Button in red. If you hover over the red symbol you will see the exact error message:
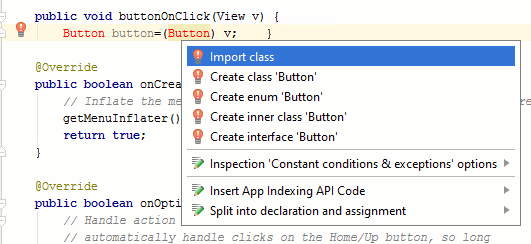
This is because you have used a class without importing it. In Java any class that you use has to be listed at the top of the program in an import statement. When ever you see a "Cannot resolve symbol" error message the most likely cause is that you haven't imported the class. This can be a tedious business but Android Studio has some help for you. If you click on the error symbol you will see a blue hint message.
If you look at the hint message it suggests pressing Alt+Enter which is always good advice because it produces a list of possible fixes for the problem.
You can implement the fix simply by selecting it from the list. In this case you have to add the class definition to the start of the program.
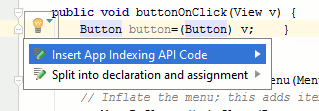
You can do this manually i.e. you can type it in, or just click in the first option. The import is added and in a moment the red errors disappear. If you hover over the corrected Button class name you will also see a light bulb.
Android Studio offers you hints on improving your code even then there are no errors - look out for the light bulbs. If you click on this it will offer to split the declaration and the assignment as being better style. Android Studio is full of hints and offers to make your code better at every turn - you don't have to accept them. For the moment let's stick with the single line.
Now we have the button object we can call its setText method:
The complete event handler is:
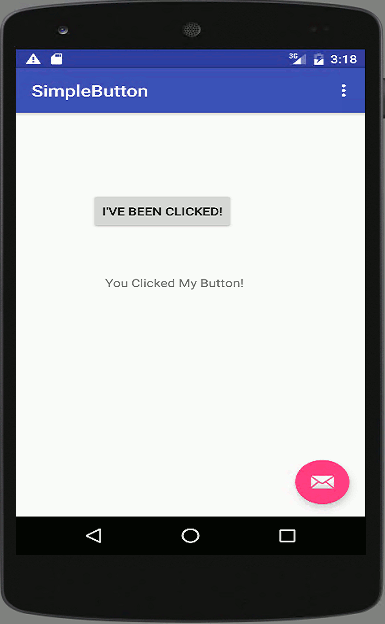
Now if you run the program you will see the button's caption change when you click the button. This is a common pattern in making your UI work - event handlers change the properties of View objects to modify the UI. Notice that this approach only works if you know the type of the object that caused the event and called the event handler. If your event handler is only connected to a single widget then you do know the type of the object that caused the event. If it isn't or if you want to modify the properties of a View object that isn't the subject of the event then you have to find it. This is exactly what we are going to do next. Finding View ObjectsNow suppose we want to do something to one of the other widgets in the view. In this case we have to find the object that represents the widget without the help of the event handler's argument. For example how do we find the TextView that we placed below the button? In the event handler the Button is the object that caused the event to happen so it is already found but how do you find another widget in the layout? This is a very standard pattern in working with view objects from the Activity. First you make use of the R object to find the widget's id. In this case the TextView has been given the id textView by default so we can use:
and this returns a unique integer that identifies the widget. Next we use the Activities
method which takes the integer id and returns the Java object corresponding to id. Of course this is returned as a View object because findViewById doesn't know the type of the object it returns any more accurately. So we have to cast to make use of the TextView object. Putting all this together gives:
Once again Android Studio will complain about TextView and if you press Alt+Enter it will add the class import to the start of the program for you:
Now that you have the TextView object you can use the setText method to change what it displays:
The complete event handler is:
If you now run the program you will see that you are informed twice of the fact that this very important button has been clicked:
You may think that this is all very small stuff and nothing like a real app but this is how building a UI works in Android. You now know how to design a single screen app using the widgets available in the designer toolbox and how to hook them up to handle their click events, find the Java object that represents them and how to call methods that modify them. Apart from the fine detail of how each of the widgets works - radio buttons, checkboxes and so on you now have the general outline of how to build a single screen app. |
|||||
| Last Updated ( Monday, 27 March 2017 ) |