| Introducing Android Fragments |
| Written by Mike James | |||||
| Thursday, 24 November 2016 | |||||
Page 2 of 4
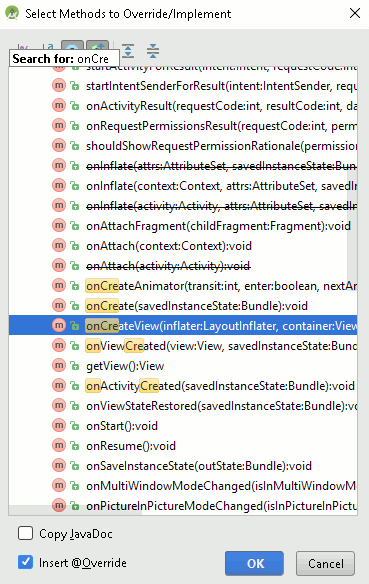
When you click OK, the Override/Implement dialog box opens and you can navigate down to onCreateView, select it and click OK:
This creates a new file in the project to store the class and code to create the class and override the onCreateView method..
It will also automatically add the import statement needt to make it all work for you. Now we have to fill in the details of onCreateView. We could define an XML layout file or use the designer - more of which in the next chapter where we look at using Android Studio's Fragment facilities - but the most direct way and the one that lets you see exactly what is happening is to create the View objects in code. In practice you would normally use the XML to create the View hierarchy but working with code means there is no irrelevant details to confuse the issue. If you are not happy with creating View objects in code then see Chapter 11: Bitmap Graphics in Android Programming: Starting With An App (ISBN: 978-1871962475). To create a simple UI for the Fragment to supply to the Activity we will just create a LinearLayout containing a Button:
This should be perfectly easy to follow but there are a few subtle points. When you create a View object you have to provide it with a "context" - this is the Activity it belongs to and you usually pass it this to indicate the current object i.e. the Activity instance. In this case we are in an instance of the Fragment object so you can't use this. However, at the time that the onCreateView is called the Fragment will be associated with a Activity i.e. the Activity that is going to display its View. You can use the getActivity method to return the Activity that the Fragment is associated with and this is what you use as the context when you create a View object within a Fragment - that is:
Notice also that you seem to have to return a ViewGroup object from onCreateView, even though this isn't documented. Finally you don't add the Fragment's View to the container you have been passed. You are only provided with it so you can find out details of the layout and adjust your View objects accordingly. At this point we have a Fragment that returns a LinearLayout which contains a Button object with the text "Hello Button". Not a very useful Fragment but the simplest example I can think of.
Using a Fragment Now that we have our customized fragment complete with a very simple UI it is time to display it in an Activity. This is perhaps the most complicated part of using a Fragment although once you get used to it its not so difficult. The first new feature is that every Activity has a FragmentManager which is used to control how Fragments are displayed. To display a Fragment you first have to obtain the FragmentManager using getFragmentManager, then you have to get a FragmentTransaction from the FragmentManager. You can't do anything with a Fragment unless you start a transaction. Within the transaction you can set up what you want to happen, usually add the Fragment to the current layout, but nothing happens until you use the commit method. The final complication is that the add method, used to add a Fragment to a specified container, needs the container specified by id number. This fine for an XML layout, but not so convenient for a code generated layout. That is, if you have a FragmentTransaction object in the variable ft then:
adds Fragment frag1 to the ViewGroup with the specified id. Notice this is not a Layout Id. Let's see how to implement all of this. Let's add the Fragment to the MainActivity using the usual onCreate method:
First we need to add a LinearLayout to act as a container for the rest of the UI and the Fragment in particular:
and this needs an id property so that we can store the Fragement's UI inside it. You can simply assign an id using setId, it only has to be unique at the current level of the View hierarchy:
Finally we can add the LinearLayout to the ContentView:
Apart from the need to assign a ViewId to there is nothing new so far. Now we need to add the Fragment. To do this we create an instance of the Fragment, get the FragmentManager and use it to get a FragmentTransaction object:
Now we can add the Fragment to the LinearLayout container using its ViewId to identify it and finally commit the transaction to make it all happen:
The add method specifies the id of the container in the current View hierarchy that will host the View hierarchy supplied by the Fragment specified as the second parameter. As well as the add method, the FragmentTransaction also has a replace and remove method. The subject of managing Fragments is discussed in a later chapter. Puttting all this together gives:
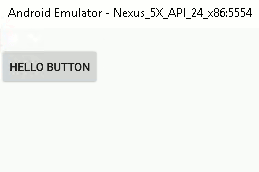
If you run the program you will now see a Button appear. The View hierarchy, after the Fragment has been added, consists of a single LinearLayout created by the Activity, containing a LinearLayout created by the Fragment, which contains a Button created by the Fragment.
There are some subtle points to note that aren't important at the moment, but could come back to bite you when you try to do some more advanced things. The first is that the Fragment's View hierarchy is not constructed at the end of the transaction, i.e. immediately after the commit. The onCreateView event is fired some time after the onCreate event handler returns. This means you cannot access the View objects added by the Fragment within the onCreate method. Secondly, at the moment we are creating the Fragment each time the onCreate method is fired by the Activity's Create event but the system automatically saves and restores Fragments when the Activity is suspended. In particular the entire Activity and its associated Fragments are destroyed if a configuration change such as a orientation change occurs. In this case the system recreates the Fragment and the Activity for you. You need to keep this in mind because this automatic destroy- recreate mechanism causes most of the complications you will encounter in using Fragments. If you rotate the phone running our current demo you will see what the problem is as each time you rotate you get another button added to the layout due to the old Fragment being recreated by the system and your new additional Fragment being created by the onCreateView event handler. It is also a good idea to get in the habit of thinking about the Fragments that an Activity uses as a "pool" of Fragments each one allocated to a container in the Activity's initial View hierarchy. The code of each Fragment waits to be asked to generate its contribution to the View hierarchy and it responds to other events. This "pool" of Fragments is managed by the FragmentManager which can allocate Fragments to containers, remove them and generally control what they are doing. Clearly mastering the FragmentManager is going to be important.
<ASIN:187196251X> |
|||||
| Last Updated ( Sunday, 26 March 2017 ) |