| Android Adventures - Menus - The Toolbar |
| Written by Mike James | |||||
| Tuesday, 05 May 2015 | |||||
Page 3 of 4
Responding To Menu EventsYou can attach click event handlers to the various items in a menu in the usual way - this is something that is often overlooked because there is a simpler and standard way of doing the job. However it is worth seeing the direct method if only to convince yourself that a menu is just another part of the View hierarchy that your application displays. If you aren't fully familiar with how to attach a click event handler to a View object then read Basic Controls And Events. When you inflate a menu resource in onCreateOptionsMenu the part of the View hierarchy that is the menu is added to the menu object passed in:
i.e. menu in the usual generated code. Next you get the inflater and inflate the resource:
After this menu contains the View hierarchy that is the entire menu as created so far. If you want to attach an event handler to one of the menu items then you might think that the standard way of doing this is to use findViewById and then use its OnClickListener property to set the event handler as you would with a set of View objects. You can't do this with the menu because it hasn't been added to the complete View hierarchy yet. The menu is only added to the View hiearchy after the onCreateOptionsMenu event handler finishes. To allow you to find the menu item while in onCreateOptionsMenu the menu object has findItem method. So to find the MenuItem that corresponds to the item with id action_send you would use:
Now that you have the MenuItem object corresponding to the Send item you can add a click event handler:
Now the event handler will be called when the Send menu item is selected by the user. The event handler should return true if it has consumed the event and false if it wants to pass it on to other handlers. The entire onCreateOptions Menu method is:
You can also add an event handler for the menu in the XML resource using the android:onClick attribute. The event handler has to have the same signature as the one demonstrated above i.e. it has to return boolean and have a single MenuItem parameter. For example
and
You can use this method to connect as many individual event handlers as you require for each of the MenuItems. However this is not the way it is usually done. It tends not to be a good idea to attach event handlers to the click events of each menu item. Instead the Activity has an onOptionsItemSelected event handler method which is called when any of the items in the menu is selected. Obviously this saves a great deal of effort because you just have to implement a single event handler - and you don't even have to hook it up to the menu. Android Studio automatically generates an event handler ready for you to use;
Which just handles the single autogenerated Settings menu option but you can see the general principle. The event handler is passed the menu item that has been selected - the actual object not just its id. You can then use the MenuItem's getItemId to retrieve the id and you can then test it against the ids that you assigned in the resource file. So for example in our simple example with a Settings and a Send item we might rewrite the generated event handler as:
You can see the general idea - test for each of the item's id in each of the case clauses and return true if you have processed the item event. This is the standard way of processing item events in menus a single event handler and a, possibly large, switch statement. Changing Menus In CodeA menu is just a View hierarchy and so you can make changes to it just like any View hierarchy by adding and customizing View objects. However menus have some extra considerations because they are displayed in a slightly different way to the rest of the UI. The problem is that the menu items are not always part of the View hierarchy - they are created when the menu is displayed. This means that you might try to modify them and they aren't present with a resulting application crash. The key to modifying a menu on the fly is the onPrepareOptionsMenu event handler. This is called just before the menu is displayed and the menu View objects are included in the View hierarchy. The onCreateOptionsMenu event only fires once when the menu is created but the onPrepareOptionsMenu is called every time the menu is redisplayed hence you can use it to make modifications to the menu. The problem is finding a simple example of its use is difficult as we will discover. Let's just add a new item via the onPrepareOptionsMenu Select a suitable location in the class and right click, select Generate and then Override method. You can select onPrepareOptionsMenu form the list and Android Studio will create a stub for you:
Now all we have to do is use the add method to add a new item. There are a number of overloaded versions of add that allow you to specify the item in detail. The simplest is just add(CharSequence) which adds an item with the specified title:
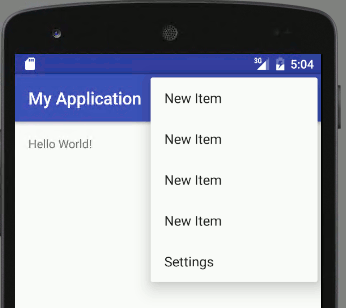
Now if you run the program you will discover that each time you select the Settings menu a couple of New Items are added to the menu.
What is going on? The answer is that each time the menu is drawn on the screen or re-drawn onPrepareOptionsMenu is called. For example if you cause the Settings menu to be displayed this overwrites the menu display and hence it has to be re-drawn and onPrepareOptionsMenu is called. If you want to modify the menu in this way you need to check that the modification has already been made. In other words you need to check the status of the menu to see if the item you want to add is already there. A slightly more realistic example is to add and remove a menu item depending on the setting of a checkbox. Add a checkbox and change the method to read:
Notice that all of the items added are given id 10 - there can be more than one menu item with the same id. If the checkbox isn't checked then the menu item with id 10 is removed. If there is no menu item with id 10 nothing happens and if there are more than one just the first is removed. Using this you can add multiple New Items and remove them by simply viewing the Settings menu which invalidates the menu display. In an even more realistic application you wouldn't wait for the menu to be invalidated by a user action you would call invalidateOptionsMenu() when you wanted the onPrepareOptionsMenu to be called. So perhaps a more realistic example is to add a button that calls onPrepareOptionsMenu to update the action bar:
and have the onPrepareOptionsMenu only add the item if it isn't already in the menu:
Finally how do you set other properties of the MenuItem you have added? The answer is that add returns the MenuItem created. So to set the new item to show in the action bar you would use something like:
Dynamically modifying the menu is a matter of keeping track of its current state and only then modifying it. |
|||||
| Last Updated ( Tuesday, 14 March 2017 ) |