|
Page 1 of 3 The GPIO driver in Linux used to be GPIO sysfs but no longer now it's the GPIO character driver. Find out how to do GPIO control the modern way, even if you are using a Pi 5.
This content comes from the second edition of our book and includes how to make it work on the Pi 5 :
Raspberry Pi IoT In PythonUsing Linux Drivers
Second Edition
By Harry Fairhead & Mike James
Buy from Amazon.
Contents
- Choosing A Pi For IoT
- Getting Started With Python
- Drivers: A First Program
- The GPIO Character Driver
- GPIO Using Ioct ***NEW!!
-
GPIO Events
-
-
Some Electronics
-
Pulse Width Modulation Extract: PWM *
-
SPI Devices
-
I2C Basics Extract: I2C *
-
The I2C Linux Driver
-
Advanced I2C
-
Sensor Drivers
-
-
Going Further With Drivers
-
Appendix I
*From the first edition waiting for update.
<ASIN:B0CT46R6LF>
The GPIO Character Driver
As far as IoT goes, the fundamental Linux driver is the GPIO driver, which gives you access to the individual GPIO lines. This is another built-in driver and so is like the LED driver introduced in the previous chapter, but it is a character driver and used in a slightly different way.
In most cases, when a device is connected via a set of GPIO lines, you usually use a specific device driver. In this way you can almost ignore the GPIO lines and what they are doing. However, there are still simple situations where a full driver would be overkill. If you want to interface a button or an LED, then direct control over the GPIO lines is the most direct way to do the job even if there are Linux LED drivers – see the previous chapter – and even an input driver.
The standard way to work with GPIO in Linux used to be via the sysfs interface and you will still find articles advocating its use and you will also encounter many programs making use of it. GPIO sysfs was, however, deprecated in Linux 4.8 at the end of 2016 and was due for removal from the kernel in 2020. At the time of writing, Pi OS is using Linux 6.2.21 and it still includes Sysfs gpio. As it could be removed at any time you shouldn’t use it for new projects, however you may still need to know about it to cope with legacy software. You can find out how it works in Appendix I.
Its replacement is the GPIO character device and, while this looks superficially like the old sysfs interface, it has many major differences. While it has some advantages, it also is slightly more complex and can no longer be used from the command line – it is a program-only interface. This said, there are some simple utility programs that are fairly standard and allow GPIO control from the command line. These are covered in the first part of the chapter, even though they are unlikely to be the main way that you work with the new interface. There is also a wrapper library, written in C, called libgpiod. Although it isn’t necessary for simple access to the GPIO lines, it is described in this chapter.
GPIO Character Device
The new approach to working with GPIO comes pre-installed in recent versions of Pi OS, but it isn’t supported in versions earlier than Buster. If you look in the /dev directory you will find files corresponding to each GPIO controller installed. You will see at least:
/dev/gpiochip0
This represents the main GPIO controller and all of the GPIO lines it provides. If you know how sysfs works you might well be expecting instructions on how to read and write to the file from the console. In this case, reading and writing to the file will do you little good as most of the work is carried out using the input/output control system call, ioctl() which cannot be used from the command line. The use of ioctl is typical of a character driver, but it does mean that using the GPIO driver is very different from other file-oriented drivers described later. The next chapter looks at the use of ioctl to directly control the GPIO character device.
If you want to explore the GPIO from the command line, you need to install some tools that have been created mainly as examples of using the new device interface. To do this you need to first install them and libgpiod, the C library that you will use later with a Python binding:
sudo apt-get install gpiod libgpiod-dev libgpiod-doc
If you don’t want to use the library to access the driver, you don’t have to install it. The GPIO driver is loaded as part of the Linux kernel and is ready to use.
The Utilities
The standalone applications that are installed are:
Lists all of the GPIO controllers that are installed:
 Notice that on the Pi 5 it is gpiochip4 that controls the external GPIO lines whereas it is gpiochip0 for other Pis. Notice that on the Pi 5 it is gpiochip4 that controls the external GPIO lines whereas it is gpiochip0 for other Pis.
Lists all of the GPIO lines provided by the named GPIO controller:
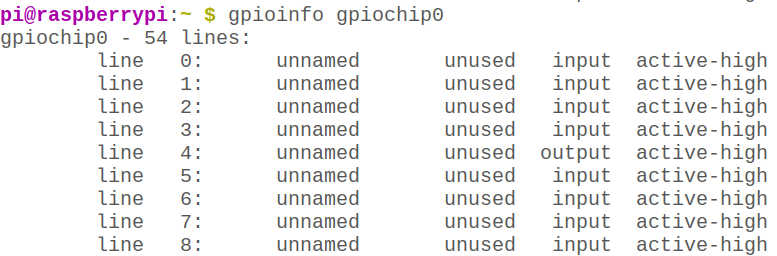
You can give particular lines names by editing the device tree. If you do give them appropriate fixed names then:
gpiofindname
will return the number of the GPIO line.
You can use this to set any number of GPIO lines in one operation. The command has the form:
gpioset options chip name/number <offset1>=<value1>
<offset2>=<value2> ...
where the options are:
-l, --active-low sets the line’s active state to low
-m, --mode= tells the program what to do after setting values
exit: exit immediately, the default
wait: wait for user to press ENTER
time: sleep for a specified amount of time
signal: wait for SIGINT or SIGTERM
-s, --sec=SECnumber of seconds to wait
-u, --usec=USEC number of microseconds to wait
-b, --background detaches from the controlling terminal
Notice that the change in the line’s state only persists while the command is executing. This means that to see the effect, you have to use wait or time. For example:
gpioset -m wait 0 4=0 17=1
sets gpiochip 0 GPIO4 to 0 and GPIO17 to 1 and waits until the user presses enter.
The gpioget command returns the state of the lines specified as text:
gpioget chip name/number <offset 1> <offset 2>
For example:
gpioget 0 4 17
will display the current state of GPIO4 and GPIO17 on gpiochip0.
The gpiomon command lets you monitor changes in input lines using a poll system call:
gpiomon options chip name/number <offset 1> <offset 2> …
The options are:
 -n, --num-events=NUM	exit after processing NUM events
 -s, --silent		don't print event info
 -r, --rising-edge	only process rising edge events
 -f, --falling-edge	only process falling edge events
 -F, --format= FMT	specify custom output format FMT

Format specifiers:
 %o: 	GPIO line offset
 %e: 	event type (0 - falling edge, 1 - rising edge)
 %s: 	seconds part of the event timestamp
 %n: 	nanoseconds part of the event timestamp
For example, to monitor GPIO4 and GPIO17 for any changes:

These utilities are useful and they can be used in scripts to control GPIO lines. For example, if you save:
while true
do
 gpioset -m time -s 1 0 4=0 17=1
 gpioset -m time -s 1 0 4=1 17=0
done
in a text file called binky.sh and set its execution permission to owner then you can run it in a console and flash a pair of LEDs connected to GPIO4 and GPIO17. Notice that if any of the GPIO lines are in use, the script will return an error message. You also need to keep in mind that the GPIO line is only in use while the gpioset command is running – that is, the line is opened at the start of the command and closed when it ends, so returning the
For the Pi 5, remember to change gpiochip0 to gpiochip4.
You can get a long way with shell scripts and the GPIO utilities, but sooner or later you are going to want to work with Python.
|