| Exploring Edison - First Contact |
| Written by Harry Fairhead | ||||
| Friday, 12 June 2015 | ||||
Page 2 of 3
The Windows 64 bit And Mac Integrated InstallerIf you are using Windows 64 bit or a Mac to develope Edison programs then there is a very easy way to get all of the drivers and software installed in one step - the Windows 64-bit Integrated Installer or the Mac OS X installer If you run this you will install all the drivers described below in one operation and update the Edison's Linux image to the latest version. You can also optionally install all of the standard development IDEs. If you use either Integrated Installer then you can still follow the steps decribed below but you wont have to download any of the drivers - you can just start using them - and you wont have to update the Linux image because this has already been done for you. The Integrated Installer takes some time to do its job so be patient. If it doesn't work, i.e. if it hangs or fails at some point then simply run it again. The Serial PortThe Edison's serial port is the way you connect a console with the Linux OS running on the device. As the serial port is converted by the breakout board to a USB connection you need a USB serial driver installed on your PC. If you are using Linux the USB serial port will be set up automatically as /dev/ttyUSB0.
If you are using OSX it will be set up automatically in /dev/tty. To find out which device it is use
and look for a device that has cu.usbserial in its name, for example:
Under Windows you will need to install a USB serial port driver. To do this either run the Integrated installer or download the FTDI driver, run the installer with admin privileges, use run as administrator. You should discover that a new USB Serial Port has been added. Use the device manager to discover its port number - usually USB Serial Port (COM3). If you have installed other drivers, e.g. using the Integrated Installer you will also see a USB Composite Device - ignore this for the moment, the port that you want is usually listed as USB Serial Port.
Next all you have to do is use a serial console to connect to the Edison. You can use any serial console to connect and the only thing you need to know is that the baud rate is 115200. Under Linux and OSX you can use screen. Under Linux you might have to install it using:
and then run it using:
Under OSX run the screen terminal using:
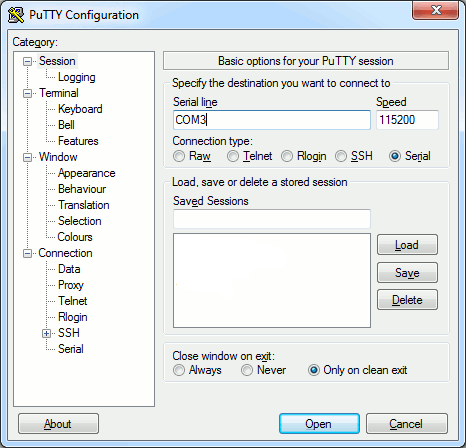
where devname is the serial device you found earlier. If you are using Windows then things are a little more difficult. You need a serial console but Windows 7 and later no longer come with one as standard. The simplest solution is to download Putty. This is a very useful program as it not only works as a serial terminal but as a Telnet and SSH console. It is worth getting to know. Just download it and run the .exe file. There is no installation. To use it to connect to the Edison simply run it and select serial connection. Enter the port that corresponds to the USB serial connectiorootn and set the speed to 115200:
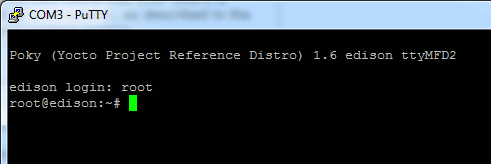
You can save these details to make connecting easier in future. If it doesn't work, the only possible reasons are that you have the wrong com port or the wrong speed - the speed has to be 115200 and you can find the com port by trial and error if needs be. No matter how you connect to the serial port, the next step is the same for all three operating systems. You might have to press carriage return twice to wake the session up, but you should then see the Yocto Linux sign-on banner. All you have to do is log in with the user name "root".
At this point you have made contact with the Edison and are working with the Linux operating system that it ships with. In theory your next task is to up-date its firmware to make sure you are working with the latest version, but if you know some Linux commands you could have a look around the system first. Updating the systemThis is something you have to do before moving on. The latest version of the OS is essential if you are to be sure that things are going to work as documented. If you have installed the software using the Integrated Installer for Windows 64bit then the OS image will have been updated for you and you can skip to the next section. However you will probably want to update the system again in the future and if so you can follow these instructions. Upgrading firmware is something that sounds difficult and it can be worrying. In the case of the Edison, however it is very simple. All you have to do is copy the operating system image to the shared drive and then tell the Edison to reboot. Taking this step by step:
The system should shut down and then reboot once to read the new image files and then once more to load the new operating system. That is, if all went well you should see the Edison boot twice. When you are finished you can delete all the files you copied to the Edison drive ready for the next time you want to transfer something to the Edison. You can also use the Integrated Installer to update the firmware by running it again and selecting that option. The prefered Intel way of doing the job is to download Flash Tool Lite. This has to be installed. To use it you simply download the image as in step 1 but don't bother to unzip it. Run the Flash Tool and use the browse button to specify the zipped image file you downloaded. Make user the Edison is connected. The Flash Tool will unzip the system image and when you click Start Flash it will upload the image to the Edison. However it will ask you to unplug and plug the Edision back in so as to reboot it. Setting Up WiFiOnce you have the latest version of the operating system installed, your next task is to connect to WiFi. You need to do this because, before you start to make use of the Edison to control anything or read any sensors, you need to up-date a critical library that, for some reason, isn't always up to date in the "latest" OS image. This isn't so important for the Arduino breakout board, but it is essential to to the working of the mini breakout board. If you don't have a WiFi network to connect to then you can use the USB port, which we haven't configured as yet, to make a network connection - see later. Connecting to WiFi is very simple. Just use the command configure_edison --setup and supply the information the utility requests. You have to provide a unique name for the device and you can optionally set a logon password. It if fairly important that you do supply a logon password because without one you can only SSH to the Edision via the serial port or the network over usb connection. This means you cannot connect an SSH terminal or FTP client via WiFi. To allow SSH connections on all ports you have to either supply a password or manually alter the configuration. When set up the WiFi a scan is performed and you'll see this displayed on the screen:
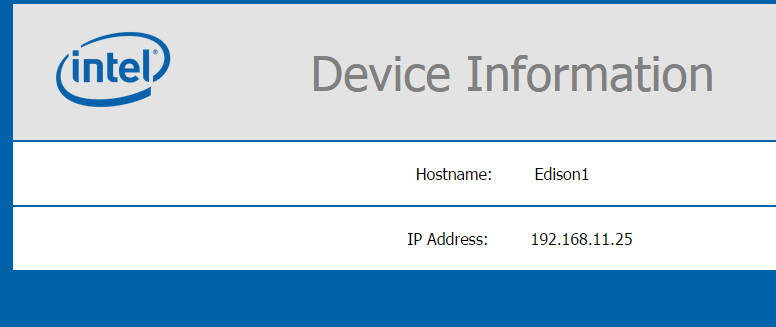
All you have to do is enter the number corresponding to the network you want to connect to. You then have to provide the network's password and, if all goes well, you will see a message telling you the IP address and how to access the device: Done. Please connect your laptop or PC to the same network as this device and go to http://192.168.11.25 or http://Edison1.local in your browser. When you get to the web page all you will see is confirmation of the IP address and name.
What really matters is that you have managed to get the Edison connected. You can rerun the configure_edison utility any time you want to change the configuration. Updating lib mraaThe mraa library is going to be very important, but it gets upgraded faster than the OS at the moment. You need to install the latest version before trying anything out. In particular, the mini-breakout board doesn't work unless you update to the current version.. Fortunately it is a fairly easy procedure. However for it to work you have to have connected the Edison to the Internet one way or another. Then copy and paste the following at the Linux command prompt:
For future reference opkg is the Yocto Linux package manager. Following the upgrade all of the examples that follow should work. If you download and install a new OS image then you have to check that the version of Mraa you have is the very latest. The simplest way to discover the version of Mraa you have installed is to use Python, or the language of your choice to call get_version. To do this give the command
Then in the Python REPL that appears type:
and finally
Which will display something like:
You can compare this to the latest version listed on GitHub -https://github.com/intel-iot-devkit/mraa/releases Note the current version at the time of writing is 7.2 and there are updates every few days.
|
||||
| Last Updated ( Sunday, 19 July 2015 ) |