| Getting Started With RealSense In C# |
| Written by Harry Fairhead | ||||
| Thursday, 12 March 2015 | ||||
Page 1 of 3 Intel's RealSense project wants to bring a depth camera to every laptop, mobile and desktop machine. It could be revolutionary, but getting started with such a complex system isn't as easy as it should be. We start from scratch in C#. Real RealSense In C#
Intel's RealSense project is either going to be huge or vanish without trace. It is a depth camera, similar to the Kinect, complete with software for doing advanced things like gesture, face and emotion recognition. Unlike the Kinect it is optimized for closer working. It is aimed at applications where users are sitting in front of their machines rather than running around a room. It is being integrated into a range of laptops from Asus, Dell, Lenovo and HP. It is also at the heart of the innovative HP Sprout - and don't blame me for the name!
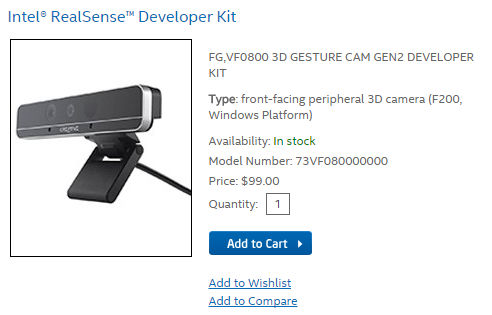
The idea is that, just as today every laptop has a built-in video camera, in the near future every laptop will have a built-in depth camera. This, if it comes true, could revolutionize the way users interact with software and provide lots of opportunities for programmer to create completely new applications. If you want to get ahead in this new area then you can order a developer kit complete with USB 3 camera for just $99 and it ships to most parts of the world.
In this series of articles the objective is to make it easy to get over the basic hurdles that starting with any new system involves. This first part doesn't do what most documentation and examples do which is to show off the most exciting and sophisticated features of the device. Instead we get started with the most basic features - but don't worry the exciting stuff is just around the corner and without a good grounding in the fundamentals you would always have a "I'm not completely sure why this works feeling". So get your SDK now and start programming. SetupTo get going all you need is a copy of Visual Studio Community edition and an installation of the SDK. Install the SDK from the web site and be ready to connect the RealSense camera. It copies a lot of software to the installation directory which is usually:
The latest R2 SDK requires that you fill in your email address and other details even if you have registered with Intel before. It then sends an email with a one-time download link. Another change is that the Depth Camera Manager DCM is no longer installed with the SDK you have to do this as a separate step. If you are using the Intel F200 camera then the DCM can be downloaded from the Intel site. Other and built in cameras in particular might need a different DCM provided by the manufacturer. If the sample applications don't seem to find the depth camera but do find the video camera when you run them then the problem is you haven't installed the DCM. There are two important DLLs that you have to add to a project before you can start to make use of the RealSense hardware:
and
The first is a wrapper that provides all of the C# classes you need to use. The second is a C++ library that the first DLL uses via p/Invoke to actually access the hardware. In fact there is a 32-bit and a 64-bit version of each library and it matters which one you choose. If the machine you are working with is 32-bit then this is the only the 32-bit libraries will work. If you are using a 64-bit machine you can use either library with the 64-bit libraries being preferable. The simplest solution is to use the 32-bit versions which work on anything. Let's create the simplest possible application that makes use of the libraries just to make sure that we have them setup correctly. StarterConsider this the "Hello World" of RealSense. First start a new WPF C# project called "Starter" or something similar. Starting with WPF is simpler than working with Windows Forms but we will see how to do this later. Use the command Project,Add Reference. In the dialog box that appears click the Browse button and navigate to the SDK installation directory containing the version of libpxcclr.cs.dll you need. The directory is usually:
or:
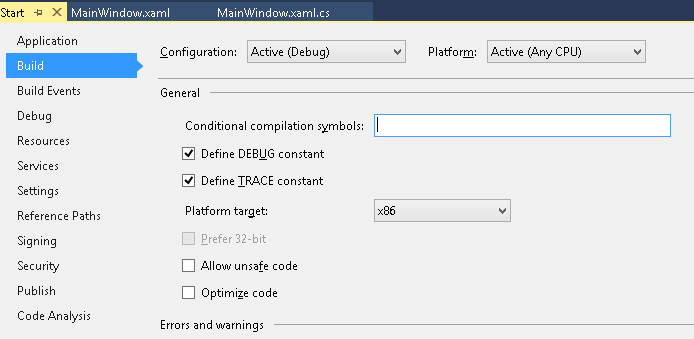
In the correct directory find the libpxcclr.cs.dll DLL and click the Add button. This adds the wrapper library to your project. If you select the 64-bit library then make sure that the machine you are working with has a 64-bit CPU and you also need to set the Platform Target in the Project,Properties to x64. If you select the 32-bit library then it should work on anything but to avoid seeing a warning message select x86 for the Platform Target in the Project,Properties dialog.
Now you have the wrapper but it needs to be able to find the P/invoke library. The simplest way to do this is to make a copy of libpxccpp2c.dll into the project's binary folder:
(Or the Release directory is this is a release version) The DLL has to be in the folder that holds the programs binary files. You can find libpxccpp2c.dll in the same directory you used to add the reference e.g. usually one of:
or
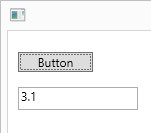
Make sure you use the same number of bits for both libraries. There are better ways to integrate the libraries with your project that have advantages like selecting the correct library for the system and auto-updating when a new library is available but these are described later - for now let's just get something working. Next place a Button and a TextBox, named textBox1 on the form, and in the Button's click handler enter:
This is essentially the first example in the documentation but with corrections so that it works. When ever you need to use the RealSense you first need a Session object and this is obtained via the CreateInstance object factory. In this example we then just use the QueryVersion method to retrieve a version object which gives the version number to display in the TextBox.
Now you should be able to run the program. Nothing much should happen of course but if you see any error messages then you haven't set things up propertly. The most common problem is failing to copy the p/invoke DLL into the binary folder - debug or release. Another common problem is using the 64-bit libraries without setting the Platform Target to x64 - the error message in this case tells you that the library is in the wrong format. Getting Some VideoAlthough using the RealSense camera as a video device probably isn't the most exciting thing to do it is a good place to start as it typifies how you can get at the data from the other sensors and modules. Add to the project we have just created an Image control called image1. This will be used to display the video. The steps in working with the RealSense camera generally follow the same general plan. F irst you need a SenseManager which is used to set up the type of data you want and to get it. The simplest way to create an instance is to use the session object you have already created:
Once you have a SenseManager instance you can use it to configure what data you want. There are three basic sensor data streams - color, depth and infra-red (ir). You can select any combination of streams but for simplicity we will just enable the color stream:
The last two parameters specify the width and height of the image - if you leave these set to zero the device will provide you with a default resolution. After enabling any streams you want to work with you have to initialize the system:
This sets up the processing pipeline that gets and optionally processes the data from the hardware. |
||||
| Last Updated ( Friday, 26 January 2018 ) |