|
Page 1 of 2 Canvas in WebGL mode provides the ability to perform fast pixel operations. In this extract from a chapter in my new book on JavaScript Graphics we look at how to use the GPU to implement a convolution
Now available as a paperback or ebook from Amazon.
JavaScript Bitmap Graphics
With Canvas
Contents
- JavaScript Graphics
- Getting Started With Canvas
- Drawing Paths
Extract: Basic Paths
Extract: SVG Paths
Extract: Bezier Curves
- Stroke and Fill
Extract: Stroke Properties
Extract: Fill and Holes
Extract: Gradient & Pattern Fills
- Transformations
Extract: Transformations
Extract: Custom Coordinates
Extract Graphics State
- Text
Extract: Text, Typography & SVG
Extract: Unicode
- Clipping, Compositing and Effects
Extract: Clipping & Basic Compositing
- Generating Bitmaps
Extract: Introduction To Bitmaps
Extract : Animation
- WebWorkers & OffscreenCanvas
Extract: Web Workers
Extract: OffscreenCanvas
- Bit Manipulation In JavaScript
Extract: Bit Manipulation
- Typed Arrays
Extract: Typed Arrays
- Files, blobs, URLs & Fetch
Extract: Blobs & Files
Extract: Read/Writing Local Files
Extract: Fetch API **NEW!
- Image Processing
Extract: ImageData
Extract:The Filter API
- 3D WebGL
Extract: WebGL 3D
- 2D WebGL
Extract: WebGL Convolutions
<ASIN:B07XJQDS4Z>
<ASIN:1871962579>
<ASIN:1871962560>
Earlier in the chapter we looked at how 2D graphics could be implemented in WebGL. Not only can you draw new things you can also process bitmaps and in this extract the focus is on how to handle bitmaps in a GPU and on implementing a convolution which is a very basic filtering operation.
Included in the chapter but not in this extract are:
- 2D WebGL
- A 2D Vertex Shader
- Transformations
- Triangles
- Rectangles
- Circles - Triangle Fan
- Multiple Objects
- Animation
Bitmaps in WebGL
Although WebGL works in terms of vertices and triangles it is possible to load and work with bitmaps. This ability is used in 3D to apply texture to 3D solids by mapping bitmaps to each of the faces. In our case we are going to make use of texture bitmaps as bitmaps, but you should be able to see how to apply the same ideas to 3D texture mapping.
There are some key new ideas and one of them is a varying. This is a variable that is used by the fragment shader to determine the property of a pixel that isn’t positioned at one of the vertices of the triangle. The idea is simply that a varying takes a value that is a weighted average of the values at the vertices that surround the pixel. The weights are simply the distances to each of the vertices. So a varying that is halfway between two vertices will have the average of the value at each vertex. More generally the pixel shown in the diagram below will have a value that is the average of the values at A, B and C weighted by the distance from each of the vertices.
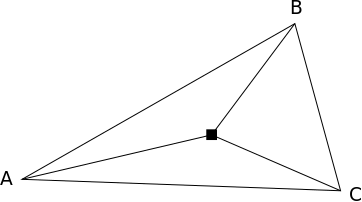
The most common example of a varying is assigning a color to each of the three points and then allowing the fragment shader to color the interior of the fragment in a gradient fill. A more usual practice use is to obtain a co-ordinate for the pixel based on the co-ordinates assigned to the vertices.
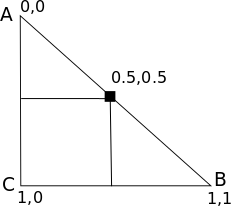
For example, if we have a right-angled triangle and assign the co-ordinates as shown, then the pixel equidistant from each vertex has a value (0.5,0.5) and pixels at intermediate positions have a proportional co-ordinate. This is the basic idea of a texture co-ordinate. Notice that the co-ordinates assigned to the vertices are not their actual position.
You can assign texture co-ordinates as you please as they are only used to provide the pixels within the triangle co-ordinates. To keep the distinction between co-ordinates that fix the position of the vertices and assigned texture co-ordinates we usually use x,y for position and u,v for texture co-ordinates.
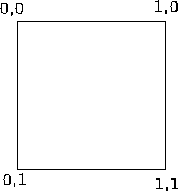
What has all this got to do with bitmaps? The answer is that we are going to load a bitmap, usually referred to as a texture map, into the GPU. A GPU bitmap has a standard co-ordinate system (0,0) to (1,1)
By applying texture co‑ordinates to the vertices of a fragment, we can sample pixels within the texture bitmap to set the color of the fragment’s pixel. To do this we need new shaders. The vertex shader becomes:
var vsScript =
 `attribute vec2 a_texCoord;
  varying vec2 v_texCoord;
  attribute vec2 vertexPosition;
  uniform mat3 transform;
  void main(void) {
    vec2 temp= vec2(transform*vec3(vertexPosition,1.0));
           gl_Position = vec4(temp,0.0,1.0);
           v_texCoord = a_texCoord;
          }`;
The new features are the two additional texCoord variables, one an attribute and one a varying. At the end of the shader, the attribute is passed to the varying which is automatically passed to the fragment shader. Vertex shaders can read and write varyings and they are automatically passed to the fragment shader where they are read only:
var fsScript =
        `precision mediump float;
         uniform vec4 f_color;
         uniform sampler2D u_image;
         varying vec2 v_texCoord;
         void main(void) {
           gl_FragColor = texture2D(u_image, v_texCoord);
         }`;
You can see that in the fragment shader we now have an image variable and the textCoord variable which is passed in from the vertex shader. The varying changes its value according to the position of the pixel being processed and the final line samples the color of the pixel in the bitmap at the specified texture co-ordinate.
To make this work we now need to load the bitmap into the GPU and set the texture co-ordinates on a suitable set of vertices. Loading the image into the GPU is a standard operation:
function loadBitmap(gl,img) {
  var texture = gl.createTexture();
  gl.bindTexture(gl.TEXTURE_2D, texture);
  gl.texParameteri(gl.TEXTURE_2D, gl.TEXTURE_WRAP_S,
                                     gl.CLAMP_TO_EDGE);
  gl.texParameteri(gl.TEXTURE_2D, gl.TEXTURE_WRAP_T,
                                     gl.CLAMP_TO_EDGE);
  gl.texParameteri(gl.TEXTURE_2D, gl.TEXTURE_MIN_FILTER,
                                     gl.LINEAR);
  gl.texImage2D(gl.TEXTURE_2D, 0, gl.RGBA, gl.RGBA,
                                  gl.UNSIGNED_BYTE, img);
}
The first two instructions create the texture. The next three set how it will be handled if it is sampled at different resolutions and outside of its borders. The final instruction associates the image object holding the bitmap with the texture. You can see that you have to specify its color format.
|