| Getting Started With NetBeans PHP - Local Projects |
| Written by Alex Armstrong | ||||
| Tuesday, 18 August 2015 | ||||
Page 2 of 2
A simple debug consoleOne of the simplest and often overlooked ways of getting basic debug information from PHP is to use the error_log function. This can be used to print any data you are interested in to a file. This doesn't sound too useful for debugging, but it is easy to turn it into a realtime display with minimal effort. The function:
will add whatever is stored in $data, complete with an added return, to the file mylog.log. You can use any file name and extension that you want to. The data is appended to the file, so it just grows until you delete it. If you use a relative path to the file then it is stored relative to the page that the function call is in. If you use an absolute path it is absolute within the file system, not the website root. That is "/mylog.log" is for example "C:/mylog.log" Having debugging data written to a file is useful, but you have to keep on loading it into an application to view it or repeatedly use an OS command to list it. Under Linux you can get a realtime view of what is being added to the file using the command:
Where you can replace mylog.log with the file name you used in the error_log command. Notice that you have to get the path to the file correct for this to work and as this is an OS command the path is always relative or absolute in the file system not the website root. If you are working under Windows there is an equivalent command, but it cannot be used in the command prompt. It only works in the PowerShell, which is like a super command prompt. Start PowerShell running and enter the command:
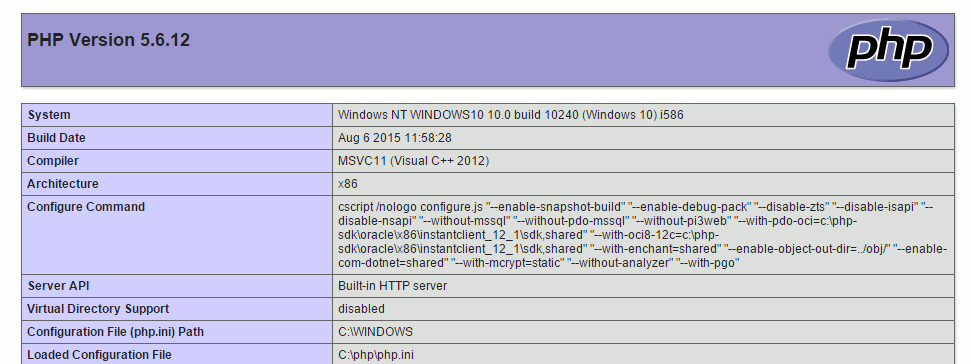
this will list the lines of mylog.log as they are are created. As before, you have to change the name of the log file to be correct and you generally need to enter the full path to the file. In either case, once you have set up the tail or PowerShell view of the file, the debug information can be seen in realtime and often this is all that you need to find out what your PHP program is doing. Full debugging with xdebugThere are times when nothing but a full debugger will do. If you are planning to do a lot of PHP development then you need to install xdebug. Even if you are just learning and experimenting xdebug can make what you are doing much easier. The only problem is xdebug has a reputation for being difficult to get working correctly. The good news is that the latest version of xdebug is much easier to use and it works with the PHP Built-in Web Server. Your first task is to download and install the correct version of xdebug. This is where a lot of beginners have difficulty because the version you require depends on the PHP version you have installed and the server. If you can work out which version you need then by all means just download it and get on with installing and using it. If you are in any doubt then make use of the new tool that the xdebug programmers have created. All you have to do is use phpinfo to get all of the information about your installation and then paste this into the new tool which then tells you which version you need and even what you need to do. First set up a PHP page with the single instruction phpinfo(); Run the program or load the page and you will see the familiar PHP info page:
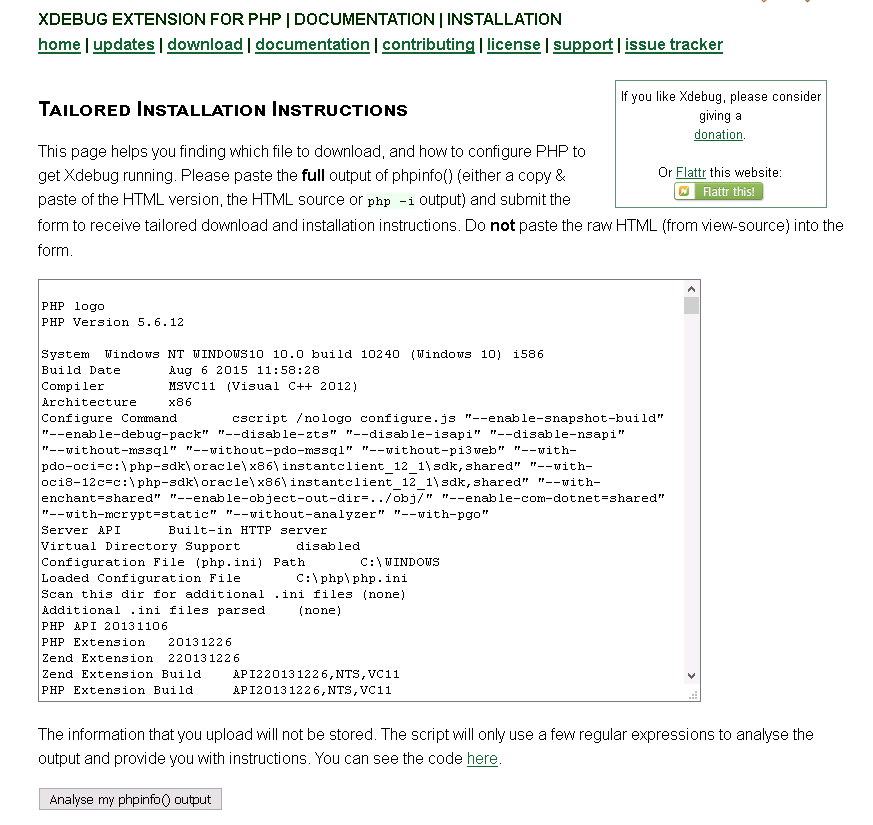
Select all of the page, use Ctrl-A if necessary, and copy and paste it all into the xdebug wizard at http://xdebug.org/wizard.php:
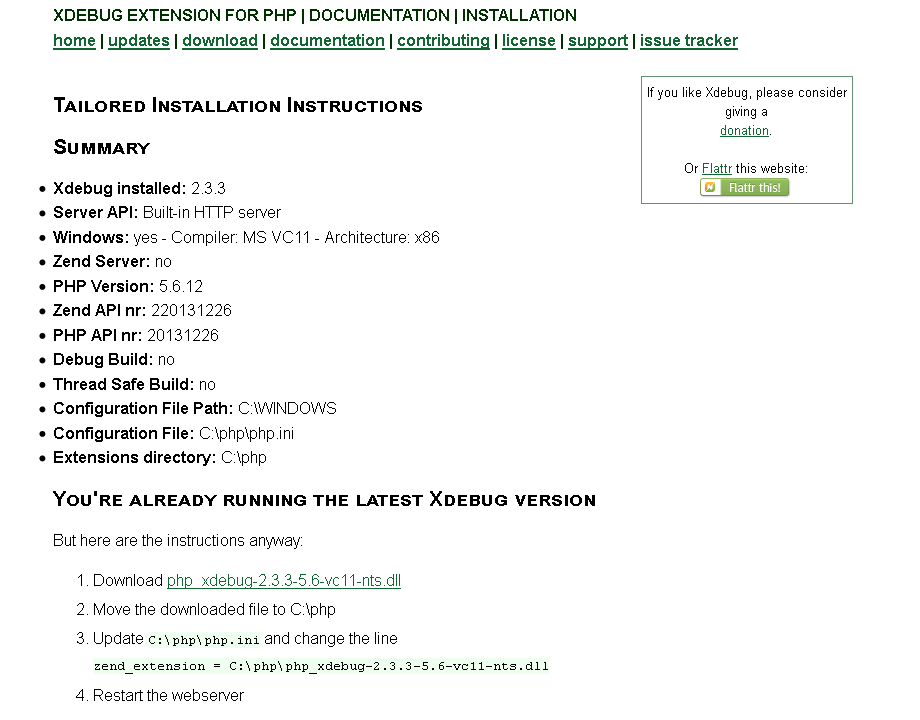
When you click the Analyse my phpinfo() output button you will see a list of recommendations:
Notice that it even tells you if you are already running the latest xdebug version. At the bottom of the page you will find step-by-step instructions - but note they are not quite complete for the NetBeen's set up you are using. First download the recommended file and move it into the same directory as your PHP installation - the instruction at the bottom of the page tell you explicitly what you need to do. Next use what ever text editor you like to create or edit the existing php.ini file in the PHP installation directory. Add the two lines:
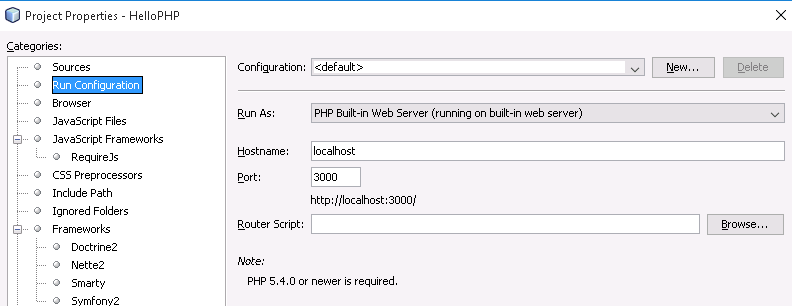
Of course you have to change the path and file name for xdebug to be correct for your installation. Finally in NetBeans, right click on the project name and select Properties. In the dialog box that appears select Run Configuration and change the port to 3000:
Now you should be ready to debug. Using the DebuggerTo place a breakpoint in your app by clicking on the line number you want the program to pause on. A red square appears to indicate a breakpoint - you can remove it in the same way.
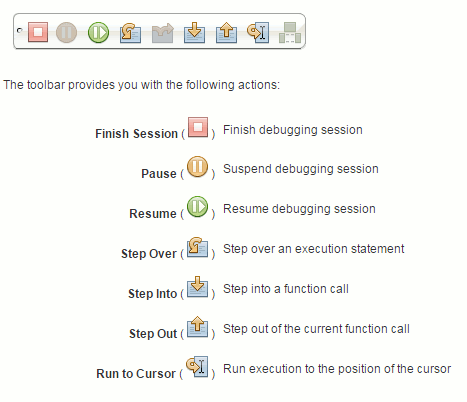
Now if you run using the Debug, File or similar command first the program will halt on the first line of the program. You can make is continue using the Debug, Continue (F5) command. It will halt again on the breakpoint you set. There is a range of debugging commands you can use to make the program move on in steps. Use Step Over to advance one instruction without drilling down into function calls and Step Into to drill down into function calls. If you are in a function use Step Out to execute to just after the return, i.e. the end of the function. You can also use Run to Cursor to stop at the current position withing the file. You can also make use of the icons in the debugger toolbar:
If things don't seem to be working property try Debug, Finish Debugger Session and start the debugging afresh. There are lots of debugger facilities and you can spend a long time finding out about them. It is worth knowing that you can view the current values stored in all of the variables using the Window, Debugging,Variables command to display the Variables window. There are many other debugging windows for you to explore:
It is also worth knowing that you can enable a debugger console using the Tools,Options command. In the dialog box that appears select PHP, Debugging and select the Show Debugger Console. This will show you all of the output that the PHP program generates, i.e. the web page it is building up. If you add:
to the PHP file then you can see the page being built up as the program runs, rather than having to wait till the program ends to see the buffers flushed.
Where NextThe PHP built in server is good for many things, but it isn't good for production use or for complex site development or testing. In the next article we look at remote local and remote working with a LAMP stack.
Related ArticlesPHP Inner Functions And Closure Object-oriented HTML Generation In PHP
To be informed about new articles on I Programmer, install the I Programmer Toolbar, subscribe to the RSS feed, follow us on, Twitter, Facebook, Google+ or Linkedin, or sign up for our weekly newsletter.

Comments
or email your comment to: comments@i-programmer.info <ASIN:1847198384> <ASIN:0596803028> <ASIN:1430229195> <ASIN:1430228474> <ASIN:0596804377> <ASIN:0596159773>
|
||||
| Last Updated ( Tuesday, 25 April 2017 ) |