| Getting started with Windows WorkFlow |
| Written by Mike James | |||
| Wednesday, 10 November 2010 | |||
Page 2 of 2
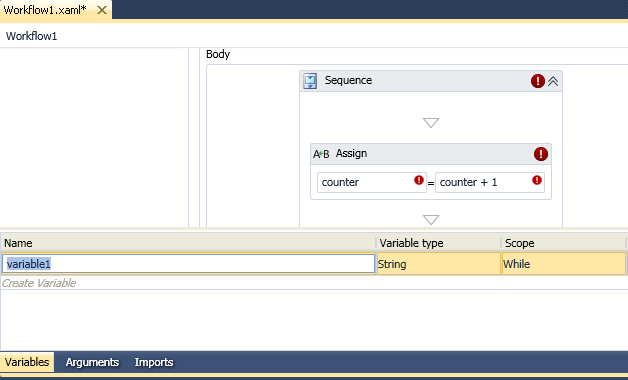
Diving deeperAt this point you might have got the idea behind WF but let’s push on into slightly more complex territory. Start a new Workflow Console Application and place on the designer a Sequence activity, and within this place a While activity. The While activity will repeat its body activity while the condition you specify is true. The body activity can be made into a set of activities by dropping a Sequence activity onto it. Within this second Sequence activity drop an Assign activity and enter the VB expression: counter=counter+1 You will see at this point an error icon because counter is a variable that doesn’t exist. To create variables we need to click on the Variables tab below the designer surface.
You can use the Create Variable command to create a new line with a new variable on it and edit the name, type and scope of the variable. In this case name the variable counter and make it an int32 with Sequence scope and a default value of 0. Finally enter the condition in the While activity as: counter <10 To display the result of the count add a WriteLine after the Assign activity and enter the expression: counter.ToString() In the outer Sequence add a Delay activity for 30 seconds.
Now if you run the project you should see 1 to 10 printed on the console window.
Working with codeAt this point you might be thinking that there is no code to play with in WF, but it is still there just below the surface. The designer generates a new class for you that you can work with in the Module.vb file.
Before getting involved in this let’s create an input parameter to the workflow. Click the Arguments tab – next to the Variables tab – and create an argument with the name upperlimit as an In argument, Int32 and default value of 10. Now go to the While activity and change the condition to: counter<upperlimit Next load the Module.vb file where you will see the code: Class Program This creates an instance of the Workflow1 class that the designer has produced. This is all good but if you want to interact with the class you have to make some changes to the code. Change the Main method to read: Shared Sub Main() Notice how the argument that you create is now a property of the workflow and you can set it to modify what the workflow does. You can also work without arguments to retrieve the results of a workflow. In general anything you can do in XAML you can do in code so it should come as no surprise to discover that you can create and work with workflow classes in code without the help of the designer. Of course this probably defeats the whole idea. In most cases your job as a programmer is to build an application that incorporates an embedded and customised designer to allow your users to create workflows that they can then execute to complete tasks. There is a lot more to WF but this much gets you started.
If you would like to be informed about new articles on I Programmer you can either follow us on Twitter, on Facebook , on Digg or you can subscribe to our weekly newsletter. |
|||
| Last Updated ( Wednesday, 10 November 2010 ) |