| Basic Dialog boxes |
| Written by Mike James | |||
| Wednesday, 01 December 2010 | |||
Page 2 of 2
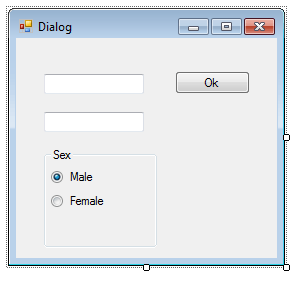
Getting the dataIf you are familiar with how VC++ implemented dialog boxes using the MFC you might recall that a big problem is getting the data values to and from a dialog box. The problem is that a raw system dialog box only exists while it is being displayed and the data it contains vanishes as soon as it is dismissed. Under .NET there is no such problem for one simple reason - after the dialog box has been dismissed it remains loaded and accessible. This makes it possible to directly access the controls on a dialog box to retrieve or set their value. For example, if you place two text boxes, a GroupBox and two radio buttons inside the GroupBox on the dialog box as shown here then you can retrieve the values in the controls directly.
Set the Button's DialogResult property to OK so that it will automatically terminate the dialog box. To access the values after the dialog box has closed you first have to make any control you want to work with accessible. To do this you first have to set the Modifiers property of any control that you want to access from the parent form to “Public” - use the Properties Window. If you do this for the UserName textbox then, after the user has finished with the dialog box you can access its contents using: Dim name As String = D.UserName.Text This is quick and easy but, of course it is also very dangerous. By setting the textbox control’s modifier to public the parent form not only has access to its value but to all of its properties. If this is not what you need then an access method that protects the controls and isolates the getting and setting of values from the actual controls you use is a much better idea. Using a data propertyWhat we really need is a property that can be used to gather all of the information in the dialog box and make it available to the parent window. This requirement can be met by a structure (struct in C#) set up so that when the property is accessed the get procedures load the values from the dialog box’s controls into the fields of the struct. This isn’t difficult but if you don’t do it in exactly the right way then you can quickly come to the conclusion that it is impossible – it isn’t. First we need a structure suitable for holding all of the data in the dialog box: Public Structure UserInfo The structure is public because the parent of the dialog box needs to use it to work with the data. The values in the dialog box don’t have to be returned “as is” and the UserSex field is a case in point. The Sex enumeration is: Public Enum Sex and we are going to process the radio buttons to select a value from this enumeration which is public for the same reason as the struct. Both are defined within the Dialog box class. Next we can define a public property called Data which is a UserInfo structure: Property Data As UserInfo You can set the values of the Data property directly but this causes problems with earier versions of Visual Basic .NET and in C#. So a better way to do the job is to first create a temporary struct to store the data in: Get Now we can simply transfer or process the data in the dialog box into the temporary structure: temp.UserName = UserName.Texttemp.User Finally we simply return the temporary structure as the value of the property Return temp The same technique can be used to add a structure property to any class or even a class property to any class. The complete property definition is: Property Data As UserInfo This is all we have to do to make the dialog box give up its data when the user dismisses it. In the calling code all we have to do to get the data is declare a structure of the correct type to store it: Dim D As New Dialog Notice how easy this is. Now we have all of the dialog data in the struct ready to use. Of course in a more elaborate example you would need to define the Set method and this is much simpler. For example: Set(ByVal value As UserInfo) Now you can set the dialog box data before displaying it: Dim D As New Dialog The fact that the dialog box isn’t destroyed after the user has dismissed it is a great simplification as far as getting the user data is concerned but… remember to use its Dispose method as in: D.Dispose(); when you have finally finished with it. Dialog boxes may be simple but a well-organised approach to using them will pay off in the future. <ASIN:0470532874> <ASIN:0521721113> <ASIN:0073517259> <ASIN:0132152134> <ASIN:0672331136> <ASIN:0470502223> |
|||
| Last Updated ( Wednesday, 01 December 2010 ) |