| Getting started with 3D XNA |
| Written by David Conrad | ||||||||
| Friday, 30 July 2010 | ||||||||
Page 5 of 7
Basic effectsWith the cube built and ready to go what we now need to do is work out how to display it. XNA has no default graphics processing pipeline and you are supposed to create vertex and pixel shaders to provide whatever special effects are essential to your game. 
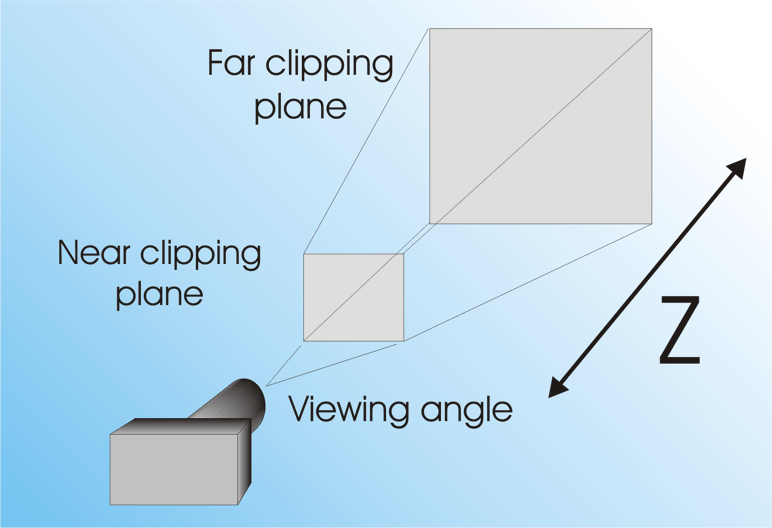
This is a reasonable approach in that most graphics cards have supported programmable shaders for a long time and it’s the reason graphics have improved so much. However, having to master High Level Shader Language (HLSL) makes it difficult to get started. Fortunately a pair of predefined vertix and pixel shaders are provided and they are combined in a single BasicEffect class. This implements a number of colouring, texturing and lighting options and is a good way to begin learning about shaders. If you have used 3D graphics systems before you will recognise much of what has to be initialised in BasicEffect as being the standard way we have to set up a view. The big difference with XNA is that the pipeline that creates the view and renders the vertexes is fully programmable and the BasicEffect is just one way to do the job. Moving to the Initialize routine we need to create a BasicEffect instance: private BasicEffect effect; There are lots of lighting effects we could set, but for simplicity let’s keep to a white ambient light colour and a single directional white light coming from the bottom right and out of the screen: effect.AmbientLightColor = Vector3.One;All that remains is to switch the lights on: effect.LightingEnabled = true; Lights, model, camera, action!An important part of understanding any 3D system is how the objects can be placed in the 3D world being constructed. When you create a model such as the cube you can nearly always create it so that is centered on the origin. You can think of each model as having its own model space that only it occupies. Before it is displayed the model is rotated, scaled and moved by the “World” transformation which is specified by the effect’s World matrix. The “perspective” transformation determines how the 3D world is converted into a 2D rendered bitmap. It defines the “viewing cone” and essentially determines how much perspective is used in rendering the 3D scene. You can think of the view cone as being something like the lens on a camera. A large view angle corresponds to a wide angle lens and a small view angle to a telephoto lens. By default the viewpoint of the rendering is at the origin of the world coordinate system. You can think of this as being equivalent to the “camera” being at the origin and pointing along the z axis. A third and final transformation supported by the effect is implemented by the “view” matrix. You can think of this as moving and possibly rotating the camera so that it can see different parts of the 3D world.
The perspective transformation is defined by the view cone
<ASIN:1430272058> <ASIN:1430232196> <ASIN:0596521952> <ASIN:B0028G5PM2@ALL> <ASIN:0672333457> <ASIN:0735623945> <ASIN:1449388361> |
||||||||
| Last Updated ( Friday, 30 July 2010 ) |