| Micro:bit Commando Jump Using MakeCode |
| Written by Sue Gee | |||||
| Monday, 09 April 2018 | |||||
Page 2 of 4
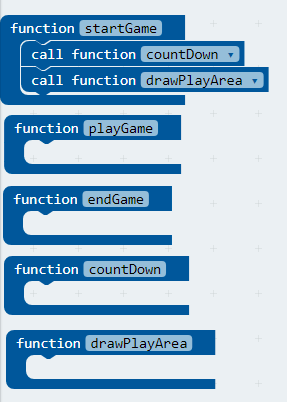
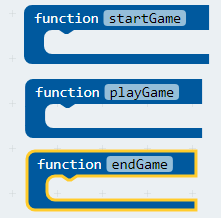
Starting the Program - Top DownThere is always a problem in getting started. A blank sheet of paper, or its digital equivalent a blank screen, is scary - for most people anyway. There is an old, but still incredibly useful, approach to programming, and many other things, called "top down programming". What you do is assume that you have already solved all of the problems in writing your program. So, for example, in our game we can pretend that we have a function that starts the game, one that plays it, and a function that ends it. If you don't know about functions you need to look them up, but at their simplest they are a way of grouping a block of code under a name and from then on you can use the block of code by simply using its name. For example, start a new project and create three new functions:
If you haven't discovered yet how to create a new function you need to look in the Advanced tab. If you switch to text view you will see the first lines of the program define three new functions, startGame, playGame and endGame. All each one does at the moment is stand in for the function you are going to write. In the jargon these are called "stubs" and the idea is that the stub stands in for the real function that you haven't written yet. Not particularly useful but we can now write our program as:
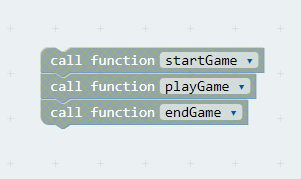
or in blocks:
This is the joy of top down programming. Of course, you now have to fill out the definitions of each of the functions to actually do something, but this isn't unreasonable. Another advantage is that you can fill in one of the stubs and still run and test the program while the other stubs remain stubs. This is called stepwise refinement. Refining the startGame functionThe easiest of the functions to refine is startGame. Let's add some code to show the player a short countdown to the start of the game and then display the wall, which constitutes the playing area of the game. Of course we don't actually start coding but define two more functions countDown and drawPlayArea and call them within startGame:
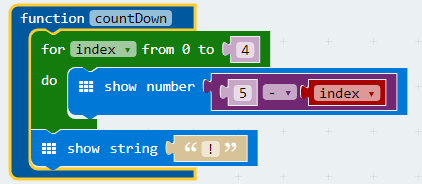
This may at first seem like procrastination of the worst sort, but as your arithmetic teacher should have told you: "put off doing any working out as long as possible". This is equally true of top down stepwise refinement. Each time you need to use an action don't write the code for it. Instead create a new function and come back to the problem later. There does come a time when you can't split something down into yet more functions so now we do need to write some code to create the functions in startGame. However, you should aim to keep all of your functions shorter than ten or so lines of code. The countDown function is simply:
This uses a for loop to count from 0 to 4 which displays the count i.e. 5, 4, 3, 2, 1 and then shows an exclamation mark to indicate the start of the game. After waiting for one second it blanks the screen by printing a space. The generated code is:
JavaScript has a complete C-style for loop and while this is powerful it isn't easy for beginners. Compared to a for loop in the style
or even Python's For I in Range(1,5) it can seem like rocket science. Not a good choice for teaching programming, but it is the way most for loops are written today. The blocks present the JavaScript for loop as something simpler
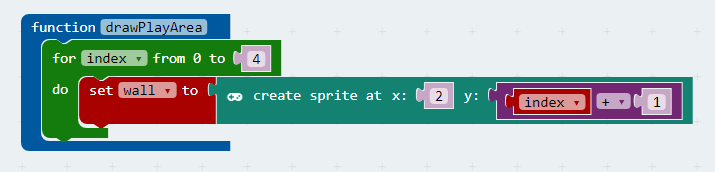
The drawPlayArea function is just as easy:
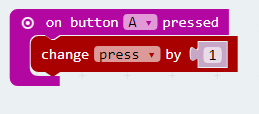
This displays a "wall" of full on LED in the middle of the screen x=2 and y runs from 1 to 5. As the for loop has a fixed start, i.e. zero, and always runs up learning how to modify the index to give the actual range required is something that has to be learned early. In this case the index goes from 0 to 4 and adding one gives 1 to 5. Notice that we have to use sprites for the wall, even though it isn't going to move, simply because we are going to use a sprite for the commando. Turning LEDs on and off directly doesn't work well with sprites as placing a sprite clears the screen. The generated code is: function drawPlayArea() {for (let index3 = 0;index3 <= 4; index3++) {wall = game.createSprite(2, index3 + 1)}}Notice that both of these functions are simple and this is another advantage of top down programming. It means you only ever have to deal with small functions that do simple things and not a huge program made up of lots of lines of code. Counting button pressesUnlike MicroPython, the Blocks Editor doesn't provide a button press count function, but it is easy and instructive to create one. The system and the language supports asynchronous events. The on button x pressed block can be placed on the editor away from the rest of the program. It isn't in the main line of execution because it executes its do blocks when the user pressed the button - as its name suggests. So if we want to count the number of times that user has pressed a button all we need is a variable press to increment each time button A is pressed.
The code is:
input.onButtonPressed(Button.A,() => {press += 1})and you could have a lot of fun trying to explain that to a beginner. We need to remember to set press to zero in the playGame function. |
|||||
| Last Updated ( Friday, 18 May 2018 ) |
 Again, you may not be too impressed, but we have a program that we can compile, run and test. We have a start and no longer have a blank screen to look at.