| Mapping in WPF |
| Written by David Conrad | |||||
| Tuesday, 11 January 2011 | |||||
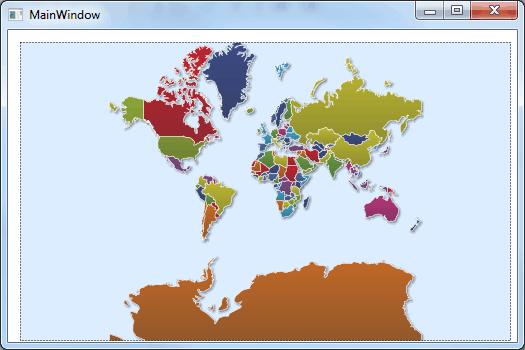
Page 1 of 4 Mapping isn't just about route planning. Representing data as maps is an important task and with the help of a Map control you can do geospatial statistics and more in WPF. The first thing to clear up - this isn't about using Bing Maps or Google Earth in WPF.Instead, what this project is about is creating maps used to present data. In this case "map" means almost any 2D representation of data - not necessarily geographic data. For example, you could create a "map" of network traffic or of a biomedical scan. The component that we are going to use, xamMap, is part of Infragistics Data Visualization toolkits and is, at the time of writing, available as a CTP edition. As a CTP it is subject to change and you need to keep this in mind while using it. It is, however, well developed and any changes should be minor.The Infragistics' two new NetAdvantage Data Visualization toolsets, one for WPF, the other for Silverlight contain lots of handy and impressive data presentation components and they work in roughly the same way. So answering the all important question for one of them gives you a good guide as to how related toolsets work. It is assumed that you have the Infragistics Data Visualization components installed and a copy of Visual Studio all setup and ready to go. You can, of course, try out the project using a free trial download of the NetAdvantage for WPF Data Visualization components. ShapefilesThe key idea behind the map control is that is it uses a Shapefile to determine what it displays. A Shapefile is a standard format for storing geospatial data. It consists of a number of different files - the .shp file which holds the geometry, the .shx file which acts as an index to the geometry file and the .dbf file, a data table in dBase IV format. There are many other optional files that can be included as part of a Shapefile collection. The first problem is getting a Shapefile. For some projects you will either have to create your own custom Shapefile or modify an existing file. Neither of these is difficult, but to get started we need a free-to-download Shapefile. There are a number of sources but the simplest and most general choice is the world map available from: http://www.vdstech.com/map_data.htm The Shapefiles are zipped together into a single world.zip file which is also included in the download of the entire project available in the I Programmer Codebin - see the end of the article for details. After downloading world.zip you need to unzip it to a suitable directory where you will find three files world.dbf, world.shp and world.shx. Starting the projectStart a new Windows WPF project and create a folder called Shapefiles in the root project directory. Next copy the Shapefile into the new directory. This can be done most easily by dragging-and-dropping the unzipped files directly into the directory within Visual Studio - but you can do the same job using the filing system. Next select Properties on each of the files in the directory and set the Copy to Output directory to Copy if newer. This will ensure that any changes you make to these files results in the files being copied to the output directory of the compile be it Debug or Release. Of course in a real application you would probably want to put the shape files in a dedicated directory away from the code files - but this arrangement works well for this demonstration. Next we need to move to the layout editor and place an instance of the xamMap control on the page. You can size and position this as required. To show the map in action the simplest thing to do is to define a single layer - there can be multiple layers in a single map display - and load the Shapefile into it. This is easy to achieve in code. First add: using Infragistics.Controls.Maps; To add a layer first we create a MapLayer object: MapLayer WorldLayer = new MapLayer(); You can place all of the code introduced here in the MainPage constructor after the InitializeComponent call. Next we need a ShapeFileReader initialized to the URL of the Shapefile: ShapeFileReader reader = The URI is relative to the current application directory which is either Debug or Relase if you are running under Visual Studio. Of course if you choose to store the Shapefiles in another directory or on the server then you will have to change the URI. Finally we set the MapLayer's Reader property to the ShapeFileReader and load the Map control with the layer: WorldLayer.Reader = reader; If you now run the program you will see a blue area where the Map control is sited and after a few moments for the Shapefile to load you should see a map of the world. About the only thing that can go wrong is if you get the name of the Shapefile wrong. In this case you won't see an error message or an exception - WPF tends to be "quiet" in situations where a file goes missing to try to give the user the impression that everything is working. If you still see a blue area after a few moments then it is almost certain there is something wrong with the file name you have specified as the URI.
There are other map layout controls that you can use in roughly the same way as the MapNavigationPane - MapScalePane, MapColorSwatchPane and MapThumbnailPane.
|
|||||
| Last Updated ( Tuesday, 11 January 2011 ) |