| Getting Remote WMI (DCOM) to work |
| Written by Mike James |
| Wednesday, 15 July 2009 |
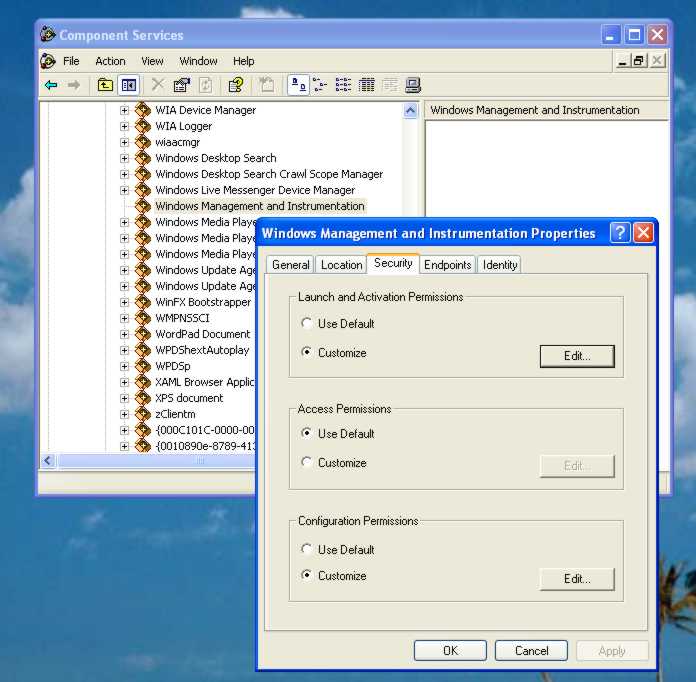
Remote WMI and DCOMOne of the really powerful features of WMI is that it is implemented using DCOM and hence can work remotely. That is, you can connect to another machine and read all of its WMI information as easily as on your local machine. Unfortunately in today’s security-conscious times running remote procedures is more difficult than ever before – in fact it can seem impossible. If you only want to use WMI or COM on a local machine then what follow is fairly irrelevant. On the other hand if you do want to use remote WMI then read on because you won’t easily find out how to make it work from other sources. The description of coding the WMI queries uses C# but the principles are the same and can be applied to any language including scripts. First the easy part – the .NET coding. Every WMI query has a “scope” which defines where it should be executed. If you don’t set a scope then it defaults to the local machine and the standard WMI information. To run a WMI query on another machine you first create a ManagementScope object: ManagementScope ms = new ManagementScope( Of course you have to replace “machine name” by the name of the actual machine you want to connect to. The “\root\cimv2” path gives the location where all of the WMI objects relating to the Microsoft environment are stored. It’s always a good idea to check that you can actually connect to the remote machine by ping-ing it using the same name. You need to have the necessary security privileges to connect to a remote machine and by default you have to be an administrator - either on the local machine or a domain administrator. You can set the users and groups who are able to connect to a machine using the Component Services management tool which you can find in Administrative tools. Expand the hierarchy until you can see DCOM Config and then find the Windows Management and Instrumentation object. Right click, select Properties, select the Custom Tab and set Custom security for Launch, Access and Configuration to include the users or groups you want to allow to use WMI remotely.
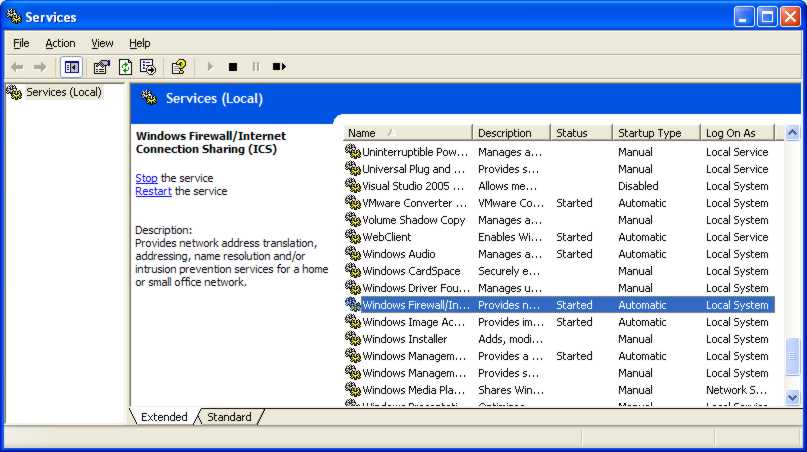
To set the credentials for the user in a program you can use: ms.Options.Username = "user name"; where “user name” and “password” need to be replaced by a valid identity with permission to log on to the remote machine and use WMI. The Impersonation property simply makes the remote DCOM objects that implement WMI run as if the specified user had logged on to the remote machine. It is secure in the sense that you can’t do anything remotely that you couldn’t do logged on to the machine directly. Use Component Services to add remote WMI usersThe only remaining task is to set the authentication used – XP uses Packet and earlier systems use connection authentication – and connect: ms.Options.Authentication = At this point WMI attempts to make a TCP connection with the remote machine and nearly always fails! If it fails with an error message that says the user is unauthorised then you need to use Component Services to edit the security settings. However, in most cases it will fail with an RPC Server not found error or "The RPC server is unavailable".The "not found" error can be due to the machine name not resolving to an IP address (check you can ping the machine using that name) but the "RPC server is not available" is a sure sign that the firewall is the problem. The reason for this is that since Windows XP SP2 the default firewall settings block RPC and WMI in particular. The definitive test to check that it is the firewall that is blocking remote WMI is to run the Services Manager which can also be found in Administrative tools, scroll down until you find Windows Firewall and then click “stop” in the right hand pane – you need to do this on both the remote and local machines. If you can now connect to the remote machine the problem is the firewall, if you still can’t then the problem is that the machine name you are using isn’t being resolved to an IP address.
Service Manager is the easiest way to turn off the firewall
There are lots of documents on the Microsoft website and elsewhere explaining how to make the firewall work with WMI/DCOM but I have never had any success making any of these proposed methods work reliably – there are just too many security patches. This “total security lock down” is becoming a real problem for application developers. There are two ways of dealing with it. The first and simplest is to switch the firewall off – but this isn’t something that many will want to consider. The second is to open the ports used by WMI. The problem is that WMI uses DCOM which after the initial connection randomly assigns a port number for all further communication – you clearly can’t open a random port number in advance. The only solution I have found to work is to use the Component Services Manager to set the range that the random port is allocated from to something small and then manually open each one. To do this you start the Component Services Manager again and right click on My Computer and select Properties. Click the Default Protocols tab and double click on the entry “Connection oriented TCP/IP”. Use the Add button to add a suitable range of ports say 5000-5010 and click OK. After this all COM+/DCOM services will select a port in this range. To open the ports open the Windows Firewall from the Control Panel, and add one entry for each port in the range 5000 to 5010 and one for port 315 which is the port used for the initial connection. All ports are TCP and you have to open port 315 on the local and the remote machine but the random ports only need to be open on the remote machine. After a restart, which is the only way to reinitialise the RPC service, you should find it all works. Once you have a connected Management Scope object you can set it as the Scope of a ManagementObjectSearcher and proceed as normal, only now retrieving information from the remote machine: ManagementObjectSearcher WMISearch = <ASIN:0735622310> <ASIN:0321501713> |
| Last Updated ( Sunday, 19 July 2009 ) |