| Exploring Edison - I2C Bus |
| Written by Harry Fairhead | |||||||||||||||||||||||||||||||||||||||||||||||||||||||||||
| Monday, 23 November 2015 | |||||||||||||||||||||||||||||||||||||||||||||||||||||||||||
Page 1 of 3 The I2C bus is one of the most useful ways of connecting moderately sophisticated sensors and peripherals to the Edison. The only problem is that it can seem like a nightmare confusion of hardware, low level interaction and high level software. There are few general introductions to the subject because at first sight every I2C device is different, but here we present one. This is a chapter from our ebook on the Intel Edison. The full contents can be seen below. Notice this is a first draft and a work in progress. Use the comments or email harry.fairhead@i-programmer.info with your queries or suggestions.
Now On Sale!You can now buy a print edition of Exploring Intel Edison.You can buy it from:
USA and World Amazon.com Chapter List
<ASIN:1871962447>
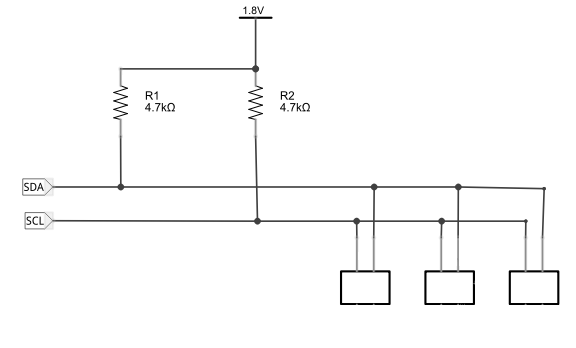
The I2C bus is a serial bus that can be used to connect multiple devices to a controller. It is a simple bus that uses two active wires - one for data and one for a clock. Despite there being lots of problems in using the I2C bus because it isn't well standardized and devices can conflict and generally do things in there own way it is still commonly used and too useful to ignore. The big problem in getting started with the I2C bus is that you will find it described at many different levels of detail - from physical bus characteristics, the protocol, the details of individual devices. It can be difficult to relate all of this together and produce a working anything. In fact you only need to know the general workings of the I2C bus, some general features of the protocol and know the addresses and commands used by any particular device. To explain and illustrate these idea we really do have to work with a particular device to make things concrete. However the basic stages of getting things to work - the steps, the testing and verification - are more or less the same irrespective of the device. I2C Hardware BasicsThe I2C bus is very simple. Just two signal lines SDA and SCL the data and clock lines respectively. The each single line is pulled up by a suitable resistor to the supply line at what ever voltage the devices are working at 3.3V and 5V are common choices but it could be 1.8V as well, The size of the pullup resistors isn't critical, but 4.7K is typical as shown. You simply connect the SDA and SCL pins of each of the devices to the pull up resistors. Of course if any of the devices have built-in pullup resistors you can omit the external resistors. More of a problem is if multiple devices each have pull ups. In this case you need to disable all but one set. The I2C bus is an open collector bus. This means that it is actively pulled down by a transistor set to on. When the transistor is off, however, the bus returns to the high voltage state via the pullup resistor. The advantage of this approach is that multiple devices can pull the bus low at the same time. That is an open collector bus is low when one or more devices pulls it low and high when none of the devices is active. The SCL line provides a clock which is used to set the speed of data transfer - one data bit is presented on the SDA line for each pulse on the SCL line. In most cases the I2C bus has a single master device - the Edison in our case - which drives the clock and invites the slaves to receive or transmit data. Multiple masters are possible, but this is advanced and not often necessary. The Edison cannot work with multiple masters. At this point we could go into the details of how all of this works in terms of bits. However, the Edison and the mraa software handles these details for us. All you really need to know is that all communication occurs in 8-bit packets. The master sends a packet, an address frame, which contains the address of the slave it wants to interact with. Every slave has to have a unique address - usually 7 bits but it can be 11 bits and the Edison does support this. One of the problems in using the I2C bus is that manufacturers often use the same address or same set of selectable addresses and this can make using particular combinations of devices on the same bus difficult or impossible. The 7-bit address is set as the high order 7 bits in the byte and this can be confusing as an address that is stated as 0x40 in the data sheet results in 0x80 being sent to the device. After sending an address frame it then sends or receives data frames back from the slave, There are also special signals used to mark the start and end of an exchange of packets but the Edison takes care of these. This is really all you need to know about I2C in general to get started but it is worth finding out more of the details as you need them - you almost certainly will need them as you debug I2C programs. Edison I2CThe Edison supports two I2C buses but only one is usable on the Arduino breakout board. For this reason it is better to use I2C-1 unless you have a very good reason not to. The pins used on the mini-breakout board, including ground and power lines that are concerned with I2C:
As we are going to use a 1.8V sensor and I2C bus 1 the pins that we are going to use are:
|
|||||||||||||||||||||||||||||||||||||||||||||||||||||||||||
| Last Updated ( Monday, 23 November 2015 ) |