| WinRT JavaScript - The App Bar |
| Written by Ian Elliot | ||||
Page 2 of 3
Hooking up EventsOf course to actually do anything we need to set event handlers for the AppBarCommand objects. The best way to do this is to use the addEventListener method of the command object. For example to set an event handler on mybutton1 you would use:
You could also use the click property of the AppBarCommand object. As well as click the addEventListener can set handlers for beforeshow, beforehide, aftershow and afterhide. Alternatively you could set up an event handler on the appbar and use the event object to work out which button caused the click:
Button TypesSo far we have only looked at the simple button AppBarCommand object but there are four different types: button, toggle, flyout and separator. You can set the type of an AppBarCommand object using its type property. For example to add a separator you would use:
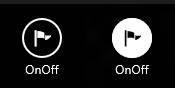
Notice that the way that the separator shows also depends on the tag you use - hr (horizontal rule) draws a single vertical bar. The toggle type is very simple. If you set a button to be a toggle then it supports the selected property which flips its logical state each time the user clicks the AppBarCommand. The icon used is also color reversed in the on or true state. You can also use the selected property to set the initial state of the toggle either in HTML or in code.
Creates toggle button which is initially set to true. In code this would be:
The problem with the toggle button is that it doesn't give much feedback to the user. How can the user know what the state of the icon corresponds to or even which state of the icon is on or off
The only resonable solution is to write some code to change the text
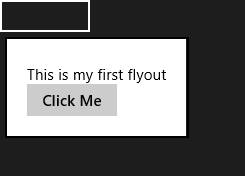
The final type of control is more complicated that the others in that involves the use of another control - the flyout. Let's take a look at how this works first. The FlyoutThe flyout is a replacement for the dialog box. You can make a flyout appear anywhere on the screen and its contents can be any HTML you want to use. In this sense a flyout is a mini-HTML page. For example you can define a simple flyout as:
This flyout has a single button and some text but you can add more of any control you care to use. To make the flyout appear you need an anchor element to provide the position of the flyout. In this case we can just add a button:
Now all we need is an event handler:
If you are wondering why the first line isn't
the obvious answer is that myFlyoutButton isn't a WinJS control but a standard HTML control. There is an argument for adding WinJS counterparts of all HTML controls for uniformity. Now if you click on the button the flyout appears in the location specified.
If the user clicks on the surface away from the flyout then it is hidden. Of course you can make the flyout do useful things by simply attaching event handlers to the button and any other controls it contains. |