|
Page 1 of 3 You can create an Android UI using code rather than XML but this isn't as well known. Here's how to do it in Java, in an extract from my published book Android Programming in Java: Starting With An App.
Starting With an App
Third Edition
Is now available in paperback and ebook.
Available from Amazon.
- Getting Started With Android Studio 3
- The Activity And The UI
- Building The UI and a Calculator App
- Android Events
Extract: Using Lambdas
- Basic Controls
- Layout Containers
- The ConstraintLayout
Extract: Guidelines and Barriers
- UI Graphics A Deep Dive
Extract: Programming the UI ***NEW
- Menus & The Action Bar
- Menus, Context & Popup
- Resources
- Beginning Bitmap Graphics
Extract: Simple Animation
- Staying Alive! Lifecycle & State
- Spinners
- Pickers
- ListView And Adapters
If you are interested in creating custom template also see:
Custom Projects In Android Studio

Programming The UI
If you want to be a really good Android programmer, not only do you need to know how to create a UI, but also how the UI is created. To be really confident in what you are doing, you need to understand some of the inner workings of the Android graphics system. This is also essential if you want to modify the UI in code and work with menus.
A UI Library
There are lots of different UI construction kits for Java and other languages, AWT, Swing, Qt, MFC, WPF and on, and you might think that mastering them all would be a difficult, if not impossible, task. In fact it is a lot easier than you might think because most UI libraries use the same general approach and the Android UI library, which doesn't seem to have a given name, is no different. Let's take a careful look at how it works.
An Activity has a window associated with it and this is usually the entire graphics screen of the device it is running on. In other words, an Activity can allow other Java classes to draw on the device's screen. However, rather than simply providing direct access to the graphics hardware, there is an extensive set of classes that make building a UI and performing graphics operations easier.
Before we look at general graphics we need to first find out how the UI is constructed.
The View
The basis of all UI components and general 2D graphics is the View class. This is a general-purpose class that has lots and lots of methods and properties that determine how it will display the component or other graphics entity it represents. It also takes part in the event handling system, which means Views can respond to events. There are View classes that implement all of the standard components that you make use of in the Android Studio Designer, i.e. Button, TextView and so on.
Every View object has an onDraw method that can draw the graphic representation of what it represents onto a Canvas object which is essentially a bitmap with drawing methods. What happens is that the Activity calls the View's onDraw method when it needs to update the UI and passes it a Canvas object that it then renders to the screen – you don't have to worry about how the Canvas is rendered to the screen at this level. You can think of this as, “every View object knows how to draw itself”.
To summarize:
-
An Activity can be associated with a View object.
-
When the Activity needs to draw its UI it calls the View object's onDraw method e.g. view.onDraw(Canvas).
-
The View object then draws on the Canvas whatever it needs to, whether a button, text or something else.
-
The Activity then displays the Canvas object on the screen.
An Activity can only be associated with a single View object, which determines what is drawn on the screen. This might seem a bit limited but, as you will see, it is far from limited because View objects can be nested within one another.
Using setContentView
How do you set a View object to show in the Activities window?
The answer is that you use the Activities setContentView method, which is what we have been doing all along.
To see this in action, start a new Basic Activity project and change onCreate to read:
@Override
protected void onCreate(Bundle savedInstanceState) {
 super.onCreate(savedInstanceState);
 Button b = new Button(this);
 setContentView(b);
}
Don't forget to use Alt+Enter to add the import statements needed to allow you to use the Button class, and don't leave any code in onCreate that would use other View objects such as the menu.
The first instruction creates a Button object, which is a subclass of View, and the second sets this as the Activities View. If you run this program what you will see is a gray area that fills the entire screen:
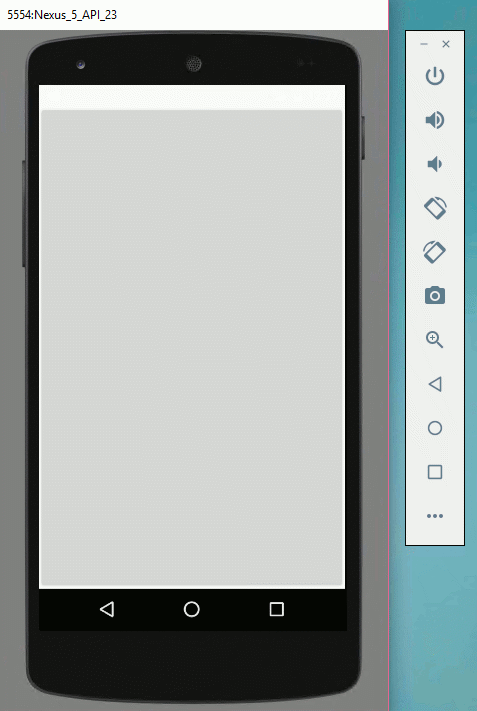
Yes, this is the button! You can even click it although, with no event handler, nothing happens.
<ASIN:1871962544>
<ASIN:1871962552>
|