| Android Adventures - Custom Dialogs Using DialogFragment |
| Written by Mike James | |||||
| Thursday, 19 June 2014 | |||||
Page 4 of 4
The BackstackYou may be happy with the behavior of the dialog as it is. However, it doesn't currently take part in the operation of the back button. For example if the dialog is showing then pressing the back button doesn't dismiss it - it dismisses the entire application. That is the back button works as if the dialog wasn't on the screen. If you want to include the dialog in the backstack you simply have to add it. This is only slightly more complicated. In the Activity's button click handler you have to use the FragmentManager to create a FragmentTransaction:
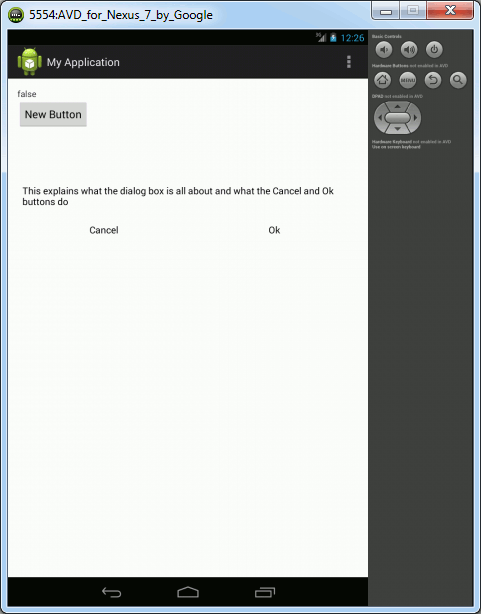
Now if you run the program you can display the dialog and when you click the backbutton the dialog is dismissed and you get back to the app. You can use the Backstack in more complex ways but remember a dialog box should be modal and hence including it in an apps "history" is going against this basic idea. If you find you want to allow this sort of behaviour then this is probably a clue that you shouldn't be using a dialog. Displaying The Dialog In The Main UIAs already explained on of the advantages of using a DialogFragment in the way described is that you can embed it in the Apps UI just like any Fragment - as long as you haven't made unconditional use of the Dialog object. The obvious reason is you can't just assume the Dialog object exists as it is only created if the show method is called. To display the example dialog in the main UI first we need to add a suitable container. Add a FrameLayout to the Activity's UI and give it the id container. This will be used to display the dialog's UI. The only change we need to make to the DialogFramgment is to test to see if there is a Dialog object available for use:
With this change the DialogFragment can be used as a dialog or as part of the UI. To add the DialogFragment we need to change the button's OnClick handler to read:
This is of course exactly what you would do to display a Fragment. If you now run the program you will see the dialog UI displayed as part of the Activity's UI.
However it isn't quite like a standard UI Fragment. Now when you select the Cancel or Ok buttons the UI disappears! The reason of course is that you are still calling the dismiss method to remove the dialog. Even if you display the DialogFragment in the Activity's UI the dismiss method still removes the DialogFragment from the FragmentManger. Summary
Dialogs In DialogFragmentEarlier it was mentioned that using the onCreateView method wasn't the most frequently used way of creating a dialog UI. In fact it is more common to customize the Dialog object that is created within the DialogFragment. This is where things like AlertDialog come into the picture. In this case the displayed UI comes 100% from the Dialog object and the DialogFragment can only be used with the show method and if you add it to the FragmentManager then the Dialog UI will not be displayed. It is arguable that using the old Dialog class in this way is unnecessary, but it is the way things are done and you need to understand it. This is the topic of the next chapter.
You can download the code for the programs from the CodeBin (note you have to register first).
Android Adventures - Mastering Fragments & Dialogs
ContentsThis book is currently being revised. Chapter 5 and later refer to an earlier version of Android Studio - revisit for updates.
If you are interested in creating custom template also see: Custom Projects In Android Studio
To be informed about new articles on I Programmer, install the I Programmer Toolbar, subscribe to the RSS feed, follow us on, Twitter,Facebook, Google+ or Linkedin, or sign up for our weekly newsletter.
Comments
or email your comment to: comments@i-programmer.info
|
|||||
| Last Updated ( Saturday, 25 July 2015 ) |