| Raspberry Pi IoT In C - 1-Wire Via Serial |
| Written by Harry Fairhead | ||||
| Monday, 28 December 2020 | ||||
Page 2 of 3
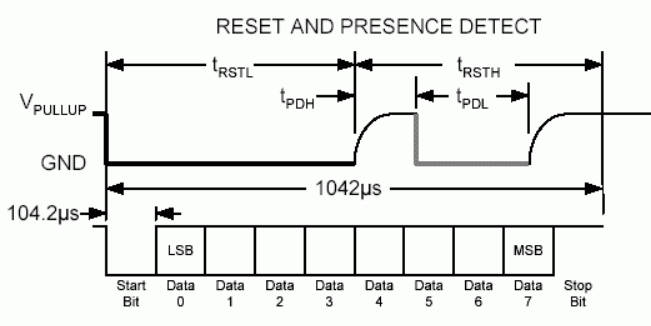
Using A UART to Work with 1-WireAs an exercise in using a UART to decode a general serial protocol we can implement the temperature-reading function given in Chapter 14 to read the DS18B20 one-wire device. This is more than a useful exercise as it provides access to the device which works irrespective of what the operating system is doing. The raw getTemperature function fails once or twice in every 100 reads due to the operating system spoiling the timing. This isn’t a serious problem as the error is easily detected as a crc error and the temperature can be re-read. However, the UART approach described next never misses a reading as long as the 1‑wire bus isn’t noisy – that is, the operating system never causes a timing error. The reason is that the UART gets on with the job of measuring the line state independently and it has buffers that make sure no data is ever lost. The first thing we have to do is deal with the electronics. In this example we are using a Pi 4 with UART3 enabled on GPIO3 and GPIO4. As the output has a pull-up where the standard UART pins have pull-down this makes things slightly simpler. If you are going to use the standard UART pins you have to use a transistor to convert the pull-down into a pull-up. If you do use GPIO3 and GPIO4 then all you have to do is connect them together and to the DS18B20 data line, with the other pins connected to 3.3V and ground respectively. The basic idea is that we can use the UART to send an initial stop pulse which pulls the line down. After this we can send data on the line for a write or just allow the DS18B20 to pull the line low. Of course, we have to get the timing right. Let’s start with the presence/reset pulse. If we use a speed of 9600 baud, the start bit pulls the line down for 104.2µs, the next four zero bits holds the line low for 502µs and then the final four one bits allow it to be pulled up. If there is a device connected to the line, it will pull the line down for a few microseconds. The serial port will read the line at the same time it is being written as the RX is connected to the TX. The TX sent 0xF0, and you might expect this to be what is received. If there is no device connected then RX will receive 0xF0, but if there is an active device connected the line will be pulled down for some part of the last four bits. As the low order bits are sent first this causes the RX to receive something like 0xE0, 0xD0, and so on i.e. some of the four high order bits are zeroed by the device pu
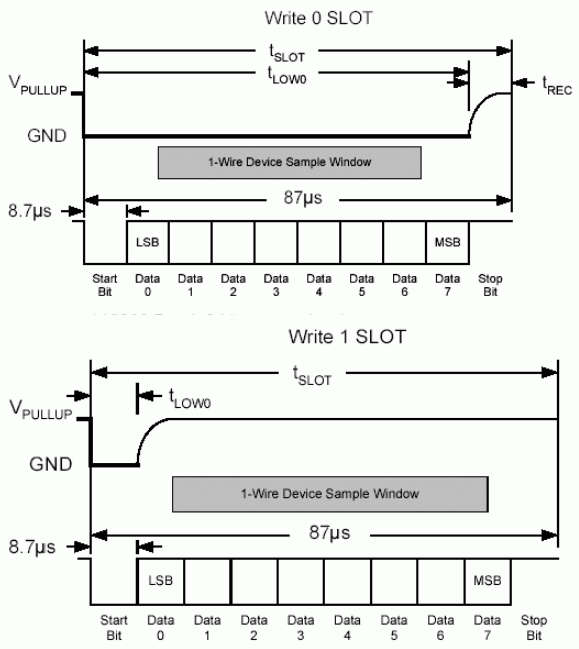
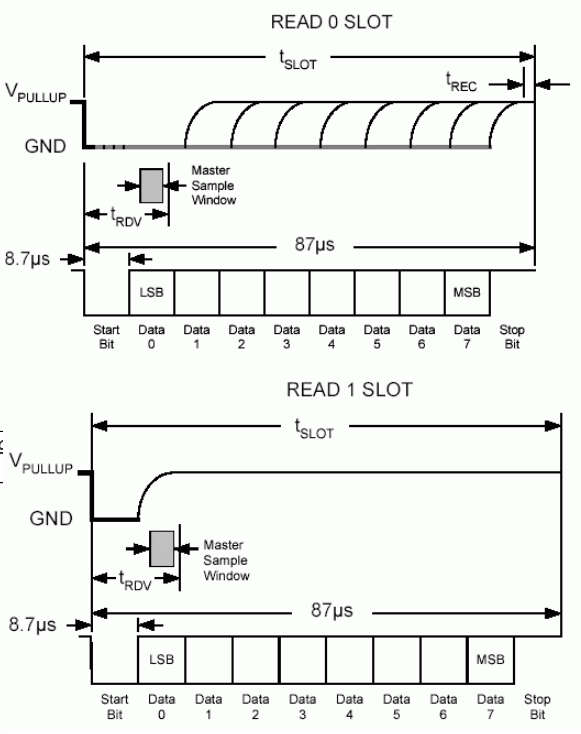
Assuming that the serial line is set to 9600 baud, the presence/reset pulse can be implemented as a function: char buf = 0xF0; int count = write(sfd, &buf, 1); count = read(sfd, &buf, 1) if (buf == 0xF0) return -1; return 0; To read and write a single bit we need to increase the baud rate to 115200. In this case the start bit lasts 8.7µs, which acts as the initial pulse to read or write a single bit.
To write a zero we simply write 0x00 which holds the line low for eight bits, about 78µs. To write a one we let the line be pulled up after the start bit, which leaves it high for 78µs: void writeBit(int sfd, int b) {
char buf;
if (b == 0) {
buf = 0x00;
} else {
buf = 0xFF;
}
int count = write(sfd, &buf, 1);
count = read(sfd, &buf, 1);
}
Reading a bit works in the same way. If you write 0xFF then the line is allowed to be pulled high and the remote device can pull it low for a zero or let it remain high to signal a one. That is, if you write 0xFF and read back 0xFF then you have read a one:
uint8_t readBit(int sfd) {
    char buf;
    buf = 0xFF;
    int count = write(sfd, &buf, 1);
    count = read(sfd, &buf, 1);
    if (buf == 0xFF) return 1;
    return 0;
}
With these modified readBit- and writeBit functions we can use the program developed in Chapter 14 to read the device. The only modifications are to change the parameter that specifies the GPIO line to be used to one that specifies the serial file being used and the need to open and set the line’s baud rate. There is a new function, openPort which opens the specified serial device and sets its characteristics to 8 bits, 1 stop bit and no parity at 115200 baud. The presence function changes the baud rate to 9600, performs the presence/reset operation and then changes the baud rate back to 115200. The remaining functions have minor changes. |
||||
| Last Updated ( Monday, 28 December 2020 ) |