| Pi IoT In Python Using Linux Drivers - PWM |
| Written by Harry Fairhead & Mike James | |||||
| Monday, 11 October 2021 | |||||
Page 3 of 4
A PWM ClassThe big problem in using the PWM driver is in avoiding opening and closing files, which is a slow operation. A better idea is to implement a class that can work with the driver without closing the frequency and duty cycle files until no longer needed: import subprocess
import io
from time import sleep
import os
class Pwm:
def __init__(self, channel,f,duty):
if not(channel==0 or channel==1):
return
self.chan = str(channel)
indicator = "pwm-2chan"
command =["sudo", "dtoverlay", "pwm-2chan"]
temp = subprocess.Popen(["sudo", "dtparam",
The only tricky part of the implementation is the need to use os.path.exists to check that the driver has had time to actually create the folders and files that the program goes on to use. You also need to remember to use the flush method to clear the buffers to the hardware. The constructor allows you to open a PWM channel at a set frequency and duty cycle. The frequency is set in Hertz and the duty cycle as a percentage: pwm=Pwm(1,1000,50) sets PWM channel 1 to 1kHz and a 50% duty cycle. Once you have the Pwm object you can use the enable and disable methods to turn it on and off. You can also use the setFreq and setDuty methods to modify the frequency and duty cycle. When you are finished with the channel, you have to call disable if the channel is still working and then closeChan. Notice that the files that control frequency and duty cycle are open until closeChan is called. You have to disable the channel before you close it. There are lots of features you can add to this class to make it work in a more foolproof way. For example, you could record if the channel was enabled or disabled and automatically disable it as part of the closeChan command. You also need to add error handling. To use the Pwm object all you need is something like: pwm0=Pwm(0,1000,50)
pwm0.enableChan()
sleep(5)
pwm0.disableChan()
pwm0.closeChan()
print("finished")
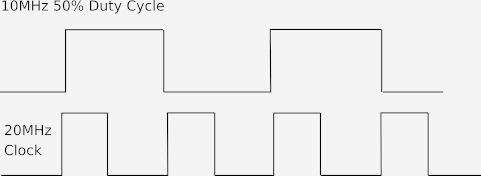
Clocks and Duty Cycle ResolutionIf you just take the PWM driver at face value then you might believe that you can set any frequency and any duty cycle – this is not the case. Due to hardware limitations, the resolution of the duty cycle depends on the PWM clock frequency and this also governs the highest frequency PWM signal you can create. The situation with the Raspberry Pi is complicated by the fact that the PWM clock is set once when the device is booted. Any changes to the clock that occur after boot are not reset by loading the PWM driver and any changes can result in the driver setting the wrong frequency and duty cycle. The effective PWM clock is 20MHz in an unmodified, just rebooted, Pi Zero and Pi 4. The importance of the clock is that the PWM signal can only change once per clock pulse. What this means is that the highest frequency that you can use is 10MHz with a 50% duty cycle:
If you select a duty cycle other than 50% then you will get either 100%, 50% or 0% depending on which value is closer to the desired value. In practice, you will also see some strange behavior for anything other than 50%. A program to produce the highest frequency is: pwm0=Pwm(0,10000000,50)
pwm0.enableChan()
sleep(5)
pwm0.disableChan()
pwm0.closeChan()
print("finished")
This program only works if the Pi is running at its maximum processor clock frequency and the PWM clock has been set to its highest value. Unfortunately, once the PWM clock has been set lower it sticks at the lower frequency even if the CPU clock rate increases. This means that the program is only guaranteed to work on a freshly booted Pi that hasn’t throttled its CPU speed. If the PWM clock isn’t running at 20MHz then you will see an error as the driver refuses to set a frequency higher than the clock rate. One solution to the clock problem is to reset the driver by unloading it so that the PWM program always reloads it. This is one use of the dtoverlay command to remove a driver that seems to work and is useful. However, it may well interact with other drivers and it only works if the PWM driver is the last one to have been added. You can manually remove the driver overlay using: sudo dtoverlay -r 0 which only works if the driver overlay was the last one loaded. If you would like to automate this you can change the start of the Pwm class constructor to read: indicator = "pwm-2chan"
command =["sudo", "dtoverlay", "pwm-2chan"]
temp = subprocess.Popen(["sudo", "dtparam", "-l"],
stdout = subprocess.PIPE)
output = str(temp.communicate())
print(output,flush=True)
if output.find(indicator)!=-1:
temp = subprocess.Popen(
This removes the driver if it is present and installs it again. Notice that this only works if the driver is the most recently installed and no check is made to ensure that this is the case. The number of different duty cycles you can achieve depends on the number of clock pulses in the total period. At 10MHz there are just two clock pulses and so just three duty cycles, 0%, 50% and 100%. |
|||||
| Last Updated ( Monday, 11 October 2021 ) |